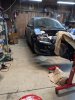
Found some info here and there wanted to share some helpful (?) hints on my install of Bilstein B16 series front & rear with springs kit. Spend some time if you want the best pricing, some sites don't have direct fitment data for comparisons. I found best pricing wasn't direct Mazda type of suppliers.
Mine --> 00867416 - Bilstein B16 (PSS9) Suspension Kit Mazda 3 Front and Rear; 2004-2013 came from Late Model Performance. Best pricing at the time...
So was following Factory manual for some of the points to do the front...Some things are not needed to be removed according the manual. So what you see is only a small portion of doing this install.
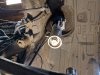
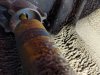
Getting lower strut out of the front assembly was not as simple as a hammer....but at the time that's what I tried, easy way first but if you need more force......So back to here and search came up with a great hint by...
(will include the member who shared once I find whom later)
Use a bottle jack, in my case spring perch base then jack base on just the lower arm pinch shoulder..EASY!!


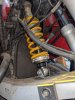
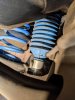
Assembly of the strut /spring was different than I expected. Bought a 3/4 ton Pick up Truck sized spring compressor from Harbor Freight.....holy crap it wasn't going the compress that spring!
So thought about what I had on hand to compress that sucker.....No inspiration.. just started seeing where it would take me (New top mounts mine were 160K old and trashed)
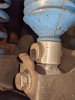
Started stacking and found important to remind....use a large socket to keep the adjuster from getting ruined
(See pic black 1/2 drive socket)


Here's how I did it. Get everything close, only two hands!!! I ran adjustable spring perches to bottom and must make sure correct nut faces towards each other, one side has a slight machined facing for flat surface fitment together. Socket on floor, strut tower springs, assembled top mount and make sure correct orientation is correct (factory manual) strut shaft NUT HANDY press down and barely will it allow a thread
of nut onto shaft. Proper hex on shaft top and tighten nut...not completely until top mount spring perch to spring end are seated correctly and orientation of mount tab (tit) before complete tighten of nut.
Then for my case only wanted the least possible drop so brought compression of sprint nuts to almost max lift.
Here is how they look side by side.

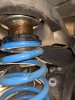
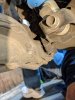
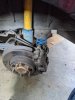
Here is the lower arm strut body machine surface comparison. What I'm trying to show is the stock body bottom is captured by through bolt so if you have loosey goosey and do a wheelie... those front wheels won't fall off....Man I'm old... In my day of the schwinn banana seat bicycles we didn't have that nanny crap. So the Bilsteins use the tab to bottom onto the through bolt. Clamp force is the only thing so make sure to correct torque.


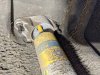
Hint !!! the stock strut body OD and the Bilstein OD are different by .005" so you can't just force in correct fitment to lower arm socket position. I had a perfect handy taper punch to force open slightly the gap just enough to get the needed clearance for the drop in of the strut body. Tricky in that the bolt needs to be in place so that Strut Tab I was talking about is bottomed (touching) on strut arm socket of the compression through bolt. Removal of punch will trap the strut body in that position.

 Looking good >>>
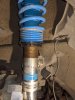
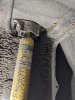
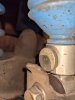
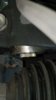
Here is the tight clearance of the adjuster to CV boot. Actually easier than I expected to adjust. On drive up ramps and me on a crawler can get fingers in there to adjust.

That's it folks !!!
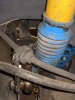
Now the back is just as stock...Easy...
Don't loosen the upper spring perches. The stock springs will drop out after shock lower mount bolts are removed. Bilstein supplied Rear Springs look too short. I had reservations on the springs being loose on full downward travel, but the shock at full extension is the travel stop. So spring length is fine. Again wanted no drop so new Bilstein supplied add on spring perches were adjusted to allow. Make sure spring ends fit correctly in lower arm spring pocket.
Easy to adjust... I use ramps on this end to adjust too.
Mine --> 00867416 - Bilstein B16 (PSS9) Suspension Kit Mazda 3 Front and Rear; 2004-2013 came from Late Model Performance. Best pricing at the time...
So was following Factory manual for some of the points to do the front...Some things are not needed to be removed according the manual. So what you see is only a small portion of doing this install.
Getting lower strut out of the front assembly was not as simple as a hammer....but at the time that's what I tried, easy way first but if you need more force......So back to here and search came up with a great hint by...
(will include the member who shared once I find whom later)
Use a bottle jack, in my case spring perch base then jack base on just the lower arm pinch shoulder..EASY!!
Assembly of the strut /spring was different than I expected. Bought a 3/4 ton Pick up Truck sized spring compressor from Harbor Freight.....holy crap it wasn't going the compress that spring!
So thought about what I had on hand to compress that sucker.....No inspiration.. just started seeing where it would take me (New top mounts mine were 160K old and trashed)
Started stacking and found important to remind....use a large socket to keep the adjuster from getting ruined
(See pic black 1/2 drive socket)
Here's how I did it. Get everything close, only two hands!!! I ran adjustable spring perches to bottom and must make sure correct nut faces towards each other, one side has a slight machined facing for flat surface fitment together. Socket on floor, strut tower springs, assembled top mount and make sure correct orientation is correct (factory manual) strut shaft NUT HANDY press down and barely will it allow a thread
of nut onto shaft. Proper hex on shaft top and tighten nut...not completely until top mount spring perch to spring end are seated correctly and orientation of mount tab (tit) before complete tighten of nut.
Then for my case only wanted the least possible drop so brought compression of sprint nuts to almost max lift.
Here is how they look side by side.
Here is the lower arm strut body machine surface comparison. What I'm trying to show is the stock body bottom is captured by through bolt so if you have loosey goosey and do a wheelie... those front wheels won't fall off....Man I'm old... In my day of the schwinn banana seat bicycles we didn't have that nanny crap. So the Bilsteins use the tab to bottom onto the through bolt. Clamp force is the only thing so make sure to correct torque.
Hint !!! the stock strut body OD and the Bilstein OD are different by .005" so you can't just force in correct fitment to lower arm socket position. I had a perfect handy taper punch to force open slightly the gap just enough to get the needed clearance for the drop in of the strut body. Tricky in that the bolt needs to be in place so that Strut Tab I was talking about is bottomed (touching) on strut arm socket of the compression through bolt. Removal of punch will trap the strut body in that position.
Looking good >>>Here is the tight clearance of the adjuster to CV boot. Actually easier than I expected to adjust. On drive up ramps and me on a crawler can get fingers in there to adjust.
That's it folks !!!
Now the back is just as stock...Easy...
Don't loosen the upper spring perches. The stock springs will drop out after shock lower mount bolts are removed. Bilstein supplied Rear Springs look too short. I had reservations on the springs being loose on full downward travel, but the shock at full extension is the travel stop. So spring length is fine. Again wanted no drop so new Bilstein supplied add on spring perches were adjusted to allow. Make sure spring ends fit correctly in lower arm spring pocket.
Easy to adjust... I use ramps on this end to adjust too.
Attachments
Last edited:
") Spring rate is stock then faster progression to harder rate as compressed. have yet to hit bump stops from either speed bumps, or sidewalk driveway mounds, general driving. Valving numbers marking is confusing though.
Spring rate is stock then faster progression to harder rate as compressed. have yet to hit bump stops from either speed bumps, or sidewalk driveway mounds, general driving. Valving numbers marking is confusing though.