DIY 3.5” Air Intake

Thanks for all the advice man I appreciate it! I’ll check into it but a got a wrench thrown into my build plans whenever I found a house and ended up buying it....haha Now im broke again at the moment.... Being an adult sometimes sucks! Hahahaha
 
If you are going with an S4 and want to use it to its potential you will want 3.5" . You will start to run out of MAF voltage headroom with smaller intakes especially when it gets colder out. I have CS turbo with 3.5" and was hitting 4.5volts in the winter which is a safe place to be. 3.5 offers reliable DD without a lot of other issues and will flow more than enough for your needs.
 
If you are going with an S4 and want to use it to its potential you will want 3.5" . You will start to run out of MAF voltage headroom with smaller intakes especially when it gets colder out. I have CS turbo with 3.5" and was hitting 4.5volts in the winter which is a safe place to be. 3.5 offers reliable DD without a lot of other issues and will flow more than enough for your needs.

Alright thanks for the info! I bought a house so it kind of set my project back about another tax season now though unfortunately lol:bash:
 
******** UPDATE *********

Ok so I created this thread in hopes of making my own air intake to save money and know it was made by me and not someone else. I want to give others the reassurance that it isn't very difficult and will cut your 3.5" - 4" air intake in half basically!

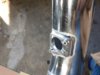
To start you will want some solid aluminum piping material. I went with some 6061 which welds nicely and is of high quality. I purchased a 2ft long 90 degree piece that was 3.5" diameter and a weld on MAF flange made for 3.5" pipe.
IMG_20201010_152038929.jpg
IMG_20201010_152427436_HDR.jpg
IMG_20201010_152330612_HDR.jpg
MRP performance seems to make very very nice quality weld on MAF flanges and that is who I chose for that. Then I cut the pipe at an angle best suited to aim the intake from the turbo outward from the block. I had no special tools for this but just simply tried to go for what I felt like was a cut to make one half have a 60* bend and the other half have a 30* bend. I used a little band saw I have and it ripped right through it but barely fit lol
IMG_20201010_190424055.jpg
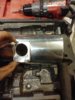
A belt sander would be my preferred method to make the cut nice and flat but I had to use a flap disc on a 4.5" grinder and use the ol' eyeball method haha After that I checked with a mazda homie on how far his MAF sensor was from the end of his intake and he said about 4" and has had no issue and doesn't have an air straightener so I went with that or more. I pre-drilled a pilot hole for my hole saw and cut a hole that was the same inside diameter as the maf flange hole.
IMG_20201010_191117292.jpg
IMG_20201010_191345797.jpg

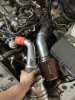
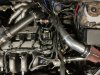
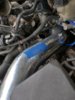
I cleaned up the burs that were around the inside with a inverted dremel bit on my drill since my pneumatic dremel is annoyingly loud. Once I had the pipe cut and the maf placement found and cut I mocked it up on the car how I wanted it all positioned. I will say I actually checked the MAF placement before cutting the hole for it on the car because I wanted my maf to be unseen and on the bottom of the air intake. After finding the correct orientation for it all I taped it all together and marked it with a sharpie across the joint onto each piece of pipe in case it came untaped. I had to take off the stock bulky plastic piece on my wiring harness as it was kind of in the way for how I wanted the intake to be placed. I rewrapped the wires in very good quality electrical tape nice and tight and with a double layer. I will also add here that I have an EGR delete and relocated my battery about a year ago to make sure that this would fit nicely without any hassle.
IMG_20201010_164232874_HDR.jpg

I found a friend in my local I work in to weld it up luckily but had a couple estimates to have it welded (before it was made to where they could look at it and really get an idea) and they said anywhere from $100-$150. All in all it turned out great and I will give an update on it as soon as I get my CST4 installed and get to use it. Hopefully this helps someone else needing to save money but wants to have a nice quality 3.5" air intake for a speed 3/6!!
IMG_20210123_161244911.jpg IMG_20210123_161416298.jpg
 

Attachments

  • IMG_20210123_161310829.jpg
    IMG_20210123_161310829.jpg
    4.5 MB · Views: 20
  • IMG_20201010_194012209.jpg
    IMG_20201010_194012209.jpg
    445.3 KB · Views: 19
  • IMG_20201010_162222978_HDR.jpg
    IMG_20201010_162222978_HDR.jpg
    1.3 MB · Views: 20
  • VID_20210123_132757063.mp4
    VID_20210123_132757063.mp4
    8.7 MB · Views: 1
Last edited:
Props to making your own intake. Keep an eye on the MAF sensor if it is on the bottom. Manufacturers place them on top to keep oil and moisture from accumulating on the sensor itself.
 
Props to making your own intake. Keep an eye on the MAF sensor if it is on the bottom. Manufacturers place them on top to keep oil and moisture from accumulating on the sensor itself.
Thanks for the tip man! I didn't really think about that but hopefully it won't cause any issues. I just figured it would look nice so why not right!?
 
One thing to note is that is very important to have the mad sensor oriented correctly. With a high quality flange it shouldn't be difficult just something for others to pay attention to
 
Great work! I’m guessing you are or were a welder by trade at some point?
Yes I am a pipefitter apprentice by trade and have welded for most of my jobs. This is a friend's work as far as the welding goes though. I haven't welded much aluminum but am hoping to get my own setup for the garage in the near future. Thanks though I hope it works as good as it looks! Lol
 
Wanted to give an update on the intake since I have it running and in use now. Used the measurements off of @JohnnyTightlips intake and haven't had any issues without an air straightener.

Also, as an after thought, I didn't run any connections to the intake (ie. vac lines, recirc hose, etc) so running the maf turned on the bottom should be no issue at all. There shouldn't be any oil residue or any of the such. So far it works great and I highly recommend saving a couple hundred dollars and doing this! Hope it helps someone else to know what is needed and that it is now proven to work!
 

Attachments

  • IMG_20210402_211045073_HDR.jpg
    IMG_20210402_211045073_HDR.jpg
    1.4 MB · Views: 15
  • IMG_20210402_210942228_HDR.jpg
    IMG_20210402_210942228_HDR.jpg
    3.1 MB · Views: 14
Back
Top