2012FailWheelDrive
Greenie N00B Member
Whats up guys, I was having some shifting and starting issues with my 2012 speed3 and after some inspection I found a decent size crack in my clutch pedal assembly. The crack was causing the pedal assembly to flex in a way that it wasn't pushing the starter interlock switch fully and not allowing me to start the car (unless I reached under and depressed it by hand). After doing research and not finding much info I contacted @EdgeAutosport.com to see if they could get ahold of a new assembly for me. As always they came through and with a great price. Here is the assembly they shipped me, it came with the clutch master cylinder attached, part number BBN5-41-300A. Also here is the thread leading up to this point https://mazdaspeeds.org/index.php?threads/gen-2-cracked-clutch-pedal.5938/
![pedal-assembly_39862831871_o[2].jpg](https://www.mazdaspeeds.org/data/attachments/7/7854-48c9d7ec0bc23968db394a138742caca.jpg?hash=SMnX7AvCOW "pedal-assembly_39862831871_o[2].jpg")
Now this does not seem like a common thing on Gen 2 speeds so there wasn't much info out there about changing out the assembly, besides reading the shop manual instructions which were vague at best. So I decided that I was going to tackle this and take lots of pics to put together a how to that may help someone down the road.
To get started you need to remove your battery, battery box and intake to make some room to access the two (2) lines on the back of the clutch master cylinder.
![pedal-assembly_38963977055_o[1].jpg](https://www.mazdaspeeds.org/data/attachments/7/7855-62b67a57da747a7159b5f35244d10022.jpg?hash=YrZ6V9p0en "pedal-assembly_38963977055_o[1].jpg")
On the top line you are going to push the tab down and pull the line off. On the bottom line you have to pull out the spring clip with a flat head screwdriver then pull the line and rubber seal out of the clutch master cylinder.
Top line
![pedal-assembly_24991652517_o[1].jpg](https://www.mazdaspeeds.org/data/attachments/7/7856-45b4e4abf4e3abdd05ac9f2abcae2387.jpg?hash=RbTkq_Tjq9 "pedal-assembly_24991652517_o[1].jpg")
Bottom line
![pedal-assembly_24991640317_o[1].jpg](https://www.mazdaspeeds.org/data/attachments/7/7857-c76a803f558a50b98b2090a2ae302ea1.jpg?hash=x2qAP1WKUL "pedal-assembly_24991640317_o[1].jpg")
Once you have the lines removed head inside the vehicle and push the driver seat all the way back and the steering wheel all the way up. Your going to want to remove the scuff plate by pulling it up and the left kick panel by removing one push fastener. The right side kick panel just pulls off as well.![pedal-assembly_39862825561_o[1].jpg](https://www.mazdaspeeds.org/data/attachments/7/7858-8c9e99497e9866ac54dc97e4c5043df2.jpg?hash=jJ6ZSX6YZq "pedal-assembly_39862825561_o[1].jpg")
Next you need to remove the center console. Start by pulling up on your cup holder.
![pedal-assembly_28082948709_o[1].jpg](https://www.mazdaspeeds.org/data/attachments/7/7859-5abab1a5547e6cc5d98f3f00278c29ca.jpg?hash=WrqxpVR-bM "pedal-assembly_28082948709_o[1].jpg")
Once the cup holder is out of the way remove the shift knob and shift knob surround by pulling up on it and disconnect the 3 plugs on the back side.
![pedal-assembly_25989389958_o[1].jpg](https://www.mazdaspeeds.org/data/attachments/7/7860-d164cff7d59108478df3b40beffed1f4.jpg?hash=0WTP99WRCE "pedal-assembly_25989389958_o[1].jpg")
Next remove the two (2) 8mm bolts holding the console to the dash, be careful not to drop them into the abyss...
![pedal-assembly_39830419672_o[1].jpg](https://www.mazdaspeeds.org/data/attachments/7/7861-912389c3e63f1c57f8e79ddb3c97775d.jpg?hash=kSOJw-Y_HF "pedal-assembly_39830419672_o[1].jpg")
Open up the center console and remove all the contents and remove the two (2) 8mm bolts in the very bottom.
![pedal-assembly_25989379758_o[1].jpg](https://www.mazdaspeeds.org/data/attachments/7/7862-adeec7aade7d5fadad6ed38509ca50f0.jpg?hash=re7Hqt59X6 "pedal-assembly_25989379758_o[1].jpg")
Once the bolts are removed get in the back seat and lift while lightly pulling the console to the rear of the car. I didn't get a picture but you will have to unclip at least one connector and a wire harness clip near the e-brake.
![pedal-assembly_39830409902_o[1].jpg](https://www.mazdaspeeds.org/data/attachments/7/7863-34c51c0bfbaeef117d8ef382b918f9d1.jpg?hash=NMUcC_uu7x "pedal-assembly_39830409902_o[1].jpg")
Once the center console is out of the car you can start working on removing the lower dash panel. First remove your hood release lever by pressing down on the middle tab and pulling it out towards you.
![pedal-assembly_39152552494_o[1].jpg](https://www.mazdaspeeds.org/data/attachments/7/7864-ad9d6b9be91f722c75ce092772ab4b45.jpg?hash=rZ1rm-kfci "pedal-assembly_39152552494_o[1].jpg")
Then remove the phillips head screw behind the hood release lever.
![pedal-assembly_39830435612_o[1].jpg](https://www.mazdaspeeds.org/data/attachments/7/7865-4be30cbab51ca265e50feda3182f8387.jpg?hash=S-MMurUcom "pedal-assembly_39830435612_o[1].jpg")
Once the screw is removed the lower dash panel just pulls off. Start on the left side which is held on by two (2) clips and one hook.
![pedal-assembly_24991711507_o[1].jpg](https://www.mazdaspeeds.org/data/attachments/7/7866-d372e7f58edbe4a490ff879426b0025f.jpg?hash=03Ln9Y7b5K "pedal-assembly_24991711507_o[1].jpg")
Once the left side is free pull on the right side near the start button.
![pedal-assembly_28082926779_o[1].jpg](https://www.mazdaspeeds.org/data/attachments/7/7867-79dfa06b6a52109ce38c141d670a1433.jpg?hash=ed-ga2pSEJ "pedal-assembly_28082926779_o[1].jpg")
Once all the clips are free the only thing attached are four (4) connectors and a wire harness clip. Two (2) connectors on the left.
![pedal-assembly_28082922319_o[1].jpg](https://www.mazdaspeeds.org/data/attachments/7/7868-4946577ee00e7e392e226641dc1fd0bd.jpg?hash=SUZXfuAOfj "pedal-assembly_28082922319_o[1].jpg")
Two (2) connectors on the right and the wire harness clip.
![pedal-assembly_25989367638_o[1].jpg](https://www.mazdaspeeds.org/data/attachments/7/7869-f454d98d5fbaf6c26ba7d4519507f756.jpg?hash=9FTZjV-69s "pedal-assembly_25989367638_o[1].jpg")
Once all the connectors are disconnected, the lower dash panel should come out. Now that you have made some room we can get started on the pedal assembly. Here is your work space for the next few hours, give or take.
![pedal-assembly_24991680917_o[1].jpg](https://www.mazdaspeeds.org/data/attachments/7/7870-df327e4fa3a122ebd07fd2b55d33d76b.jpg?hash=3zJ-T6OhIu "pedal-assembly_24991680917_o[1].jpg")
First thing to do is remove the two (2) sensors connected to the assembly. If I am not mistaken there is a wire harness clip that needs to come off as well. The blue and gray sensor twists 45 degrees counterclockwise then pulls out and the black sensor you have to lift the tab in the back and pull it towards you.
![pedal-assembly_39862799651_o[1].jpg](https://www.mazdaspeeds.org/data/attachments/7/7872-dba45e8a01eb45e57f90e087324b382f.jpg?hash=26ReigHrRe "pedal-assembly_39862799651_o[1].jpg")
Disconnect the clutch master cylinder arm from the pedal assembly using a flathead screwdriver on both sides of the white clip.
![pedal-assembly_25989315768_o[1].jpg](https://www.mazdaspeeds.org/data/attachments/7/7873-18f54bb06381a0d20d0730de1e4afe65.jpg?hash=GPVLsGOBoN "pedal-assembly_25989315768_o[1].jpg")
After you have the arm disconnected you can start going after the four (4) 12mm bolts that hold the assembly in. This is the order I took and how I will reference the bolts.

Bolts 1 and 2 are pretty straightforward. Bolt 1 is easily accessible from the footwell you will just have to remove the steering shaft trim held on by two (2) clips.
![pedal-assembly_25989360808_o[1].jpg](https://www.mazdaspeeds.org/data/attachments/7/7877-667e529f64a48922af182e207df8b285.jpg?hash=Zn5Sn2SkiS "pedal-assembly_25989360808_o[1].jpg")
Then remove bolt 1.

Bolt 2 is accessible from the footwell also and is located right beside where the blue/gray sensor was. I just used a deep 12mm socket to get it.

Bolt 3 is up above bolt 1 a bit and behind where the black sensor used to be.

To access bolt 3 I used two (2) six inch extensions and one 3 inch extension and went through where the dash trim used to be.
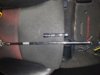
Extensions used
![pedal-assembly_38963908405_o[1].jpg](https://www.mazdaspeeds.org/data/attachments/7/7882-caf901c6305af5664b8b535e22eeb112.jpg?hash=yvkBxjBa9W "pedal-assembly_38963908405_o[1].jpg")
How I accessed bolt 3 with said extensions.
![pedal-assembly_28082903079_o[1].jpg](https://www.mazdaspeeds.org/data/attachments/7/7883-0dfe8b898cd1ae5c1e23466b443f56b4.jpg?hash=Df6LiYzRrl "pedal-assembly_28082903079_o[1].jpg")
Here's the view looking at bolt 3 through the dash
![pedal-assembly_24991652447_o[1].jpg](https://www.mazdaspeeds.org/data/attachments/7/7884-1dd2ff87f18eb6a5394849fa2964e710.jpg?hash=HdL_h_GOtq "pedal-assembly_24991652447_o[1].jpg")
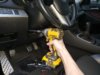
Now we can move to the most difficult bolt, bolt 4. To access bolt 4 I went through the area near the fuse box. You will have to remove three (3) 12mm bolts that hold the bcm to the pedal assembly. I used the same combination of extensions with the addition of a knuckle.
![pedal-assembly_39152508774_o[1].jpg](https://www.mazdaspeeds.org/data/attachments/7/7904-960a6dad24b834a5af6d1eca69911cb4.jpg?hash=lgptrSS4NK "pedal-assembly_39152508774_o[1].jpg")
Unplug the blue marked sensor then remove the very bottom bolt first, this will get the sensor and bracket out of the way. (sorry for out of focus pic)

Once the sensor is out of the way you will gain access to another 12mm bolt, circled in red, that was behind the sensor. Bolt 4 is circled in blue for reference.

The third and final 12mm bolt holding the bracket on is above the previously removed sensor and directly above bolt 4.

Once all three (3) 12mm bolts are removed go back down in your footwell and remove this fastener by pressing in on the tabs with a flathead to pull out the red center and then give it a twist and remove. This holds the bcm bracket to the body of the car.
![pedal-assembly_39152504144_o[1].jpg](https://www.mazdaspeeds.org/data/attachments/7/7889-8941760e2bffad4d85f2e5403657fcb1.jpg?hash=iUF2Div_rU "pedal-assembly_39152504144_o[1].jpg")
![pedal-assembly_39830341202_o[1].jpg](https://www.mazdaspeeds.org/data/attachments/7/7891-d43263d499498eb469e563751f681aa3.jpg?hash=1DJj1JlJjr "pedal-assembly_39830341202_o[1].jpg")
Then I completely unplugged the bcm (white box on the bracket) which had six (6) plugs and one wire harness clip. By doing this it gave it enough wiggle room to pull it towards the fuse box and off of the pedal assembly. Also with the bracket out of the way you can finally remove bolt 4.

Once all four (4) 12mm bolts that hold the assembly to the firewall are removed get back in the footwell and with some vise grips or channel locks and spin the clutch master counterclockwise till the tabs line up with holes on the pedal assembly.
![pedal-assembly_39862736111_o[1].jpg](https://www.mazdaspeeds.org/data/attachments/7/7894-ef59423b4cfba55aa1734f22448e46fe.jpg?hash=71lCO0z7pV "pedal-assembly_39862736111_o[1].jpg")
With the tabs lined up the clutch master and pedal assembly should be able to separate like so.
![pedal-assembly_25989296358_o[1].jpg](https://www.mazdaspeeds.org/data/attachments/7/7895-8734fe21e41696a54a902cb63df9ad4d.jpg?hash=hzT-IeQWlq "pedal-assembly_25989296358_o[1].jpg")
So, now this is the part where you wrestle the pedal assembly and master cylinder out from under the dash. I was able to do this without disconnecting the steering knuckle like the shop manual says. After a yanking ,pulling, and trying all sorts of ways to get it out for a while, what worker for me was to pull the assembly towards me as far off the firewall as possible and at the same time remove the master cylinder from behind the pedal. This required both hands so I didn't get a pic but it's pretty self explanatory. Here's the old pedal and clutch master finally out of the car.
![pedal-assembly_25989306998_o[2].jpg](https://www.mazdaspeeds.org/data/attachments/7/7896-8a379177bff0801f7905655836de2ee0.jpg?hash=ijeRd7_wgB "pedal-assembly_25989306998_o[2].jpg")
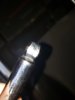
And the crack that I had in the pedal assembly.
![pedal-assembly_38963852175_o[1].jpg](https://www.mazdaspeeds.org/data/attachments/7/7897-3d2f6f674e67b9e52beba8ff88988c22.jpg?hash=PS9vZ05nue "pedal-assembly_38963852175_o[1].jpg")
For the reinstall I used the same technique to put the pedal assembly in place, lining it up, pulling it off the firewall as much as possible, then sliding the new master cylinder behind the pedal assembly and through the firewall then finally into the pedal assembly. This worked well but wouldn't line up at first because I was getting snagged on this protruding piece of metal so when you go to install the pedal make sure that the protruding metal piece is in the middle of the assembly near the return spring.

Once everything is lined up you have to twist the master cylinder clockwise into the pedal assembly to lock it in place. There are four holes and four tabs but one hole and one tab is bigger than the rest so it only fits one way. Once its locked in place reattach the master cylinder arm to the pedal assembly by pushing it into place.
![pedal-assembly_25989287158_o[1].jpg](https://www.mazdaspeeds.org/data/attachments/7/7905-fa579eb0154e25c30e856d2b369aa3cc.jpg?hash=-leesBVOJc "pedal-assembly_25989287158_o[1].jpg")
At this point you can go ahead and reinstall the four (4) 12mm bolts (bolts 1-4) that hold the pedal assembly to the firewall, the shop manual torque spec says 14-19 ft lb. Reattach the bcm bracket with the three (3) 12mm bolts and footwell clip, install and plug in sensor marked 7, and plug in the plugs 1-6 to the bcm.

Also, side note keep an eye on your clutch return spring, thankfully I caught that it was out of place before I put everything back together.

So with all the connectors plugged in and bolts tightened down you can reinstall the lower dash panel by reconnecting the four (4) plugs then pushing the clips/hook into their holes. Reinstall the phillips screw behind the hood release lever and the release lever itself by sliding it back into place.
Reinstall the center console by sliding it back in and fastening the four (4) 8mm bolts that hold it in place as well as the wire harness clip and connectors. Then move to the outside of the car and reconnect to two (2) lines on the clutch master cylinder by pushing them back into place.
![pedal-assembly_24991578627_o[1].jpg](https://www.mazdaspeeds.org/data/attachments/7/7902-687807600fd8a06c4c24d0a53167b7fd.jpg?hash=aHgHYA_YoG "pedal-assembly_24991578627_o[1].jpg")
Once the lines are back on you can jack up the car and bleed the hydraulic system, while I was at it I put in a new slave cylinder as well. I used the one man bottle bleeding system and it worked great. (youtube it)

Once the system is bled and the pedal has a good feel to it reinstall your battery, intake and ecu then fire her up and take her for a test drive.....

....hahahaha jk
Since the installation of the new pedal assembly shifts are buttery smooth and effortless although I am getting close to needing a tranny fluid change. I am still having issues with my starter interlock switch not wanting to start the car so I am going to put in a new one to see if it acts better (or bypass it). Also at first the new pedal was a bit noisy so I reached up to my return spring with a heavily greased hand and lubed it up and it is nice and quiet now.
I believe that about wraps up the How-To for the pedal assembly / clutch master cylinder, so best of luck to anyone who has to do this.
Now this does not seem like a common thing on Gen 2 speeds so there wasn't much info out there about changing out the assembly, besides reading the shop manual instructions which were vague at best. So I decided that I was going to tackle this and take lots of pics to put together a how to that may help someone down the road.
To get started you need to remove your battery, battery box and intake to make some room to access the two (2) lines on the back of the clutch master cylinder.
On the top line you are going to push the tab down and pull the line off. On the bottom line you have to pull out the spring clip with a flat head screwdriver then pull the line and rubber seal out of the clutch master cylinder.
Top line
Bottom line
Once you have the lines removed head inside the vehicle and push the driver seat all the way back and the steering wheel all the way up. Your going to want to remove the scuff plate by pulling it up and the left kick panel by removing one push fastener. The right side kick panel just pulls off as well.
Next you need to remove the center console. Start by pulling up on your cup holder.
Once the cup holder is out of the way remove the shift knob and shift knob surround by pulling up on it and disconnect the 3 plugs on the back side.
Next remove the two (2) 8mm bolts holding the console to the dash, be careful not to drop them into the abyss...
Open up the center console and remove all the contents and remove the two (2) 8mm bolts in the very bottom.
Once the bolts are removed get in the back seat and lift while lightly pulling the console to the rear of the car. I didn't get a picture but you will have to unclip at least one connector and a wire harness clip near the e-brake.
Once the center console is out of the car you can start working on removing the lower dash panel. First remove your hood release lever by pressing down on the middle tab and pulling it out towards you.
Then remove the phillips head screw behind the hood release lever.
Once the screw is removed the lower dash panel just pulls off. Start on the left side which is held on by two (2) clips and one hook.
Once the left side is free pull on the right side near the start button.
Once all the clips are free the only thing attached are four (4) connectors and a wire harness clip. Two (2) connectors on the left.
Two (2) connectors on the right and the wire harness clip.
Once all the connectors are disconnected, the lower dash panel should come out. Now that you have made some room we can get started on the pedal assembly. Here is your work space for the next few hours, give or take.
First thing to do is remove the two (2) sensors connected to the assembly. If I am not mistaken there is a wire harness clip that needs to come off as well. The blue and gray sensor twists 45 degrees counterclockwise then pulls out and the black sensor you have to lift the tab in the back and pull it towards you.
Disconnect the clutch master cylinder arm from the pedal assembly using a flathead screwdriver on both sides of the white clip.
After you have the arm disconnected you can start going after the four (4) 12mm bolts that hold the assembly in. This is the order I took and how I will reference the bolts.
Bolts 1 and 2 are pretty straightforward. Bolt 1 is easily accessible from the footwell you will just have to remove the steering shaft trim held on by two (2) clips.
Then remove bolt 1.
Bolt 2 is accessible from the footwell also and is located right beside where the blue/gray sensor was. I just used a deep 12mm socket to get it.
Bolt 3 is up above bolt 1 a bit and behind where the black sensor used to be.
To access bolt 3 I used two (2) six inch extensions and one 3 inch extension and went through where the dash trim used to be.
Extensions used
How I accessed bolt 3 with said extensions.
Here's the view looking at bolt 3 through the dash
Now we can move to the most difficult bolt, bolt 4. To access bolt 4 I went through the area near the fuse box. You will have to remove three (3) 12mm bolts that hold the bcm to the pedal assembly. I used the same combination of extensions with the addition of a knuckle.
Unplug the blue marked sensor then remove the very bottom bolt first, this will get the sensor and bracket out of the way. (sorry for out of focus pic)
Once the sensor is out of the way you will gain access to another 12mm bolt, circled in red, that was behind the sensor. Bolt 4 is circled in blue for reference.
The third and final 12mm bolt holding the bracket on is above the previously removed sensor and directly above bolt 4.
Once all three (3) 12mm bolts are removed go back down in your footwell and remove this fastener by pressing in on the tabs with a flathead to pull out the red center and then give it a twist and remove. This holds the bcm bracket to the body of the car.
Then I completely unplugged the bcm (white box on the bracket) which had six (6) plugs and one wire harness clip. By doing this it gave it enough wiggle room to pull it towards the fuse box and off of the pedal assembly. Also with the bracket out of the way you can finally remove bolt 4.
Once all four (4) 12mm bolts that hold the assembly to the firewall are removed get back in the footwell and with some vise grips or channel locks and spin the clutch master counterclockwise till the tabs line up with holes on the pedal assembly.
With the tabs lined up the clutch master and pedal assembly should be able to separate like so.
So, now this is the part where you wrestle the pedal assembly and master cylinder out from under the dash. I was able to do this without disconnecting the steering knuckle like the shop manual says. After a yanking ,pulling, and trying all sorts of ways to get it out for a while, what worker for me was to pull the assembly towards me as far off the firewall as possible and at the same time remove the master cylinder from behind the pedal. This required both hands so I didn't get a pic but it's pretty self explanatory. Here's the old pedal and clutch master finally out of the car.
And the crack that I had in the pedal assembly.
For the reinstall I used the same technique to put the pedal assembly in place, lining it up, pulling it off the firewall as much as possible, then sliding the new master cylinder behind the pedal assembly and through the firewall then finally into the pedal assembly. This worked well but wouldn't line up at first because I was getting snagged on this protruding piece of metal so when you go to install the pedal make sure that the protruding metal piece is in the middle of the assembly near the return spring.
Once everything is lined up you have to twist the master cylinder clockwise into the pedal assembly to lock it in place. There are four holes and four tabs but one hole and one tab is bigger than the rest so it only fits one way. Once its locked in place reattach the master cylinder arm to the pedal assembly by pushing it into place.
At this point you can go ahead and reinstall the four (4) 12mm bolts (bolts 1-4) that hold the pedal assembly to the firewall, the shop manual torque spec says 14-19 ft lb. Reattach the bcm bracket with the three (3) 12mm bolts and footwell clip, install and plug in sensor marked 7, and plug in the plugs 1-6 to the bcm.
Also, side note keep an eye on your clutch return spring, thankfully I caught that it was out of place before I put everything back together.
So with all the connectors plugged in and bolts tightened down you can reinstall the lower dash panel by reconnecting the four (4) plugs then pushing the clips/hook into their holes. Reinstall the phillips screw behind the hood release lever and the release lever itself by sliding it back into place.
Reinstall the center console by sliding it back in and fastening the four (4) 8mm bolts that hold it in place as well as the wire harness clip and connectors. Then move to the outside of the car and reconnect to two (2) lines on the clutch master cylinder by pushing them back into place.
Once the lines are back on you can jack up the car and bleed the hydraulic system, while I was at it I put in a new slave cylinder as well. I used the one man bottle bleeding system and it worked great. (youtube it)
Once the system is bled and the pedal has a good feel to it reinstall your battery, intake and ecu then fire her up and take her for a test drive.....
....hahahaha jk
Since the installation of the new pedal assembly shifts are buttery smooth and effortless although I am getting close to needing a tranny fluid change. I am still having issues with my starter interlock switch not wanting to start the car so I am going to put in a new one to see if it acts better (or bypass it). Also at first the new pedal was a bit noisy so I reached up to my return spring with a heavily greased hand and lubed it up and it is nice and quiet now.
I believe that about wraps up the How-To for the pedal assembly / clutch master cylinder, so best of luck to anyone who has to do this.
Attachments
![pedal-assembly_39862799651_o[1].jpg](/data/attachments/7/7871-9ea410b53d7710712015baeb70ece97a.jpg?hash=nqQQtT13EH)
Last edited: