****If you have ANY questions about the instructions, do not proceed until you contact RaiderFab! There is a chat option as well as the contact us, and email options PRIOR to drilling holes or making any modification which cannot be undone.****
Ford Focus ST Bumper Quik Latch Installation Guide
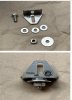
Kit Consists of:
? 4 - Quik Latches
? 4- Brackets
? 4 - Latch Pins (M6 x 1.0 x 45)
? 4 - Nuts
? 4 - Bolts
? 12 - Small Washers
? 4- Larger Washers
? 4 -Assist Springs
? 4 -Assist Spring Retainers
? Threadlock
Tools Required:
? 10mm Socket
? 11mm Socket or 7/16” Socket
? 11mm Wrench or 7/16” Wrench
? ¾” Drill Bit
? Plastic Clip Removal Tool (Not Required but helpful)
? Flat head screwdriver
? Drill
? ?” Impact Ratchet (Not Required but helpful)
? ?“ Ratchet
? T-30 Bit
? Painters Tape
? Paint Marker
Installation Process:
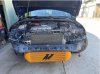
1. Remove Headlights and Front Bumper
Using the T30 bit remove the Headlights from their designated socket and remove the remaining (2) T30 holding up the Upper Bumper Bracket. Remove the Hood Latch release from the slot. Disconnect all lights (Headlights and Foglights).

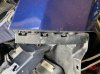
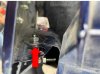
2. Remove Bumper Brackets and Plastic Tabs
Using a 10mm Socket remove the (2) 10mm bolts securing down the bracket and push the little tab on top to completely remove the bracket. Using either some pliers or a small flat head push in the sides and take out the little clear plastic tabs. Proceed the same step with the other side.


3. Install RaiderFab Brackets
Each bracket will consist of [ 1 Bolt, 1 Nut, 3 Small Washers, and 1 Big Washer]. There would be a total of 4 brackets. Install them in place where the OEM plastic tabs would have been in the Square hole. The installation order for the bracket is as follows: Bolt, RF Bracket, 3 Small Washers, Fender Lining, Big Washer, and Nut.


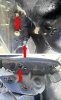
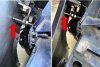
4. Install Ball Stud and Check Quik Latch Fitment
When installing the ball stud make sure it is not too far out where the bumper can’t sit flush to the fender. Vice versa with the ball stud being too far in.


 5. Mark Bumper for Drilling
Using a Paint Marker or even if you have paint lying around, cover the ends of the ball studs in paint. Fit the bumper up to the car and press the sides of the bumper onto the painted ball. Let it sit for a minute so the paint doesn’t smear when taking off the bumper, this will leave a dot to be able to center the drill bit on.

6. Drill hole in bumper and install Quik Latch
*BEFORE DRILLING PLACE PAINTER’S TAPE ON PAINTED SIDE TO PREVENT THE PAINT FROM CHIPPING*
Using a ?” drill bit, drill a small pilot hole to be able to guide the ¾” drill better. When drilling the ¾” hole, start off slowly for a cleaner cut. It is best to have someone else with you to be able to hold the bumper in place. Install Quik Latch for fitment, do touch ups if necessary with drill.
Once the Quik Latch is flush with the bumper add some threadlocker on the backside and tighten using the provided nut.

7. Install assist spring and spring retainer
The Assist Spring and Spring Retainer will help make sure the Quik Latch is always under assist and can’t be popped off on its own. Simply install the spring over the ball stud and push the spring retainer over the end of the ball.

8. Set ball stud height and reinstall bumper cover
Perform a final check on the ball distance and height from the bumper. Set up to your liking best to have it flush from the bumper and the fender. Once you are ready you could finally reinstall your bumper cover for the final time.
Installation Complete!
Your Ford Focus ST Bumper Quik Latch system is now successfully installed.

Ford Focus ST Bumper Quik Latch Installation Guide
Kit Consists of:
? 4 - Quik Latches
? 4- Brackets
? 4 - Latch Pins (M6 x 1.0 x 45)
? 4 - Nuts
? 4 - Bolts
? 12 - Small Washers
? 4- Larger Washers
? 4 -Assist Springs
? 4 -Assist Spring Retainers
? Threadlock
Tools Required:
? 10mm Socket
? 11mm Socket or 7/16” Socket
? 11mm Wrench or 7/16” Wrench
? ¾” Drill Bit
? Plastic Clip Removal Tool (Not Required but helpful)
? Flat head screwdriver
? Drill
? ?” Impact Ratchet (Not Required but helpful)
? ?“ Ratchet
? T-30 Bit
? Painters Tape
? Paint Marker
Installation Process:
1. Remove Headlights and Front Bumper
Using the T30 bit remove the Headlights from their designated socket and remove the remaining (2) T30 holding up the Upper Bumper Bracket. Remove the Hood Latch release from the slot. Disconnect all lights (Headlights and Foglights).
2. Remove Bumper Brackets and Plastic Tabs
Using a 10mm Socket remove the (2) 10mm bolts securing down the bracket and push the little tab on top to completely remove the bracket. Using either some pliers or a small flat head push in the sides and take out the little clear plastic tabs. Proceed the same step with the other side.
3. Install RaiderFab Brackets
Each bracket will consist of [ 1 Bolt, 1 Nut, 3 Small Washers, and 1 Big Washer]. There would be a total of 4 brackets. Install them in place where the OEM plastic tabs would have been in the Square hole. The installation order for the bracket is as follows: Bolt, RF Bracket, 3 Small Washers, Fender Lining, Big Washer, and Nut.
4. Install Ball Stud and Check Quik Latch Fitment
When installing the ball stud make sure it is not too far out where the bumper can’t sit flush to the fender. Vice versa with the ball stud being too far in.
Using a Paint Marker or even if you have paint lying around, cover the ends of the ball studs in paint. Fit the bumper up to the car and press the sides of the bumper onto the painted ball. Let it sit for a minute so the paint doesn’t smear when taking off the bumper, this will leave a dot to be able to center the drill bit on.
6. Drill hole in bumper and install Quik Latch
*BEFORE DRILLING PLACE PAINTER’S TAPE ON PAINTED SIDE TO PREVENT THE PAINT FROM CHIPPING*
Using a ?” drill bit, drill a small pilot hole to be able to guide the ¾” drill better. When drilling the ¾” hole, start off slowly for a cleaner cut. It is best to have someone else with you to be able to hold the bumper in place. Install Quik Latch for fitment, do touch ups if necessary with drill.
Once the Quik Latch is flush with the bumper add some threadlocker on the backside and tighten using the provided nut.
7. Install assist spring and spring retainer
The Assist Spring and Spring Retainer will help make sure the Quik Latch is always under assist and can’t be popped off on its own. Simply install the spring over the ball stud and push the spring retainer over the end of the ball.
8. Set ball stud height and reinstall bumper cover
Perform a final check on the ball distance and height from the bumper. Set up to your liking best to have it flush from the bumper and the fender. Once you are ready you could finally reinstall your bumper cover for the final time.
Installation Complete!
Your Ford Focus ST Bumper Quik Latch system is now successfully installed.