Copied from the other forum, figured id put this here as well.
As some of you may know, I had some shit luck and a valve seat shattered unexpectedly, mashing my piston faces and scraping up my cylinder walls. I also recently graduated and got salaried so its time to say fuck it. Lets build this thing.
Last summer I bought a 06 VRM MS6 after wrecking the genwon and fell in love. So much more sophisticated of a vehicle, IMO. It is a very clean shell, has only seen one winter, no rust, straight body, etc. So it is the perfect candidate to pour money into. I acknowledge that i will never get my money back on this thing, so I figured why not just throw money at it and really enjoy it before i move on.
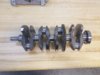
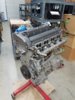
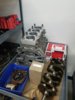
My work owns and operates an engine shop, very popular in the Viper community, Arrow Racing Engines. So I took my block there for inspection and machining. I also took full advantage of the huge discount we get on parts through my employer. I believe, at this point, I have everything needed to put this build together. The purchased list is as follows
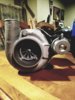
GTX3076r
Manley Rods
Manley Pistons
Stage 1 OEM rebuild kit with bolts (edge)
AEM WMI w/ Damond Motorsports spacer
ACT 6 puck sprung clutch with streelite flywheel
CX Racing FMIC
Massive speed BSD
JBR TB gasket
ATP turbo line kit
3 bar map sensor w/ harness
OEM Water pump
AEM Uego Wideband
Prosport Evo boost
Prosport Evo oil pressure with Damond motorsports adapter
3 inch intake (forgot brand)
Darton repair sleeve (for strange inclusion in bore)
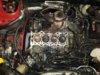
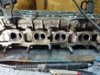
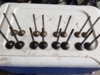
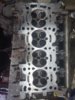
I am certain that there is more, but this is this the running list i have been keeping. I also have been doing a mild port and polish on my replacement cylinder head. I put more emphasis on opening up the exhaust ports, but was more-so just port matching the intake runners. I also now have very clean valves.
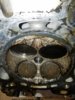
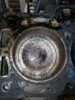
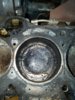
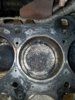
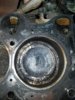
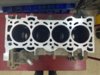
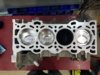
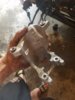
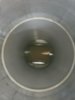
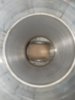
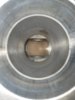
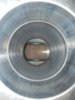
The darton sleeve is to repair my #2 cylinder which had a strange hard spot in the bore. I did not want to buy a new block, so I sourced a repair sleeve from Darton. It was not an advertised part, but it does exist, in case anyone else was wondering. You can see the strange spot (ground down) in the pics below.
I am making this thread as a resource for questions that pop up, and for documentation of the whole process. If anyone sees things that i dont have listed and should, or anything like that please speak up!
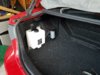
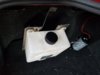
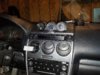
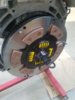
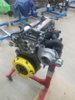
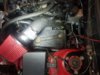
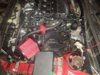
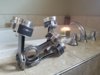
Below are some of the pictures i have taken to this point.
As some of you may know, I had some shit luck and a valve seat shattered unexpectedly, mashing my piston faces and scraping up my cylinder walls. I also recently graduated and got salaried so its time to say fuck it. Lets build this thing.
Last summer I bought a 06 VRM MS6 after wrecking the genwon and fell in love. So much more sophisticated of a vehicle, IMO. It is a very clean shell, has only seen one winter, no rust, straight body, etc. So it is the perfect candidate to pour money into. I acknowledge that i will never get my money back on this thing, so I figured why not just throw money at it and really enjoy it before i move on.
My work owns and operates an engine shop, very popular in the Viper community, Arrow Racing Engines. So I took my block there for inspection and machining. I also took full advantage of the huge discount we get on parts through my employer. I believe, at this point, I have everything needed to put this build together. The purchased list is as follows
GTX3076r
Manley Rods
Manley Pistons
Stage 1 OEM rebuild kit with bolts (edge)
AEM WMI w/ Damond Motorsports spacer
ACT 6 puck sprung clutch with streelite flywheel
CX Racing FMIC
Massive speed BSD
JBR TB gasket
ATP turbo line kit
3 bar map sensor w/ harness
OEM Water pump
AEM Uego Wideband
Prosport Evo boost
Prosport Evo oil pressure with Damond motorsports adapter
3 inch intake (forgot brand)
Darton repair sleeve (for strange inclusion in bore)
I am certain that there is more, but this is this the running list i have been keeping. I also have been doing a mild port and polish on my replacement cylinder head. I put more emphasis on opening up the exhaust ports, but was more-so just port matching the intake runners. I also now have very clean valves.
The darton sleeve is to repair my #2 cylinder which had a strange hard spot in the bore. I did not want to buy a new block, so I sourced a repair sleeve from Darton. It was not an advertised part, but it does exist, in case anyone else was wondering. You can see the strange spot (ground down) in the pics below.
I am making this thread as a resource for questions that pop up, and for documentation of the whole process. If anyone sees things that i dont have listed and should, or anything like that please speak up!
Below are some of the pictures i have taken to this point.
Attachments
-
 20170522_193217.jpg3.4 MB · Views: 41
 -
 20170530_211437.jpg5 MB · Views: 35
 -
 20170606_205120.jpg4.5 MB · Views: 38
 -
 20170617_200014.jpg3.5 MB · Views: 35
 -
 20170619_115308.jpg3.2 MB · Views: 35
 -
 20170619_115313.jpg1.2 MB · Views: 29
 -
 20170619_115321.jpg910.7 KB · Views: 31
 -
 20170619_115326.jpg947.3 KB · Views: 31
 -
 20170619_115330.jpg942.8 KB · Views: 34
 -
 20170622_194356.jpg1.8 MB · Views: 35