Corchid
Greenie N00B Member
Hey all, first post
Had some of the tools required for a Cerakote job and did not want to pay someone else to do it for me. Figured it would be good practice for learning to paint stuff like body work in the future.
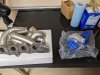
The general steps to do this can be found anywhere I suppose but here's my example with a CS exhaust manifold and a Pulsar turbo exhaust housing.

The general steps are as follows:
For my process, I had a few screwups which can be avoided by heeding my tale.
I was watching youtube videos on this process and seeing some good results with not too many specialized tools. One specialized tool that I did not invest in was a blasting cabinet. So I used a child's tent instead. I used a media gun from Harbor Freight and a smaller compressor. It took a lot of waiting between segments to make sure the pressure was still high. Also, a lot of trips to refill the gun. Not a huge issue but if you wanted it to be very easy, get a huge compressor and a media gun that can suck from a bucket of media.

It worked okay, but definitely a lot of media bounced back out of the flaps. It also created a fine layer of dust in the whole garage pretty much, so cover anything important like the exposed impeller of your turbo...
I don't know how thorough my sandblasting job was but it definitely looks a lot duller than the unblasted part.

At this point I realized that I should have masked stuff and stuffed things much better. I had sand grit inside the turbo housing and sand grit inside every runner on the manifold. This resulted in about 3+ hours of meticulously cleaning these surfaces with acetone and shop rags. I used a thicker gauge wire and rags as a tool to push through the EM runners. I also used a clean paint brush to get the hard spots in the turbo housing.


After cleaning inside and outside of the pieces with acetone, I baked them at 300 F (freedom units) for 30 minutes. I let them cool off in the oven by cracking it open and turning off the oven.

I then made sure to use brand new latex gloves for this portion. I carried them to the garage, where I masked off the wall and ground, and hung them up by bungee cord and shitty nylon rope. I masked the turbo faces off after hanging them up.

For the spraying section, I used the same compressor and a HVLP spray gun from amazon (MAKE SURE IT HAS THE RIGHT TIP). I used the recommended mesh strainer for the c-series Cerakote that I purchased (100 mesh). Cerakote will bend you over for the pain gun tip and the mesh strainer so don't buy from them. I went amazon, again.


I got extremely suited up with a clean suit, goggles, ear pro (I hate getting jump-scared by the compressor starting up), and a 3m respirator.
Here's my impression of a serial killer

MAKE SURE TO GET THE RIGHT FILTERS FOR YOUR RESPIRATOR. I got the pink circle ones and I still ended up breathing in a ton of paint vapor somehow. My breath smelled like paint for a few hours after. If I die of cancer soon I'll know why. At least my car will be fast and have cool engine bay temps.
I basically did nothing with the settings on the spray gun. I just sprayed some test cardboard first and it looked alright to me. I would say in general just make sure its not spraying too heavy, especially for the EM because the crevices will stack up material and it will run. The Cerakote seems to run easily. Start spraying from the crevices and work outwards. You don't want to do the opposite because you will end up hitting the crevice more times than you want and it will run, like I mentioned. Spray the mating surfaces and inlets to any exhaust holes as well. I didn't do this on the turbo because I'm paranoid about the tolerances being too close so I don't wanna wreck my shit.


let the pieces hang there for at least 24 hours before touching it. Install after 5 days, however you might be able to get away with sooner. Wouldn't push your luck though.

Had some of the tools required for a Cerakote job and did not want to pay someone else to do it for me. Figured it would be good practice for learning to paint stuff like body work in the future.
The general steps to do this can be found anywhere I suppose but here's my example with a CS exhaust manifold and a Pulsar turbo exhaust housing.
The general steps are as follows:
- Clean any parts with acetone / degreaser (brake cleaner)
- Mask off / stuff any passages within the parts (exhaust runners, turbo insides)
- Sandblast the parts with 100 - 120 grit media at 80+ psi
- Bake the parts in the oven at 300 degrees for 30 minutes
- Hang the parts for painting (DO NOT HANDLE WITHOUT GLOVES)
- Spray the parts with 30 psi and a 0.08 mm tip on the spray gun
- Let sit for 1 day before handling, 5 days before installing
For my process, I had a few screwups which can be avoided by heeding my tale.
I was watching youtube videos on this process and seeing some good results with not too many specialized tools. One specialized tool that I did not invest in was a blasting cabinet. So I used a child's tent instead. I used a media gun from Harbor Freight and a smaller compressor. It took a lot of waiting between segments to make sure the pressure was still high. Also, a lot of trips to refill the gun. Not a huge issue but if you wanted it to be very easy, get a huge compressor and a media gun that can suck from a bucket of media.
It worked okay, but definitely a lot of media bounced back out of the flaps. It also created a fine layer of dust in the whole garage pretty much, so cover anything important like the exposed impeller of your turbo...
I don't know how thorough my sandblasting job was but it definitely looks a lot duller than the unblasted part.
At this point I realized that I should have masked stuff and stuffed things much better. I had sand grit inside the turbo housing and sand grit inside every runner on the manifold. This resulted in about 3+ hours of meticulously cleaning these surfaces with acetone and shop rags. I used a thicker gauge wire and rags as a tool to push through the EM runners. I also used a clean paint brush to get the hard spots in the turbo housing.
After cleaning inside and outside of the pieces with acetone, I baked them at 300 F (freedom units) for 30 minutes. I let them cool off in the oven by cracking it open and turning off the oven.
I then made sure to use brand new latex gloves for this portion. I carried them to the garage, where I masked off the wall and ground, and hung them up by bungee cord and shitty nylon rope. I masked the turbo faces off after hanging them up.
For the spraying section, I used the same compressor and a HVLP spray gun from amazon (MAKE SURE IT HAS THE RIGHT TIP). I used the recommended mesh strainer for the c-series Cerakote that I purchased (100 mesh). Cerakote will bend you over for the pain gun tip and the mesh strainer so don't buy from them. I went amazon, again.
I got extremely suited up with a clean suit, goggles, ear pro (I hate getting jump-scared by the compressor starting up), and a 3m respirator.
Here's my impression of a serial killer
MAKE SURE TO GET THE RIGHT FILTERS FOR YOUR RESPIRATOR. I got the pink circle ones and I still ended up breathing in a ton of paint vapor somehow. My breath smelled like paint for a few hours after. If I die of cancer soon I'll know why. At least my car will be fast and have cool engine bay temps.
I basically did nothing with the settings on the spray gun. I just sprayed some test cardboard first and it looked alright to me. I would say in general just make sure its not spraying too heavy, especially for the EM because the crevices will stack up material and it will run. The Cerakote seems to run easily. Start spraying from the crevices and work outwards. You don't want to do the opposite because you will end up hitting the crevice more times than you want and it will run, like I mentioned. Spray the mating surfaces and inlets to any exhaust holes as well. I didn't do this on the turbo because I'm paranoid about the tolerances being too close so I don't wanna wreck my shit.
let the pieces hang there for at least 24 hours before touching it. Install after 5 days, however you might be able to get away with sooner. Wouldn't push your luck though.
Attachments
Last edited by a moderator: