HoneybadgerMZ3
Greenie N00B Member
****If you have ANY questions about the instructions, do not proceed until you contact RaiderFab! There is a chat option on raiderfab.com, email raiderfabusa@gmail.com, or message on social media, PRIOR to drilling holes or making any modification which cannot be undone.****
Was asked to help make things happen. Things have happened, here's my write up. It's word heavy but thorough. Pics for reference.
Finished photos first:


You need:
Was asked to help make things happen. Things have happened, here's my write up. It's word heavy but thorough. Pics for reference.
Finished photos first:
You need:
- 3/4" Step bit
- 10mm Deep socket
- 10mm Socket
- 10mm Wrench
- Whatever size socket for your lugnuts or key.
- Jack
- Jack Stands
- Breaker Bar
- Torque Wrench
- Pliers
- Needle Nose Pliers (sometimes, things thread fine, sometimes they're a little tough because of the low-grade steel Mazda uses for bumper bolts causing minor surface rust in the threads, it's just to help you)
- Drill (if you want use a manual hand driller and do so, then I'll buy you a beer myself)
- The supplied RaiderFab solution.
- Break lug nuts loose ((459) How to Change a Tire: A Step-by-Step Guide— Cars.com - YouTube)
- Jack up front of car
- Apply jack stands
- Remove wheels
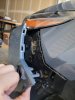
- Remove fender liner (front portion or the entirety; if front portion tuck behind brake rotor to have working room)
- Remove small screw inside fender, it joins the bumper and fender together.

- Remove fasteners on the bottom for bumper/wind tray to help prevent stress on the bumper.
- You can now pop the bumper away from the car by gently but firmly pulling it out.

- It should pop out fairly easily.
- Be mindful of the trim near the headlight, it’s barely secured, try to not pull the bumper out too far away.
- Remove the two T30 bolts located nearest the fender well and headlight.
- Installing the Raiderfab fastener studs:
- Closest to fenderwell:
- Keep one nut on the outside nearest the smooth stud head and begin thread in to the welded nut backside of the hole the T30 bolt was in.

- You may need to use a pair of pliers to thread this in by grabbing and turning the head of the stud until you can reach the backside of the threads once it passes through. Once you have enough thread for two nuts, apply two nuts to the backside. Leave some space between them and the welded nut to have adjustment room.
- You can use a 10mm open ended wrench on the inside nut to move the stud in, or the outside nut to move the stud out.
- Drive this to almost fully in, leave just a bit of length because we need to use the stud to make a dimple on the bumper plastic to mark where we need to drill soon.
- Take your bumper and refasten it into the clips, it should hit the stud you just put in.
- In the spot it touches the stud, press firmly with your hand and around the area the stud is touching the bumper. This will create a dimple in the plastic so that we know where to begin drilling with the step bit.

- Just drill enough with the step bit to see the metal stud peeking through, we don’t want to damage it, then pull the bumper back off so you have enough space to drill out the rest of the hole we need to install the latch mechanism.


- Install the latch mechanism.
- Just drill enough with the step bit to see the metal stud peeking through, we don’t want to damage it, then pull the bumper back off so you have enough space to drill out the rest of the hole we need to install the latch mechanism.
- Remove the hex collar, insert threads into the hole, apply hex collar. Use some Loctite closest the bumper portion itself and then firmly faster the hex collar.
- Move outwards the fastener stud now, apply some Loctite to it on the outside threads, then reseat it back to almost fully in. Do a small test latch to check the length is appropriate to latch and make adjustments via the nuts on the backside. Unlatch and relatch to check.
- On the backside, remove the two nuts.
- Loctite the threads, apply a washer, lock washer, and nut and tighten down until the lock washer is fully compressed, then ? turn more.
- On the backside, remove the two nuts.
- Keep one nut on the outside nearest the smooth stud head and begin thread in to the welded nut backside of the hole the T30 bolt was in.
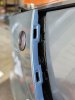
- At the headlight, you will remove the metal clip on the inside with a steel pick or needle nose pliers, we’ll be adding our own hardware.

- Install the fastener stud now with a washer and nut closest to the smooth head of the stud. There will be about 10mm of so of thread you want to keep on the outside of those but you can make adjustments later if needed. Let it gently hang.
- On the inside, you will add a washer, lock washer, and nut. Fasten these by installing the washer first by sliding it over while holding the stud from the outside, then lock washer, then nut. It’s a tight space. I found it easier to slip on the two washers, then use the stud to thread into the nut.
- Get these firmly set, and bring the stud inboard until it’s peeking past the black plastic.
- Install the fastener stud now with a washer and nut closest to the smooth head of the stud. There will be about 10mm of so of thread you want to keep on the outside of those but you can make adjustments later if needed. Let it gently hang.
- Attempt to gently refasten the bumper clips (including the new quik latch you just installed by the fenderwell).
- It should touch the bumper and prevent it from fully clipping in.

- Like with the fenderwell, firmly press around this area to force a dimple to form in the bumper.
- Drill this to barely show the fastener stud head, then unlatch and finish drilling this out with your step bit.

- It should touch the bumper and prevent it from fully clipping in.
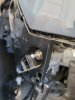
- Secure the quik latch to the bumper.
- Insert threaded portion, small bit of Loctite on threads by bumper, firmly tighten the hex collar.
- Now do a test fit of the quick latch to see how far in or out you need to move the stud to keep it flush and lined up with the bumper/fender/headlight.
- To help move it you can use a 10mm deep socket on the outside, and a 10mm on the inside to break loose the nuts and move it freely. Get it to where you think you need it, firmly tighten it down and do a test fit. If good, then loosen the outside nut and apply Loctite, then tighten it down.
- Loosen the inside nut and apply some Loctite.
- Torque them down, double check fitment and make adjustments.
- Insert threaded portion, small bit of Loctite on threads by bumper, firmly tighten the hex collar.
- Once fitment is confirmed, add another washer to the outside, then grab a spring and the cut washer.
- With the spring between the washer and cut washer over the stud, push down on the cut washer with your fingers OR to make it a little easier, just push down on the entire thing with an 8mm or 10mm socket.
- Once it is past the head of the stud, you can use another plain washer and the 8mm/10mm socket to help seat down the cut portions of the cut washer for a slightly better seat against the stud head.
- This is to help with unlatching.
- Yes, the fenderwell one doesn’t have one. The area is too short to use one and the bumper is easily accessible to help pull it off when unlatching.
- With the spring between the washer and cut washer over the stud, push down on the cut washer with your fingers OR to make it a little easier, just push down on the entire thing with an 8mm or 10mm socket.
Attachments
-
RaiderFab 4th Gen Install Document.pdf40.9 KB · Views: 0
-
 348366172_137712422612838_4680023183031197929_n.jpg221.8 KB · Views: 3
 -
 348365447_580913920591883_5724351114611122048_n.jpg181.2 KB · Views: 2
 -
352435527_6243970465723907_7508225827122691955_n.mp4357.9 KB · Views: 0
-
 348378295_217891724466742_577477401437372470_n.jpg183.2 KB · Views: 3
Last edited:
