This is my amateur guide to installing GA7163 Radio.

Good news, everyone! it actually super easy to install and only took me about 40min and that's stopping to take pictures. A pro could probably do this in 20min.
Steps
1. Unpack the box and make sure everything there is included.
2. screw side mounting plates on to the side of the radio with provided hardware and unhook your cars battery.


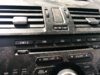
3. Remove vents dash trim piece using the provided trim removal tool, by gently prying up.


4. Unscrew the 2 mounting screws holding the radio in place

5. slide your fingers down the back of the radio using both hands pull outwards towards you and the radio will pop out of place. then garbing the bottom lip remove the radio from its bay.

6. Once free of its bay, unplug the 3 connectors attached to the stock radio, using a flat head screwdriver to help push the release buttons on the clips. ( sorry to hard to get my phone back there to take a picture. )
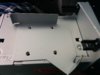
7. The radio should be free to remove and your bay should look something like this.

8. Connect the wiring harness to the correct plugs, you cant mix this up they only fit one place.


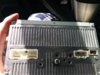
9. Attach the double sided tap to the provided gps anti, then attach gps anti to the flat spot above your vent piping, This is tricky to see, just feel around with your hands. The second photo shows where i stuck it up with in the dash. The wire should be spooled up routed between your vents. They bay is now ready for the installation


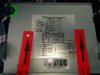
10. Plug in wire adapters to the back of the radio, there is a 3rd wire the goes above the black plugin in picture, this is also the stage where you plugin your usb to ipod connection if you wanted this feature.

11. Attach radio wires to the bay wires, this cant be mixed up as they only fit in one place/
Then tuck wires as far back into the bay as possible routing the gps anti wire in the space provided at the top corners of the radio and slide radio into place.

12. adjust radio placement by wiggling it tell its appears and feel flush to the surrounding dash pieces
This would be good time to reconnect the battery and test the radio functionality before securing it into place.
13. Secure the radio to the dash by screwing to the to side brackets to the car
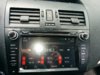
14. Reinsert your vent trim it should just pop back into place

and your are complete.
Here is a great video for older model, but alot of the tips and tricks still apply.
Good news, everyone! it actually super easy to install and only took me about 40min and that's stopping to take pictures. A pro could probably do this in 20min.
Steps
1. Unpack the box and make sure everything there is included.
2. screw side mounting plates on to the side of the radio with provided hardware and unhook your cars battery.
3. Remove vents dash trim piece using the provided trim removal tool, by gently prying up.
4. Unscrew the 2 mounting screws holding the radio in place
5. slide your fingers down the back of the radio using both hands pull outwards towards you and the radio will pop out of place. then garbing the bottom lip remove the radio from its bay.
6. Once free of its bay, unplug the 3 connectors attached to the stock radio, using a flat head screwdriver to help push the release buttons on the clips. ( sorry to hard to get my phone back there to take a picture. )
7. The radio should be free to remove and your bay should look something like this.
8. Connect the wiring harness to the correct plugs, you cant mix this up they only fit one place.
9. Attach the double sided tap to the provided gps anti, then attach gps anti to the flat spot above your vent piping, This is tricky to see, just feel around with your hands. The second photo shows where i stuck it up with in the dash. The wire should be spooled up routed between your vents. They bay is now ready for the installation
10. Plug in wire adapters to the back of the radio, there is a 3rd wire the goes above the black plugin in picture, this is also the stage where you plugin your usb to ipod connection if you wanted this feature.
11. Attach radio wires to the bay wires, this cant be mixed up as they only fit in one place/
Then tuck wires as far back into the bay as possible routing the gps anti wire in the space provided at the top corners of the radio and slide radio into place.
12. adjust radio placement by wiggling it tell its appears and feel flush to the surrounding dash pieces
This would be good time to reconnect the battery and test the radio functionality before securing it into place.
13. Secure the radio to the dash by screwing to the to side brackets to the car
14. Reinsert your vent trim it should just pop back into place
and your are complete.
Here is a great video for older model, but alot of the tips and tricks still apply.
Attachments

Last edited:
