Vansquish
Gold Member
This thread was originally posted on MSF back in October of 2012 by @TiGraySpeed6.
Your MAP sensor is what the ECU uses to read boost pressure. The stock Manifold Absolute Pressure sensor (MAP) is a 2.5 BAR unit, which tops out around 23-24psi, and looses accuracy around 22-23psi. If you want to accurately see pressures in that range or over, regardless of BT or K04, it's a wise idea to upgrade to at least a 3 BAR sensor. This is important even if you want to run boost pressures around 19-20psi, since the throttle cut and fuel cut settings will be at or beyond the point in the stock sensor range where things get fuzzy, so they may not work consistently, work as expected, or even work at all.
In the past this meant trying to find an overpriced sensor,usually in the range of $90-$125, and then having to cut the OEM plug off and solder the wires for the correct plug. There was a premium price since the MAP used by Mazda not only reads boost pressure, but has a built in Temp sensor, which even now, years later, is a nice touch, and fairly unusual in the USA.
Frankly, it was both expensive & a PITA, and that kept many people from making a very intelligent upgrade.
NO MORE-
3 BAR MAP + PNP Harness
no soldering, plug n play, completely reversible to stock, and can be re-sold later as a kit if you stock out.
Under $100 for everything!
Ballenger Motorsports
Bosch 3 BAR MAP with Temp - $29.99
their PN SNSR-03085
Bosch # 0 281 002 845
Home » Shop » Sensors » Pressure Sensors » Bosch 3 Bar TMap Map Sensor with IAT
Plug-n-Play Mazdaspeed MAP Harness - $60 shipped
The OEM Mazda MAP sensor uses a proprietary connector. This harness will convert that connector into a more standard Bosch connector for use with a wider range of MAP sensors.
Mazdaspeed MAP Harness - Bitwise Motorsports
Corrections to the tune must be made!
For ATR (not sure if VT is same terminology)
If you run the HT, you're out of luck...
-> Bring the laptop to your car, fire up ATR and connect it through your AP to the ECU. Through the View menu, set Dashboard so you can view Boost. Dashboard gauges can be set through Options>Gauge List. With the Key On & Engine Off (KOEO) note what it reads for boost. Mine read -0.16. on the stock MAP sensor. You're going to want to end up with your KOEO boost as close to 0 as you can get.
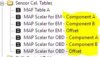
For the 845 MAP sensor, you need to change three sets of MAP Scaler tables, found in the Sensor Cal folder. These are all those other tables in the same place as where you make the MAF Cal changes.
Three sets of tables, EM, Log & OBD, make the same changes in all three set, 9 individual tables.

=========================
UPDATE: Much of the remainder of this post is dedicated to finding the best values to enter in the Offset table. While this manual process still works as well as ever there is also a new set of values which have been in use for months now and have proven to be consistent & accurate. Later in this thread @rfinkle2; shares the math he used to define these numbers, and they've worked well across the country. You can feel free to just use these and know you're probably going to be more accurate than the original values were with the stock MAP sensor...
Scalar A - 296
Scalar B - 0.22
Offset - 5.444
Thanks Rob! Working magic like always!
=========================
-=> The original method:
Scalar A - 65.78
Scalar B - 1
Offset - will end up somewhere between 8.35 to 5.44
The Offset is the one that you need to change to find which value gets you closest to 0. After testing the three most common, I ended up using 6.00. Those three common used reference values are 5.44, 6.50 & 8.35.
Below are the values I found.
oem: -0.16
5.44: +0.06
6.50: -0.08
8.35: -0.37
6.00: -0.01 <--- Where I ended up after testing the common values
Here's an example of the dashboard boost gauge when I had the 5.44 scaler loaded-
*remember, key on, engine off*

These settings are also discussed in the ATR Help File. You've read the help file, right? (stern look.....)
So, start by getting the stock KOEO Boost reading so you have a baseline, then go ahead & swap the map sensor. Next load a map with updated scaler & offset values and check the KOEO Boost. Since it's doubtful you'll be close to 0 with this first revision change just the three offset tables to another of the three baseline values, flash the map, check the KOEO Boost again.
Repeat till you determine what offset gets you closest to 0. The offset value needed seems to be slightly different from car to car. It only takes a few moments to make the offset changes & flash the map, so go ahead & try all three common values to get a feel for how they change the KOEO boost reading. You want a offset value that gets you close to 0.
The three common used reference offset values again: 5.44, 6.50 & 8.35, and you may well end up using an offset value of your own like I did. I used a offset value of 6.00 to get a KOEO Boost reading of -0.01.
All told, it took me ~30-40 minutes from on ramps (to save my back) to off ramps & test drive, including testing the four different versions of offset listed above, to complete this project.
Once your set you'll have a accurate boost readings up to about 30psi. If you're feeling particularly froggy, they make a 3.5 BAR, even a 4 BAR....
Your MAP sensor is what the ECU uses to read boost pressure. The stock Manifold Absolute Pressure sensor (MAP) is a 2.5 BAR unit, which tops out around 23-24psi, and looses accuracy around 22-23psi. If you want to accurately see pressures in that range or over, regardless of BT or K04, it's a wise idea to upgrade to at least a 3 BAR sensor. This is important even if you want to run boost pressures around 19-20psi, since the throttle cut and fuel cut settings will be at or beyond the point in the stock sensor range where things get fuzzy, so they may not work consistently, work as expected, or even work at all.
In the past this meant trying to find an overpriced sensor,usually in the range of $90-$125, and then having to cut the OEM plug off and solder the wires for the correct plug. There was a premium price since the MAP used by Mazda not only reads boost pressure, but has a built in Temp sensor, which even now, years later, is a nice touch, and fairly unusual in the USA.
Frankly, it was both expensive & a PITA, and that kept many people from making a very intelligent upgrade.
NO MORE-
3 BAR MAP + PNP Harness
no soldering, plug n play, completely reversible to stock, and can be re-sold later as a kit if you stock out.
Under $100 for everything!
Ballenger Motorsports
Bosch 3 BAR MAP with Temp - $29.99
their PN SNSR-03085
Bosch # 0 281 002 845
Home » Shop » Sensors » Pressure Sensors » Bosch 3 Bar TMap Map Sensor with IAT
Plug-n-Play Mazdaspeed MAP Harness - $60 shipped
The OEM Mazda MAP sensor uses a proprietary connector. This harness will convert that connector into a more standard Bosch connector for use with a wider range of MAP sensors.
Mazdaspeed MAP Harness - Bitwise Motorsports
Corrections to the tune must be made!
For ATR (not sure if VT is same terminology)
If you run the HT, you're out of luck...
-> Bring the laptop to your car, fire up ATR and connect it through your AP to the ECU. Through the View menu, set Dashboard so you can view Boost. Dashboard gauges can be set through Options>Gauge List. With the Key On & Engine Off (KOEO) note what it reads for boost. Mine read -0.16. on the stock MAP sensor. You're going to want to end up with your KOEO boost as close to 0 as you can get.
For the 845 MAP sensor, you need to change three sets of MAP Scaler tables, found in the Sensor Cal folder. These are all those other tables in the same place as where you make the MAF Cal changes.
Three sets of tables, EM, Log & OBD, make the same changes in all three set, 9 individual tables.
=========================
UPDATE: Much of the remainder of this post is dedicated to finding the best values to enter in the Offset table. While this manual process still works as well as ever there is also a new set of values which have been in use for months now and have proven to be consistent & accurate. Later in this thread @rfinkle2; shares the math he used to define these numbers, and they've worked well across the country. You can feel free to just use these and know you're probably going to be more accurate than the original values were with the stock MAP sensor...
Scalar A - 296
Scalar B - 0.22
Offset - 5.444
Thanks Rob! Working magic like always!
=========================
-=> The original method:
Scalar A - 65.78
Scalar B - 1
Offset - will end up somewhere between 8.35 to 5.44
The Offset is the one that you need to change to find which value gets you closest to 0. After testing the three most common, I ended up using 6.00. Those three common used reference values are 5.44, 6.50 & 8.35.
Below are the values I found.
oem: -0.16
5.44: +0.06
6.50: -0.08
8.35: -0.37
6.00: -0.01 <--- Where I ended up after testing the common values
Here's an example of the dashboard boost gauge when I had the 5.44 scaler loaded-
*remember, key on, engine off*
These settings are also discussed in the ATR Help File. You've read the help file, right? (stern look.....)
So, start by getting the stock KOEO Boost reading so you have a baseline, then go ahead & swap the map sensor. Next load a map with updated scaler & offset values and check the KOEO Boost. Since it's doubtful you'll be close to 0 with this first revision change just the three offset tables to another of the three baseline values, flash the map, check the KOEO Boost again.
Repeat till you determine what offset gets you closest to 0. The offset value needed seems to be slightly different from car to car. It only takes a few moments to make the offset changes & flash the map, so go ahead & try all three common values to get a feel for how they change the KOEO boost reading. You want a offset value that gets you close to 0.
The three common used reference offset values again: 5.44, 6.50 & 8.35, and you may well end up using an offset value of your own like I did. I used a offset value of 6.00 to get a KOEO Boost reading of -0.01.
All told, it took me ~30-40 minutes from on ramps (to save my back) to off ramps & test drive, including testing the four different versions of offset listed above, to complete this project.
Once your set you'll have a accurate boost readings up to about 30psi. If you're feeling particularly froggy, they make a 3.5 BAR, even a 4 BAR....