****If you have ANY questions about the instructions, do not proceed until you contact RaiderFab! There is a chat option on raiderfab.com, email raiderfabusa@gmail.com, or message on social media, PRIOR to drilling holes or making any modification which cannot be undone.****
March 2024, a 2nd option for installation is available! https://mazdaspeeds.org/index.php?t...ution-for-1st-gen-mazdaspeed-3-option2.16171/
Gen1 MS3 Full Kit (fenderwell AND headlight area latches:
https://raiderfab.myshopify.com/products/2007-2009-mazdaspeed-3-bumper-fitment-solution-full-kit
Gen1 MS3 Fenderwell Only:
https://raiderfab.myshopify.com/pro...eed-3-bumper-fitment-solution-fenderwell-only
@Youngwonder made a how-to as well:
http://mazdaspeeds.org/index.php?threads/how-to-raiders-bumper-fitment-fix-v2.2577/
Tools:
Loctite (Red or blue)
10mm socket and a ratchet (or wrench-but you need 2)
10 mm wrench
Cordless Drill
Step Bit-largest diameter 3/4"
Punch/awl
Claybar Ball, or a piece of clay. Something moldable and sticky.
Patience
Vise Grips (if installing a 2nd latch up front into the bumper bracket)
10 mm socket to remove bumper bracket bolt (again, if installing 2nd latch)
phillips and flat blade screw driver
Jack and Jack Stands
Tools to remove your wheels.
As many of you know, I wrote the how-to for the Gen1 Mazdaspeed 3 Quik Latch Installation. I have been working on a solution which eliminates the rear bumper bolt being needed to be removed for the bumper to removed. Why? 2 reasons. 1) When the bumpers get pulled off or damaged, that is the part of the bumper that never gets flush again. Even with the 2 latches in the plastic bracket. 2) It is a pain to have to deal with.
So last year, my proof-of-concept was tested on my old bumper. Fast forward to 2016, the new bumper already had fitment issues. So latches were going on. I decided to put the RaiderFab brackets to use. This bracket is in development to be sold, so many people can use this. Or bend up bar stock and make your own. It was a pain with a Dremel though.
The first step was to get a new plastic insert for the fenders, as well as the screw that goes up and in. Why did I do that? Because shitty body shops used speed nuts to fix it, not OEM parts. So if you do not have em, this is what you need. I ordered through Edge Autosport.
Parts (I ordered 2)
Plastic Bumper Insert thing:
GJ6A-50-0Z5
Screw:
9CF600516B
So now onto the latches. First thing I noticed, is that the newer version of the brackets are black. Having installed the studs into both the white and black ones, I recommend replacing them to the newer black versions before you install the latches. The black ones are more pliable for the latch stud, and are not brittle.
Right Side: BR6C500U1A
Left Side: BR6C500T1A
Ok, so now that is done, time to get to work.
Put car on jackstands, remove front wheels.
Remove the fenderliner push tabs into the bumper, and move it out of the way, or remove completely.
It helped me a LOT to remove the front bumper. Bunch of phillips screws underneath, as well as in the center area. If you have TMIC, remove the air flow duct things, as you need to reach down and pull up on clips holding bumper to the crash bar. Unplug foglights and the bumper will come off.
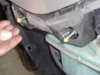
Screw the bracket to the bumper. Ideally it will be centered in the adjustment slot, but can be moved if needed. Install the custom pin and spring kit if you purchased it. Use a nut and washer on the back side of the bracket, and tighten it to the fender once aligned. It will take a little working with to get the latch pin in the proper depth to catch the latch. Again, patience. I recommend using blue or red Loctite on the hardware to keep it nice and tight. Match installation points on the other latch (or take a pic of it for reference to help the other side. Once dialed in, use the 10 mm wrench and socket/ratchet to tighten the pin to the bracket.


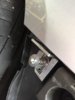
To be able to fit around the bracket, the bumper MUST be trimmed. That is basically removing all the weak part that the bumper used to attach to the fender with. It is wasted by then. Mine was. This is what worked for me.

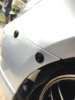
Next up is the bumper drilling. I used claybar, rolled up in small balls. Placed on the top of the pins. Then pressed bumper on. You will want it in the center of the bumper area like in the pics. I used a center punch to mark the spot where the clay stuck, then drilled a small hole. (reusing my old pics for some).


Mounted again to confirm alignment. I used my step bit again, but drilled inward and stopped each step for alignment. Was a lot easier this way. If it is off-center at one of the steps, just move the drill towards the center 1 step, and then straight once centered. Install the latches to the bumper for a test fit once drilled through the largest point. Not centered? Fear not, just use the drill, and push the bit toward center a tad, the latch will cover small gaps. Repeat.
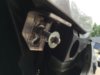
FOR SECOND LATCH INTO BUMPER BRACKET ONLY: Remove far forward bolt in bracket (10mm). Install Spring kit if purchased onto the latch pin. Use a small pair of vise grips, and grip the stud tight, and rotated the pliers to get it to screw in or out. The ball of the latch stud will need to be pretty close to flush with the bracket top. So tightening and loosening the nut will take some time. This is where the new brackets really help. I removed and reinstalled a few times and no worry of breaking.


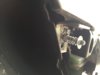
Single Latch install.

(Need a better pic of Driver's side)
If the headlight area is loose, you need 2 per side like me. If only the fenderwell, you just need 1 per side and the RaiderFab/Maisonvi Latch Bracket kit on sale now!
March 2024, a 2nd option for installation is available! https://mazdaspeeds.org/index.php?t...ution-for-1st-gen-mazdaspeed-3-option2.16171/
Gen1 MS3 Full Kit (fenderwell AND headlight area latches:
https://raiderfab.myshopify.com/products/2007-2009-mazdaspeed-3-bumper-fitment-solution-full-kit
Gen1 MS3 Fenderwell Only:
https://raiderfab.myshopify.com/pro...eed-3-bumper-fitment-solution-fenderwell-only
@Youngwonder made a how-to as well:
http://mazdaspeeds.org/index.php?threads/how-to-raiders-bumper-fitment-fix-v2.2577/
Tools:
Loctite (Red or blue)
10mm socket and a ratchet (or wrench-but you need 2)
10 mm wrench
Cordless Drill
Step Bit-largest diameter 3/4"
Punch/awl
Claybar Ball, or a piece of clay. Something moldable and sticky.
Patience
Vise Grips (if installing a 2nd latch up front into the bumper bracket)
10 mm socket to remove bumper bracket bolt (again, if installing 2nd latch)
phillips and flat blade screw driver
Jack and Jack Stands
Tools to remove your wheels.
As many of you know, I wrote the how-to for the Gen1 Mazdaspeed 3 Quik Latch Installation. I have been working on a solution which eliminates the rear bumper bolt being needed to be removed for the bumper to removed. Why? 2 reasons. 1) When the bumpers get pulled off or damaged, that is the part of the bumper that never gets flush again. Even with the 2 latches in the plastic bracket. 2) It is a pain to have to deal with.
So last year, my proof-of-concept was tested on my old bumper. Fast forward to 2016, the new bumper already had fitment issues. So latches were going on. I decided to put the RaiderFab brackets to use. This bracket is in development to be sold, so many people can use this. Or bend up bar stock and make your own. It was a pain with a Dremel though.
The first step was to get a new plastic insert for the fenders, as well as the screw that goes up and in. Why did I do that? Because shitty body shops used speed nuts to fix it, not OEM parts. So if you do not have em, this is what you need. I ordered through Edge Autosport.
Parts (I ordered 2)
Plastic Bumper Insert thing:
GJ6A-50-0Z5
Screw:
9CF600516B
So now onto the latches. First thing I noticed, is that the newer version of the brackets are black. Having installed the studs into both the white and black ones, I recommend replacing them to the newer black versions before you install the latches. The black ones are more pliable for the latch stud, and are not brittle.
Right Side: BR6C500U1A
Left Side: BR6C500T1A
Ok, so now that is done, time to get to work.
Put car on jackstands, remove front wheels.
Remove the fenderliner push tabs into the bumper, and move it out of the way, or remove completely.
It helped me a LOT to remove the front bumper. Bunch of phillips screws underneath, as well as in the center area. If you have TMIC, remove the air flow duct things, as you need to reach down and pull up on clips holding bumper to the crash bar. Unplug foglights and the bumper will come off.
Screw the bracket to the bumper. Ideally it will be centered in the adjustment slot, but can be moved if needed. Install the custom pin and spring kit if you purchased it. Use a nut and washer on the back side of the bracket, and tighten it to the fender once aligned. It will take a little working with to get the latch pin in the proper depth to catch the latch. Again, patience. I recommend using blue or red Loctite on the hardware to keep it nice and tight. Match installation points on the other latch (or take a pic of it for reference to help the other side. Once dialed in, use the 10 mm wrench and socket/ratchet to tighten the pin to the bracket.
To be able to fit around the bracket, the bumper MUST be trimmed. That is basically removing all the weak part that the bumper used to attach to the fender with. It is wasted by then. Mine was. This is what worked for me.
Next up is the bumper drilling. I used claybar, rolled up in small balls. Placed on the top of the pins. Then pressed bumper on. You will want it in the center of the bumper area like in the pics. I used a center punch to mark the spot where the clay stuck, then drilled a small hole. (reusing my old pics for some).
Mounted again to confirm alignment. I used my step bit again, but drilled inward and stopped each step for alignment. Was a lot easier this way. If it is off-center at one of the steps, just move the drill towards the center 1 step, and then straight once centered. Install the latches to the bumper for a test fit once drilled through the largest point. Not centered? Fear not, just use the drill, and push the bit toward center a tad, the latch will cover small gaps. Repeat.
FOR SECOND LATCH INTO BUMPER BRACKET ONLY: Remove far forward bolt in bracket (10mm). Install Spring kit if purchased onto the latch pin. Use a small pair of vise grips, and grip the stud tight, and rotated the pliers to get it to screw in or out. The ball of the latch stud will need to be pretty close to flush with the bracket top. So tightening and loosening the nut will take some time. This is where the new brackets really help. I removed and reinstalled a few times and no worry of breaking.
Single Latch install.
(Need a better pic of Driver's side)
If the headlight area is loose, you need 2 per side like me. If only the fenderwell, you just need 1 per side and the RaiderFab/Maisonvi Latch Bracket kit on sale now!
Attachments
Last edited:

