supertubesocks
Greenie Member
This how to shows specific steps and tools required for the rear studs on a mazdaspeed6. The steps could easily be applied to the front studs, a MS3, or any other car. Disclaimer: this is not the best or safest method, as it requires grinding down some of the head of the stud. Perform at your own risk. This is also a good time to inspect or replace brake components.
Tool list:
14mm combo wrench
impact screwdriver
penetrant
hammer, 2lb sledge is what i used
round 8"+ punch
impact gun
lug wrench
washers and a scrap lug nut
jack and stands
Grinder, sanding disc, or belt sander
Parts list:
M12 x 1.50 by 48mm wheel stud (MS6 rear)
Step 1: Safely jack up the car and set on a jack stand. Chock the wheels as you will need to release the parking brake.
Step 2: Remove the wheel with the broken stud. Apply penetrant to broken wheel stud and anything else that needs it.
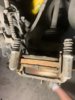
Step 3:Use the impact screw driver to loosen the phillip's head screws holding the brake rotors. Remove the screws..jpeg")
Step 4: Use the 14mm wrench to loosen the brake caliper bolts and the caliper mounting bracket bolts. Remove brake pads. Zip tie the brake caliper out of the way and set aside the bracket.
.jpeg")
Step 5: Remove brake rotors.
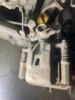
Step 6: Using the punch and hammer, flatten the dust shield against the upright. Take your time and don't hit it too hard, you shouldn't bend the dust shield in any other spots. This allows enough clearance to remove and install the studs.

Step 7: Rotate the hub so that the broken stud is in front of the area of modified dust shield. Carefully hammer it out. The bend dust shield allows enough clearance to remove the stud.

Step 8: Using a grinder, remove approximately 1/8" of the shoulder off of one side of the new wheel stud. Just enough so that it can be installed from the back side of the hub, past the modified dust shield.

Step 9: Stack up some washers on the new stud and thread on a lug nut(preferably one that can be destroyed)

Step 10: Set the parking brake. Tighten lug nut on the washers and pull the knurled part of the lug stud into the hub, WD40 on the stud helps. Tighten until the stud is fully seated on the back of the hub.
Step11: Reinstallation all removed parts in reverse order.
@Raider
Tool list:
14mm combo wrench
impact screwdriver
penetrant
hammer, 2lb sledge is what i used
round 8"+ punch
impact gun
lug wrench
washers and a scrap lug nut
jack and stands
Grinder, sanding disc, or belt sander
Parts list:
M12 x 1.50 by 48mm wheel stud (MS6 rear)
Step 1: Safely jack up the car and set on a jack stand. Chock the wheels as you will need to release the parking brake.
Step 2: Remove the wheel with the broken stud. Apply penetrant to broken wheel stud and anything else that needs it.
Step 3:Use the impact screw driver to loosen the phillip's head screws holding the brake rotors. Remove the screws.
Step 4: Use the 14mm wrench to loosen the brake caliper bolts and the caliper mounting bracket bolts. Remove brake pads. Zip tie the brake caliper out of the way and set aside the bracket.
Step 5: Remove brake rotors.
Step 6: Using the punch and hammer, flatten the dust shield against the upright. Take your time and don't hit it too hard, you shouldn't bend the dust shield in any other spots. This allows enough clearance to remove and install the studs.
Step 7: Rotate the hub so that the broken stud is in front of the area of modified dust shield. Carefully hammer it out. The bend dust shield allows enough clearance to remove the stud.
Step 8: Using a grinder, remove approximately 1/8" of the shoulder off of one side of the new wheel stud. Just enough so that it can be installed from the back side of the hub, past the modified dust shield.
Step 9: Stack up some washers on the new stud and thread on a lug nut(preferably one that can be destroyed)
Step 10: Set the parking brake. Tighten lug nut on the washers and pull the knurled part of the lug stud into the hub, WD40 on the stud helps. Tighten until the stud is fully seated on the back of the hub.
Step11: Reinstallation all removed parts in reverse order.
@Raider