JohnnyTightlips
Motorhead
More Stuffs
I did end up wrapping and sealing the headers. I want to try and keep the heat out of the car as I will not have AC anytime soon. This took a few hours and was gross. Wear some gloves and clothes that you can wash right away. Keep the wrap wet or else you will just breathe in glass all day. I was happy how they turned out and hope they hold up. The main issue with doing this is now when you work around them you need to be more careful and under the car can get fibers and crap in your face.


Intake Arrived
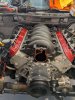
Stock LS6 intake

You will need to trim one side of the map sensor to fit on the intake.


Throttle Body - New Hitachi ETB0024 Fuel Injection Throttle Body - Gasket/O-Ring Included
Converter - For LS Throttle Body - LS1 / Truck Adapter 3 Bolt Intake to 4 Bolt 92mm
Bolts - STAINLESS STEEL LS1 INTAKE MANIFOLD BOLTS KIT For LSX LS2 LS3 LS6 CAMARO CORVETTE GM

Fuel Rails
Billet Fuel Rail Kit For OE LS1 LS6 Stock Intake Manifold 6AN + Hardware
Delphi GM 50lb/hr LS Truck Flex Fuel Injectors 12613412-8

It took me a while to find a rail that would work without needing adapters. I ended up with the one above. You can see the bolts pass through which gave me more room to work on mounting.
I made my own brackets out of L brackets and some spacers. It is very solid and I am not worried about it.


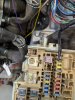
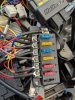
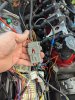
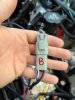
I also started to break down the wire harness I ordered and covert it to what I need.


Sad News
We had to say goodbye to my best friend of 14 years the other day. She was the best dog I could have ever asked for.
Sam 2011 - 2025


I did end up wrapping and sealing the headers. I want to try and keep the heat out of the car as I will not have AC anytime soon. This took a few hours and was gross. Wear some gloves and clothes that you can wash right away. Keep the wrap wet or else you will just breathe in glass all day. I was happy how they turned out and hope they hold up. The main issue with doing this is now when you work around them you need to be more careful and under the car can get fibers and crap in your face.
Intake Arrived
Stock LS6 intake
You will need to trim one side of the map sensor to fit on the intake.
Throttle Body - New Hitachi ETB0024 Fuel Injection Throttle Body - Gasket/O-Ring Included
Converter - For LS Throttle Body - LS1 / Truck Adapter 3 Bolt Intake to 4 Bolt 92mm
Bolts - STAINLESS STEEL LS1 INTAKE MANIFOLD BOLTS KIT For LSX LS2 LS3 LS6 CAMARO CORVETTE GM
Fuel Rails
Billet Fuel Rail Kit For OE LS1 LS6 Stock Intake Manifold 6AN + Hardware
Delphi GM 50lb/hr LS Truck Flex Fuel Injectors 12613412-8
It took me a while to find a rail that would work without needing adapters. I ended up with the one above. You can see the bolts pass through which gave me more room to work on mounting.
I made my own brackets out of L brackets and some spacers. It is very solid and I am not worried about it.
I also started to break down the wire harness I ordered and covert it to what I need.
Sad News
We had to say goodbye to my best friend of 14 years the other day. She was the best dog I could have ever asked for.
Sam 2011 - 2025


")


