Update time...
Last week I had some time to install the adjustable Upper Control Arm. This was the last stock piece on the rear axle. In the following pictures you can see how the OEM bushing on this arm was not broken but definitely tired.


This adjustable arm lets me control pinion angle by lengthening or shortening the length from the chassis to the top of the diff. This is important because a bad pinion angle can cause severe wear to the driveshaft itself, U-joints, and pinion bearing inside the diff. Here is an old but great video that illustrates why driveshaft angles are important.
Install took me about 3 1/2 hours. It took me a bit longer than it should have because I had to drop the gas tank to get the UCA mounting snout out. I had to bend a lip of the gas tank to get some clearance for the control arm mount, no big deal. The gas tank was a bitch to get back up because of all the EVAP and E-brake lines snaked around it. Every time I would lift it, something would move and get snagged. The driveshaft has a center bearing enclosed in a bushing, it holds the driveshaft and creates the elbow for the "2 piece" design. I found the bushing was tilted from factory assembly, probably to lend movement for the panhard. I straightened that out, hopefully reducing any kind of issue with the support bearing now that the watts link supports the axle centered. Here are the final pictures...


I didn't have time to adjust it, so I did that a couple of days later. The back seat shook a bit for those 2 days. When I had time to measure and adjust, it was obvious that it was off due to the axle breather bleeding out some of the gear oil.


I left it with the diff angle at -2.5* ...or... 2.5* below what the transmission flange measured at. I also installed the transmission scoop. It replaced a stock brace that had tiny bolts mounted into huge holes on the subframe. I picked up some M12 bolts to eliminate the slop. I measured the transmission outer casing with my IR therm around 151-162* between city and highway driving prior to the install. Will measure it soon to see what the difference is.


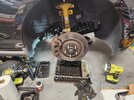
I took a look at the brakes to see WTF is causing that weird shake. I opened up the shims in the front calipers thinking that may have caused binding, and shaved some of the shoulders on the pad backing plates.


I measured the pads and they were all within a 10th or 100th of each other so wear was even. No sign of extreme heat on the pads either. I checked the rotors for warping with a square of aluminum tubing I had and some digital calipers. No warping of the rotors either. So I took them off and found some severe pad imprinting.

I used my most aggressive wire wheel and went to town on the rotors to try to get the material off. No luck, the steering wheel still shook. I've been doing brake jobs on cars for 18 years since I was a stupid teenager just learning how to wrench. I've done brakes on every car that I've ever owned and on several of my friends and families cars, and I have never had pad imprinting like this. I spent this week reading how-to's on mustang sites, and watching videos JUST IN CASE I missed something obvious on this specific application. Reading and watching some of these instructions were painful to say the least. So far all I've learned is that the mustang community is full of even more idiots than I originally thought.
All I can conclude is that the Stop Tech pads I put on were too aggressive for these shitty Autozone rotors. I made the decision to buy these rotors because at the time solid face Centric's and Brembo's were backordered on every site I looked at. I didn't want to wait, given how bad the rear brakes were, so I made the mistake of getting rotors at Autozone. Even if I bring them in and convince the clowns behind the counter that its a warranty, I'm just going to get the same shit quality rotor. So I decided to cut my losses and ordered Centric rotors for all 4 corners and ordered new shims too. Should be in by next weekend.
That's all for now.
Last week I had some time to install the adjustable Upper Control Arm. This was the last stock piece on the rear axle. In the following pictures you can see how the OEM bushing on this arm was not broken but definitely tired.
This adjustable arm lets me control pinion angle by lengthening or shortening the length from the chassis to the top of the diff. This is important because a bad pinion angle can cause severe wear to the driveshaft itself, U-joints, and pinion bearing inside the diff. Here is an old but great video that illustrates why driveshaft angles are important.
Install took me about 3 1/2 hours. It took me a bit longer than it should have because I had to drop the gas tank to get the UCA mounting snout out. I had to bend a lip of the gas tank to get some clearance for the control arm mount, no big deal. The gas tank was a bitch to get back up because of all the EVAP and E-brake lines snaked around it. Every time I would lift it, something would move and get snagged. The driveshaft has a center bearing enclosed in a bushing, it holds the driveshaft and creates the elbow for the "2 piece" design. I found the bushing was tilted from factory assembly, probably to lend movement for the panhard. I straightened that out, hopefully reducing any kind of issue with the support bearing now that the watts link supports the axle centered. Here are the final pictures...
I didn't have time to adjust it, so I did that a couple of days later. The back seat shook a bit for those 2 days. When I had time to measure and adjust, it was obvious that it was off due to the axle breather bleeding out some of the gear oil.
I left it with the diff angle at -2.5* ...or... 2.5* below what the transmission flange measured at. I also installed the transmission scoop. It replaced a stock brace that had tiny bolts mounted into huge holes on the subframe. I picked up some M12 bolts to eliminate the slop. I measured the transmission outer casing with my IR therm around 151-162* between city and highway driving prior to the install. Will measure it soon to see what the difference is.
I took a look at the brakes to see WTF is causing that weird shake. I opened up the shims in the front calipers thinking that may have caused binding, and shaved some of the shoulders on the pad backing plates.
I measured the pads and they were all within a 10th or 100th of each other so wear was even. No sign of extreme heat on the pads either. I checked the rotors for warping with a square of aluminum tubing I had and some digital calipers. No warping of the rotors either. So I took them off and found some severe pad imprinting.
I used my most aggressive wire wheel and went to town on the rotors to try to get the material off. No luck, the steering wheel still shook. I've been doing brake jobs on cars for 18 years since I was a stupid teenager just learning how to wrench. I've done brakes on every car that I've ever owned and on several of my friends and families cars, and I have never had pad imprinting like this. I spent this week reading how-to's on mustang sites, and watching videos JUST IN CASE I missed something obvious on this specific application. Reading and watching some of these instructions were painful to say the least. So far all I've learned is that the mustang community is full of even more idiots than I originally thought.
All I can conclude is that the Stop Tech pads I put on were too aggressive for these shitty Autozone rotors. I made the decision to buy these rotors because at the time solid face Centric's and Brembo's were backordered on every site I looked at. I didn't want to wait, given how bad the rear brakes were, so I made the mistake of getting rotors at Autozone. Even if I bring them in and convince the clowns behind the counter that its a warranty, I'm just going to get the same shit quality rotor. So I decided to cut my losses and ordered Centric rotors for all 4 corners and ordered new shims too. Should be in by next weekend.
That's all for now.
Last edited: