yeet123
Greenie Member
PM’d yaYeah I still have one. I had a few that I was loaning out for free (just shipping) but people are terrible and never return them.
Ive got one left that I can loan out if you want. Hit me up and we can talk.
Follow along with the video below to see how to install our site as a web app on your home screen.
Note: This feature may not be available in some browsers.
PM’d yaYeah I still have one. I had a few that I was loaning out for free (just shipping) but people are terrible and never return them.
Ive got one left that I can loan out if you want. Hit me up and we can talk.


 If inventory is zero on cover, you can do with out the alignment hole boss area being broken. As long as cover has no through crack for oil leakage. The alignment "hole" is nothing but that, no force is necessary to keep alignment correct. The crank bolt is strong enough to withstand the bolt torquing spec. The damper/timing alignment must use the special holder to keep it from moving around while you twist bolt to compress damper against all sprockets and the diamond lock washers. Manual states use a flywheel locking method; done twice that way while on engine stand with both stop bolt and flywheel locked. Twice in car so only crank stop bolt was holding crank. The holder tool also keeps the damper from turning causing the other sprockets from moving timing chain which is why the cam plate is to align cams in sync only. You lock it all as you tighten crank bolt. PIA definitely.
Yeah I thought about just reusing the timing cover but since the crank pulley bolt moved outside the limit of the crank position sensor I was gonna have to undo everything anyways, might as well replace the timing cover and make it pretty (apparently it’s only a week and a half out from shipping so not too bad) And yeah once I get a legit holder tool I’ll probably leave the TDC pin and cam plate in just to ensure everything stays in time.View attachment 22900 View attachment 22901 View attachment 22902 View attachment 22903 If inventory is zero on cover, you can do with out the alignment hole boss area being broken. As long as cover has no through crack for oil leakage. The alignment "hole" is nothing but that, no force is necessary to keep alignment correct. The crank bolt is strong enough to withstand the bolt torquing spec. The damper/timing alignment must use the special holder to keep it from moving around while you twist bolt to compress damper against all sprockets and the diamond lock washers. Manual states use a flywheel locking method; done twice that way while on engine stand with both stop bolt and flywheel locked. Twice in car so only crank stop bolt was holding crank. The holder tool also keeps the damper from turning causing the other sprockets from moving timing chain which is why the cam plate is to align cams in sync only. You lock it all as you tighten crank bolt. PIA definitely.
My method of long lever and my body weight/ ft lbs to rotation angle is around 250 maybe even more. You are going to have to get a angle gauge for your 1/2 or 3/4 breaker bar too.
Good to know for sure, scratch what I said before then. Would you say keeping the TDC pin in during torque is fine or take that out as well? Thanks for the help!!Just a warning, the cam timing locator plate is just for alignment. Instructions warn about torquing (twisting cams) as you tighten cam sprocket bolts. Cams are surface hardened on the lobes and can break from twisting.
I just done my vvt and I put a bolt in the pulley along with the timing pin and plate installed for the first 70ft lbs. Then marked the 90% mark and removed all the timing tools and finishes tightening the crank pulley bolt.Good to know for sure, scratch what I said before then. Would you say keeping the TDC pin in during torque is fine or take that out as well? Thanks for the help!!
No worries lol I appreciate the help man!I just done my vvt and I put a bolt in the pulley along with the timing pin and plate installed for the first 70ft lbs. Then marked the 90% mark and removed all the timing tools and finishes tightening the crank pulley bolt.
I actually made a crank holding tool for doing this and it worked perfectly. Once it was tightened I inserted the timing pin and spun the crank around until it hit the pin. Checked to see if the timing plate would go in and then looked at the crank sensor to see if it was able to be lined up. Hope this helps you out! I would let you borrow my tool I made to hold the crank but it is YUGE so unless you're near me then it wouldn't be worth it probably.


The way I jut did mine is in this order.Alright guys I’m kinda stumped and need some advice.
Round 2 of tightening the crank pulley bolt was still unsuccessful. Somehow the cams moved out of TDC alignment relative to the crank.
Whenever the cams are at TDC the 20th tooth is out of alignment with the CKPS, as seen below:
View attachment 22998
But somehow the crank at TDC lines up with the CKPS no problem:
View attachment 22999
I turned the engine over a couple times and pistons aren’t hitting valves or anything like that but obviously the engine’s out of time so I’ll need to tear everything down again.
I’m just not sure what I did wrong to make the cams somehow move while the crank stayed in place.
I ensured both were at TDC prior to torquing the crank bolt, removed all TDC hardware, then torqued the bolt. I left the M6 bolt in the crank pulley for alignment and it still screwed in afterwards.
My thought process is if both the cams and crank were being torqued down at the same time, if the cams rotated like that then the crank would have rotated the same amount.
Not really sure what caused this and therefore how to ensure it doesn’t happen again, anyone have any ideas?
Yeah the only thing I didn’t do from that procedure was keeping the timing hardware in during the initial 75ft lb, so maybe it was thrown off during that? But I still had my buddy counter holding the crank during so I’m not sure what was up. I’m going to put some ARP ultra torque lube on the bolt next time to see if that reduces how much force it takes to turn it.The way I jut did mine is in this order.
#1 install cams and alignment plate on the end.
#2 Install alignment pin with the crank turned until it hits it.
#3 install vvt stuff (chain, tensioner, cam sprockets but loose still, etc) tightening exhaust cam first and then intake cam as to keep timing chain nice and tight.
#4 Torque cams sprockets with new bolts down to 55ft-lbs. (I keep timing plate installed just make sure you hold cams with a wrench pulling evenly against the torque wrench as cams could break if you don't do it right)
#5 Check that crank is still against the pin, and timing plate is in.
#6 install last friction washer along with timing cover.
#7 Put crank pulley on with new bolt and put small bolt through pulley into the timing cover.
#8 Install crank sensor and align with the 20th tooth.
#9 Tighten crank pulley bolt to initial 75ft-lbs.
#10 Double check that timing tools are all in correct position still.
#11 Remove timing tools and small bolt from crank pulley.
#12 Mark crank bolt on its face at 12 o'clock position and crank pulley next to bolt at 3 oclock position.
#13 With use of a crank pulley holding tool, crank bolt until the mark on the bolt reaches the mark on the pulley or slightly past.
#14 Install timing cam plate and crank pin and check that crank bumps against the pin and that the cam plate will still slide in. (Sometimes takes some wiggling with a wrench on each cam to get it into place.
#15 Keeping in the timed position, ensure that the crank pulley's 20th tooth still lines up to the cps.
#16 drink drink of choice and take a breathe of relief lol
I guess since it's a degree value not a torque value that would be ok. I would still leave the timing tools in otherwise it can throw something offYeah the only thing I didn’t do from that procedure was keeping the timing hardware in during the initial 75ft lb, so maybe it was thrown off during that? But I still had my buddy counter holding the crank during so I’m not sure what was up. I’m going to put some ARP ultra torque lube on the bolt next time to see if that reduces how much force it takes to turn it.


First off, I'm jealous how clean your motor is lol Anyway though, secondly, did you double check all the tdc stuff after final tq? I didn't read or missed it on whether you did that. Glad it is coming together for you man!Alright boys and girls we’re back. Been a little while due to work and life but was able to wrench a little this weekend and made some significant progress.
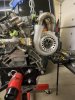
Was able to FINALLY finish timing the engine and tighten the crank pulley bolt down while keeping everything in time (been a month in the making)View attachment 23325
How I did it:
1. Tighten cams down, maintain good tension on chain (keep TDC plate and pin in, just make sure you have a strong counterhold)
2. Once timing cover’s on along with pulley, I lubed the crank bolt with ARP Ultra-Torque lube to help reduce the amount of force needed to get to the 90* mark.
3. Leave timing plate, TDC pin, and tiny M6 pulley alignment bolt in for the first 75ft lbs (counter hold crank pulley to keep from shearing timing cover hole)
4. I then took all TDC tools out and turned the engine over a couple times to make sure everything was still in time/bound together. I then rotated the crank pulley around to where the holder tool would rest against the ground (and jack stand in this case) optimally.
5. Tighten the crank bolt the next 90*, just make sure to listen/look for any wack shit going on either with the holder tool, crank pulley, etc.
I found that having someone else counter hold the pulley wasn’t working too well so I took that variable out and just used a heavy ass car lol. I think it’s just hard to match the amount of force both people are exerting so things slip/move.
I will say I am VERY glad I can finally move on lol, got the valve cover and water pump on. Now onto the rest!!
View attachment 23326

Yep! After torquing I spun it around two complete rotations, put the TDC pin & cam plate in, and made sure the 20th tooth still lined up with the CKPS (along with good tension on the chain). Everything checked out that time and then I checked it all over once more just to be safe and everything still looked good so I’m gonna send it lolFirst off, I'm jealous how clean your motor is lol Anyway though, secondly, did you double check all the tdc stuff after final tq? I didn't read or missed it on whether you did that. Glad it is coming together for you man!
That's awesome man good luck with it!Yep! After torquing I spun it around two complete rotations, put the TDC pin & cam plate in, and made sure the 20th tooth still lined up with the CKPS (along with good tension on the chain). Everything checked out that time and then I checked it all over once more just to be safe and everything still looked good so I’m gonna send it lol