Lex2007
Greenie Member
Ok ya worthless maggots, here are some instructions. Feel free to add your thoughts.
-You do not need a hydraulic press but it's preferable to a hammer.
-You cannot install the the shaft into the new bearing and carrier on a hydraulic press without using a section of pipe or something to raise it farther off the base of the press. That's because the bearing carrier gets in the way of the unit sitting upright on a typical press. A section of pipe or a tall cup from a screw type bearing press could work. Or you can use the UBANGY method.
-For the UBANGY method you will need a brass hammer, heavy plastic hammer or brass punch to get the shaft into the carrier with the new bearing installed without damaging the splines. And even then you risk damaging the splines on the end of the shaft, so be careful. Have someone to help hold while you hit it with the brass hammer and preferably a brass punch to center your blows..
-Also, you will definitely need to soak 2 bolts holding the carrier to the catalytic converter in Liquid Wrench and will likely need MAPP gas (Home Depot yellow canister) if you car has a lot miles and any time on salty roads because the 2 bolts holding the catalytic converter to the bearing carrier will be rusted to shit. Fire is your friend. I broke one and had to drill and tap it. Took quite a while. Soak those bolts before hand for a day, then rinse the penetrant off (so it doesn't catch fire) and heat them to red hot,then spray with water to cool them fast. Always have a garden hose or fire extinguisher on hand.
-Now is a great time to change the axle seal into the transaxle.
-Now is a great time change sway bar bushings as you will have a ton more space on passenger side.
This is my sloppy bearing after 160k miles, compared to a new bearing.
https://youtube.com/shorts/IP6OXWzxQF4?feature=share
4 parts needed:

If you want to (CHANGE IT WHILE YOU HAVE ALL THIS CRAP APART) change the passenger side input seal, or the differential seal, as it's sometimes called, on the transaxle, it's part: A602-27-238


Removal Steps:

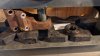
These are the rusted bolts. You can see one here. I have impact tools. One came out but is too damaged to reuse. The other broke and I had to drill and tap. Luckily there is space to do so in this case. Replace the bolts.


Now remove the 3 bolts holding the bearing carrier for the intermediate shaft to the engine block. Those will not be rusted on because the block is aluminum.
Here is how I accessed the bolt between the cat and the block. Crack it loose with fixed wrench and then use a small wrench to get it out.


The other 2 are easy to get to (circled in yellow and orange).
There is a wiring harness (circled red) attached.

I'm using a clip removal tool to take the harness clip out. You can use a screwdriver. Lube it first with WD40 so as not to break the long fuzzy part that goes into the hole.

Three bolts from engine block that hold the bearing carrier (all the same size), and the 2 rusted bolts from bracket attached to catalytic converter:

Now remove the serpentine belt tensioner. Take tension off the belt, remove the belt and then take the tensioner off (2 bolts). You need to do this to be able to pull the intermediate shaft out of the trans...ya maggot!


Now pull the intermediate shaft and the carrier with the bearing straight out. Careful not to damage the seal in the trans.
Zero oil will come out.
Here are some pics of the unit out of the car for reference.


Now comes the fun part:
Take this bracket off:

Now time to push the shaft out of the carrier and bearing.
I used a press but you can pound it out with a heavy plastic hammer or brass hammer in a vice or regular hammer with wood under it or using a brass punch. Do not damage the splines!

Here is the section inside the carrier after it pushes out.

Here is the bearing still 1/2 in the carrier and the rubber seal and the metal shield which was pushed out...

Here you can see the metal shield:

Now you can push the old bearing out with the press or use a punch to push it out.
See my old nasty bearing? It's in bad shape.
Just one dust seal left to remove with a screw driver or whatever. Use your little dick if you want. What do I care.

Just tap the new dust seal in with a rubber mallet gently. Put a little grease on the metal lip of the seal to help it slide on.
Note, it has a small metal spring under the lip of the seal...make sure it doesn't pop loose in the subsequent steps. I had to pull it back in place many times from banging the shaft in place.

Pressing in the new bearing. Both sides of my old and new bearing are the same so it doesn't matter which side you face inwards.


As you can see it cannot face up properly in the generic press. The press is too narrow. There is not enough space.
Maybe I could have used some bricks to build the base higher and make room or maybe one of the cups from the hand press I have, assuming they are tall enough, which I think they are not, but I didnt think to try it in the moment. I like hammers.

You need to use a cup press, like the Powerbuilt pictured below, or just use something just slightly lesser diameter than the new bearing to apply force across the entire bearing face in order not to damage it while you tap it in gently and evenly into the bearing carrier.

In my case I could push the bearing in with my fingers...something was wrong. I measured the old and new bearing and they were the same dimension in every way so clearly the old bearing had started to spin inside the carrier and damaged the carrier surface. So I had to use bearing glue. I let it sit for 2 hours to cure.


After the bearing is in place...bottomed out....it's time to install the the dust seal and metal shield:


Put a little grease on the metal shield and tap it on until its fully seated:


Now you need to push the intermediate shaft into the new bearing's center. I added a little bearing glue just in case.

Since the carrier wont sit up straight in my Harbor Freight press, I sat the carrier on the edge of a vice and used a BRASS hammer to smack the shaft into the bearing which we already installed in the carrier.
Even with a brass hammer you can still mangle the splines a little and it only take one spline to be a little malformed to make getting the axle back into the trans very difficult, so use something soft between the axle and the brass hammer. Or use a brass punch to hit only the center of the axle.

If you do damage the splines you'll need to file the ends and get them perfect so it will enter the trans. It happened to me. It can be remedied but its a huge waste of time filing the end of those splines, cleaning the metal filings and trying over and over to get it to slide in.
Tap the shaft in a little first and make sure it's going in straight. HAVE SOMEONE HELP YOU STEADY THE ASSEMBLY to avoid hitting the splines. Smack it into place until its seated. Its hard to tell when your done when using the UBANGY method which is why I suggested above that you measure the end of the axle protruding from the carrier so you know when you've succeeded.

Now you're done installing the new bearing, ya freak!


If you plan to install a new differential oil seal, use a 2 inch PVC pipe to tap the new seal into place.

This style seal puller works great. Oil will pour out when you remove the old seal.

Install this bracket on the carrier after the intermediate shaft is installed back in the trans so that you have space for a torque wrench on the 3 long bolts holding the carrier to the engine block:

Getting the CV axle back onto the intermediate shaft:
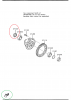
Getting the CV axle back onto the intermediate shaft is a pain because you have to get past the c-clip. Make sure and grease the splines and turn the clip with the gap facing up (as per Mazda's attached instructions). I reused the old c-clip. No need to change it.
You need to smack the axle with a real heavy plastic hammer. It's easier if you can have a friend hold the end of the CV joint against the end of the intermediate shaft while you smack it in. Otherwise it just flops around on ya. Have your boyfriend hold it in place while you both push the axle inwards all the way and then smack the outter end. I did it alone so its possible but frustrating.
If that doesn't work, you'll need to release/break the clamp holding the inner CV joint boot with a screwdriver (lift up the first tab), then push the boot over a little and hit the edge of the cup without damaging the boot. This system wont let me upload another pic of this so see reply below with pic.
Then you need to put a new clamp on the boot which is easy to do from underneath the car. You'll lose a little grease in the process but not enough to worry about.
Here is the clamp tool and some typical clamps:
Amazon product ASIN B08NX3PB4V
Here are the torque specs for putting everything back together.


Axle/spindle nut tightening torque 235.2 - 274.4 N-m (23.99 - 27.98 kgf-cm, 173.5 - 202.3 ft-lbf)
See 2 PDFs from ALLDATA with MAZDA's crappy instructions.
Now go fuck yourselves, you half-conscious, bipedal primates. ??
-You do not need a hydraulic press but it's preferable to a hammer.
-You cannot install the the shaft into the new bearing and carrier on a hydraulic press without using a section of pipe or something to raise it farther off the base of the press. That's because the bearing carrier gets in the way of the unit sitting upright on a typical press. A section of pipe or a tall cup from a screw type bearing press could work. Or you can use the UBANGY method.
-For the UBANGY method you will need a brass hammer, heavy plastic hammer or brass punch to get the shaft into the carrier with the new bearing installed without damaging the splines. And even then you risk damaging the splines on the end of the shaft, so be careful. Have someone to help hold while you hit it with the brass hammer and preferably a brass punch to center your blows..
-Also, you will definitely need to soak 2 bolts holding the carrier to the catalytic converter in Liquid Wrench and will likely need MAPP gas (Home Depot yellow canister) if you car has a lot miles and any time on salty roads because the 2 bolts holding the catalytic converter to the bearing carrier will be rusted to shit. Fire is your friend. I broke one and had to drill and tap it. Took quite a while. Soak those bolts before hand for a day, then rinse the penetrant off (so it doesn't catch fire) and heat them to red hot,then spray with water to cool them fast. Always have a garden hose or fire extinguisher on hand.
-Now is a great time to change the axle seal into the transaxle.
-Now is a great time change sway bar bushings as you will have a ton more space on passenger side.
This is my sloppy bearing after 160k miles, compared to a new bearing.
https://youtube.com/shorts/IP6OXWzxQF4?feature=share
4 parts needed:
If you want to (CHANGE IT WHILE YOU HAVE ALL THIS CRAP APART) change the passenger side input seal, or the differential seal, as it's sometimes called, on the transaxle, it's part: A602-27-238
Removal Steps:
- Unplug wheel speed sensor.
- Take off the brake caliper and rotor and hang the caliper with mechanic's wire or whatever to the suspension spring.
- Protect the brake line from stretching!
- Remove axle nut, (lower)
- Remove the ball joint bolt and nut
- Remove the pinch bolt for strut.
- Smack the hub down with hammer to get it off the strut.
- Remove the strut from the strut tower. Its only 3 bolts on the strut tower and it gives you more room to see and work.
These are the rusted bolts. You can see one here. I have impact tools. One came out but is too damaged to reuse. The other broke and I had to drill and tap. Luckily there is space to do so in this case. Replace the bolts.
Now remove the 3 bolts holding the bearing carrier for the intermediate shaft to the engine block. Those will not be rusted on because the block is aluminum.
Here is how I accessed the bolt between the cat and the block. Crack it loose with fixed wrench and then use a small wrench to get it out.
The other 2 are easy to get to (circled in yellow and orange).
There is a wiring harness (circled red) attached.
I'm using a clip removal tool to take the harness clip out. You can use a screwdriver. Lube it first with WD40 so as not to break the long fuzzy part that goes into the hole.
Three bolts from engine block that hold the bearing carrier (all the same size), and the 2 rusted bolts from bracket attached to catalytic converter:
Now remove the serpentine belt tensioner. Take tension off the belt, remove the belt and then take the tensioner off (2 bolts). You need to do this to be able to pull the intermediate shaft out of the trans...ya maggot!
Now pull the intermediate shaft and the carrier with the bearing straight out. Careful not to damage the seal in the trans.
Zero oil will come out.
Here are some pics of the unit out of the car for reference.
Now comes the fun part:
Take this bracket off:
Now time to push the shaft out of the carrier and bearing.
I used a press but you can pound it out with a heavy plastic hammer or brass hammer in a vice or regular hammer with wood under it or using a brass punch. Do not damage the splines!
Here is the section inside the carrier after it pushes out.
Here is the bearing still 1/2 in the carrier and the rubber seal and the metal shield which was pushed out...
Here you can see the metal shield:
Now you can push the old bearing out with the press or use a punch to push it out.
See my old nasty bearing? It's in bad shape.
Just one dust seal left to remove with a screw driver or whatever. Use your little dick if you want. What do I care.
Just tap the new dust seal in with a rubber mallet gently. Put a little grease on the metal lip of the seal to help it slide on.
Note, it has a small metal spring under the lip of the seal...make sure it doesn't pop loose in the subsequent steps. I had to pull it back in place many times from banging the shaft in place.
Pressing in the new bearing. Both sides of my old and new bearing are the same so it doesn't matter which side you face inwards.
As you can see it cannot face up properly in the generic press. The press is too narrow. There is not enough space.
Maybe I could have used some bricks to build the base higher and make room or maybe one of the cups from the hand press I have, assuming they are tall enough, which I think they are not, but I didnt think to try it in the moment. I like hammers
.You need to use a cup press, like the Powerbuilt pictured below, or just use something just slightly lesser diameter than the new bearing to apply force across the entire bearing face in order not to damage it while you tap it in gently and evenly into the bearing carrier.
In my case I could push the bearing in with my fingers...something was wrong. I measured the old and new bearing and they were the same dimension in every way so clearly the old bearing had started to spin inside the carrier and damaged the carrier surface. So I had to use bearing glue. I let it sit for 2 hours to cure.
After the bearing is in place...bottomed out....it's time to install the the dust seal and metal shield:
Put a little grease on the metal shield and tap it on until its fully seated:
Now you need to push the intermediate shaft into the new bearing's center. I added a little bearing glue just in case.
Since the carrier wont sit up straight in my Harbor Freight press, I sat the carrier on the edge of a vice and used a BRASS hammer to smack the shaft into the bearing which we already installed in the carrier.
Even with a brass hammer you can still mangle the splines a little and it only take one spline to be a little malformed to make getting the axle back into the trans very difficult, so use something soft between the axle and the brass hammer. Or use a brass punch to hit only the center of the axle.
If you do damage the splines you'll need to file the ends and get them perfect so it will enter the trans. It happened to me. It can be remedied but its a huge waste of time filing the end of those splines, cleaning the metal filings and trying over and over to get it to slide in.
Tap the shaft in a little first and make sure it's going in straight. HAVE SOMEONE HELP YOU STEADY THE ASSEMBLY to avoid hitting the splines. Smack it into place until its seated. Its hard to tell when your done when using the UBANGY method which is why I suggested above that you measure the end of the axle protruding from the carrier so you know when you've succeeded.
Now you're done installing the new bearing, ya freak!
If you plan to install a new differential oil seal, use a 2 inch PVC pipe to tap the new seal into place.
This style seal puller works great. Oil will pour out when you remove the old seal.
Install this bracket on the carrier after the intermediate shaft is installed back in the trans so that you have space for a torque wrench on the 3 long bolts holding the carrier to the engine block:
Getting the CV axle back onto the intermediate shaft:
Getting the CV axle back onto the intermediate shaft is a pain because you have to get past the c-clip. Make sure and grease the splines and turn the clip with the gap facing up (as per Mazda's attached instructions). I reused the old c-clip. No need to change it.
You need to smack the axle with a real heavy plastic hammer. It's easier if you can have a friend hold the end of the CV joint against the end of the intermediate shaft while you smack it in. Otherwise it just flops around on ya. Have your boyfriend hold it in place while you both push the axle inwards all the way and then smack the outter end. I did it alone so its possible but frustrating.
If that doesn't work, you'll need to release/break the clamp holding the inner CV joint boot with a screwdriver (lift up the first tab), then push the boot over a little and hit the edge of the cup without damaging the boot. This system wont let me upload another pic of this so see reply below with pic.
Then you need to put a new clamp on the boot which is easy to do from underneath the car. You'll lose a little grease in the process but not enough to worry about.
Here is the clamp tool and some typical clamps:
Amazon product ASIN B08NX3PB4V
Here are the torque specs for putting everything back together.
Axle/spindle nut tightening torque 235.2 - 274.4 N-m (23.99 - 27.98 kgf-cm, 173.5 - 202.3 ft-lbf)
See 2 PDFs from ALLDATA with MAZDA's crappy instructions.
Now go fuck yourselves, you half-conscious, bipedal primates. ??
Attachments
-
 PXL_20230108_152650739.jpg1.2 MB · Views: 23
 -
Joint Shaft Removal_Installation L3, L3 With TC (Axle Shaft Assembly) - ALLDATA Repair.pdf256.7 KB · Views: 13
-
Joint Shaft Disassembly_Assembly (Axle Shaft Assembly) - ALLDATA Repair.pdf241.7 KB · Views: 12
-
 upload_2023-1-14_9-59-53.png58.7 KB · Views: 23
 -
 upload_2023-1-14_10-0-45.jpeg1.2 MB · Views: 26
Last edited:


.png")
")