Neganox's Cats Can't Drive Build.

Thats awful decent of youto buy one. I am proud of you for being a man.
I (along with many others) am ready for the next HTP tank run. I'm on the list, even though they have no official plans. Hopefully enough of us can come together and express committed interest for them to do another run/group-buy. Moniez in hand already...
 
I (along with many others) am ready for the next HTP tank run. I'm on the list, even though they have no official plans. Hopefully enough of us can come together and express committed interest for them to do another run/group-buy. Moniez in hand already...

Provided people don't give Matt shit this time. Dude had a tree fall on him last time and people were still bitching.
 
Provided people don't give Matt shit this time. Dude had a tree fall on him last time and people were still bitching.
That's so dumb.... Matt and Katie are awesome supporters of our platform, and they're also just fellow human beings who should be treated with respect. They do awesome work and I'd hate to think the "attitude" that's notorious on the other forum was used to attack them. Those who did so should be ashamed of themselves. Matt's well-being >>>>> us having fun car parts.
 
Installed the HTP under route piping. Since I have a S3, I opted for the 2" to 2.5" reducer. Oops. A 2.25" to 2.5" reducer would've been ideal. Also I found that if I tightened down the reducer on to the piping and then push it up onto the turbo, it allowed the long neck of the turbo outlet to push down into the piping a bit, making the fit of the entire kit spot on. All tightened down I had about an inch of clearance around everything.

Other tips for installing this kit:
- Don't try to pull off the compressor side of the housing, rotate it, and stick it back on. Just be a man and pull the whole thing, adjust, and reinstall.
- You'll have to bend the coolant lines around a bit and probably extend the bottom coolant line. Use a line that has some heat resistance to it since that shit is right next to the downpipe.
- Have extra C-clips and don't fiddle with the wastegate arm.
 
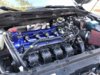
Did the DM FoST manifold swap this weekend. Took a little bit of time since I nearly cross-threaded a bolt into my head. Luckily the local hardware store had an appropriate tap to clean up the threads. I also had to shave down the FoST manifold a tad bit to nudge it to the passenger side. Not a bad install. Idle STFT and LTFT both sit at around 0 now. Treadstone piping can eat a giant AIDS dick.

Tips:
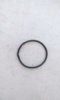
- Assemble the vacuum block while the manifold is not installed. I pointed the two smaller fittings downward and the larger fitting towards the 1 o'clock position. Mind the O-ring; that little fucker caused a massive vacuum leak and a slight case of panic. Luckily DM includes an extra.
- The throttle body can be fed up from under the car because the wiring can be a major pain in the butt if you install it to the manifold and then try to fit it downward.
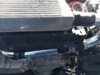
- On the gen2 I got away with using a 1 ft 180* bend, 1ft straight, 1ft, 45* bend, a couple of bump couplers, a silicone 1" T in bpv adapter, and a triple bung to assemble a cold pipe. You can get everything from siliconeintakes. Thanks to @Faeker for the pic in his for sale thread. I had to shave down the corner of the radiator support with a dremel to prevent some rubbing.
- The dipstick is a pain in the ass. You'll likely have to bend the attached bracket and the pipe itself to make it fit. You will not be reusing the big ass stupid bracket that holds a bunch of wiring.
- Matt said that you can pop off the cage around the MAP sensor to make it fit straight on. I used the bolt holding it in to feed the sensor into the manifold. Either method will allow for a seal.

Update here: https://mazdaspeeds.org/index.php?threads/neganoxs-cats-cant-drive-build.572/page-3#post-38396
 

Attachments

  • IMG_20170226_163230.jpg
    IMG_20170226_163230.jpg
    2.3 MB · Views: 45
  • 16990786_10212289630774640_1850073372_o.jpg
    16990786_10212289630774640_1850073372_o.jpg
    317.7 KB · Views: 44
  • 16990518_10212290879285852_1666257146_o.jpg
    16990518_10212290879285852_1666257146_o.jpg
    62 KB · Views: 43
Last edited:
This thread needs moar pics! :D
Thanks for the info. Visual aids are much appreciated if you have more, though...
 
Any specifics you want to see pictures of? I have an oil change coming up soon so I'll be under there again.
 
Any specifics you want to see pictures of? I have an oil change coming up soon so I'll be under there again.
Just some of the tricky stuff you described. And what's up with the MAP? Did you start with a universal CX aluminum piping kit? Parts list, coupler sizes/any reducer couplers/sizes needed, etc. Stuff like that would be really helpful. For instance, here's a great way to make cheap/excellent bead-rolling pliers for when you've cut your piping to size:
Template public:_media_site_embed_youtube not found. Try rebuilding or reinstalling the s9e/MediaSites add-on.
 
Gotcha. You'll see that the MAP sensor fits, but the hole that keep bolt to keep it secure is slightly misaligned. I angled the bolt and let it pull the MAP sensor into it's hole. The hole the bolt goes into doesn't appear to be threaded so I assume the bolt cuts the threads as it goes in.

The couplers are 2.5" bump couplers - http://www.siliconeintakes.com/hump-hose/turbo-coupler-p-15.html
You'll need as 2.75 to 2.5 reducer for the throttle body - http://www.siliconeintakes.com/intake-pipe-reducer/tube-reducer-p-59.html
I will be trying a 45* coupler from the intercooler to the 180* pipe to give the piping a little more room on that hard radiator support edge. - http://www.siliconeintakes.com/turbocharger-part/silicone-45-p-24.html
The BPV T coupler - http://www.siliconeintakes.com/bov/silicone-bov-t-p-455.html

You can also source all the aluminium sections from siliconeintakes as well.
 
I love siliconeintakes.com. Got a lot of stuff from them already. They have cool joiners and clamps, too. They also have some nice universal kits for making your own piping.
 
Yeah I had the full treadstone kit. Their piping deformed from me tightening clamps.
 
Also while I had the manifold off.. the valves looked not so good. I foresee a cleaning in the future.
 
My IC piping runs under the oil filter. It looks like you were able to run it in front of the filter... anything special to do that or is it the bump couplers that gave you the extra play to bend around the filter??
 
Extra play with the bump couplers. They'll allow for 20* bends. I also used a 90* aluminum pipe from the throttle body not a silicone one. I'll post pics when I do my oil change.
 
Back
Top