Giles' Mystery High RPM High KR

quick side note.. how long does it take you to get the manifold off? when i did it.. i didn't use any hand tools, and im pretty green.. it took like the 2 (half days).. with a few bolts left over lol..

I bet the whole job can be done in under 3 hours..

how long did it take you?
 
If you know the proper order of things and have a GenPu, it probably takes like 1-1.5h. GenWons are a little worse as you have to deal with the PS pump and belt.
 
If you know the proper order of things and have a GenPu, it probably takes like 1-1.5h. GenWons are a little worse as you have to deal with the PS pump and belt.

The hardest part for me was the nut thing on the egr pipe.. i never got it off, i actually removed the manifold with it connected..

also, finding the bolts on the hpfp rail.. those things are hidden..


once you know everything, and where it is, it makes it much easier
 
quick side note.. how long does it take you to get the manifold off? when i did it.. i didn't use any hand tools, and im pretty green.. it took like the 2 (half days).. with a few bolts left over lol..

I bet the whole job can be done in under 3 hours..

how long did it take you?
I'm not kidding when I say I've got it down to like 15 minutes on my setup. It's 7 10mm bolts, two screws, one hose clamp, and a bunch of connectors. I have a focus ST intake mani using the Damond adapter which simplifies it a lot. Gen2 as well so no PS pump.

0. get under car
1. loosen the hose clamp joining the TB to the IC piping, undo TB connector
2. undo two 10mm holding the vacuum block on (so much nicer than yanking those 3 vac hoses off each time)
3. unscrew meth solenoid and unhook meth line
4. undo five 10mm holding manifold to head
5. unclip PCV quick disconnect, unclip MAP sensor
6. yank manifold, leave dipstick tube attached
 
The hardest part for me was the nut thing on the egr pipe.. i never got it off, i actually removed the manifold with it connected..

also, finding the bolts on the hpfp rail.. those things are hidden..


once you know everything, and where it is, it makes it much easier

That's because you need to use the special EGR tube disassembly tool
zXUiBmn.jpeg
 
@gv_racing you do have it down to a science... Here im trying to remove the intake and stuff to get to the bolts by the egr, and the hpfp line..

by the time im fishing around with the bolts by the dipstick, your already watching tv inside with it finished long ago..

Ps, putting some of those bolts on is unnecessarily hard lol
 
So, it turns out I didn't know how to do a leak down test properly. I was following the instructions for good leak down testers that have an orifice between the two guages, on a cheap leak down tester that does not. Got the following results, and repeated the test a few times to ensure I wasn't feeding myself bad data

Pistons 1, 2, 3 - between 6 and 10 percent leakage
mdI6euQ.jpeg

Piston 4 - between 15 and 18 percent leakage
GCUPeVQ.jpeg


I took my valve cover => TIP tube off and felt the airflow coming from the crank case - definitely more airflow with piston 4 versus any of the other three.

I then sent a bore scope down piston #4, and thankfully did not see any carnage. Some light vertical marks, but I don't think these are cause for concern. Maybe they are, idk, tell me what you think

6oVkUDN.jpeg


So I'm now debating on taking the head off the engine and removing at least piston #4 to inspect its rings. My machine shop gapped and installed the rings on the pistons - maybe they gapped this one huge, maybe a ring is on upside down, maybe one is broken, who knows until I take it apart.

Would it be ill advised to disassemble my motor over this? Would 2x the leakage on 1/4 cylinders actually realistically cause high RPM KR readings like this?
 
Did you ever buy some ethanol or menthol ? When I had KR and some of your same symptoms. No e85 anywhere, I bought some methanol from a local speed shop. No cheap @ 60$ but after running 30% and still KR. Needed to rebuild engine. One cylinder had bad ring sealing. So Rods, pistons, overbore, bearings, deck both block and head. Essentially complete rebuild. Because I knew after the additional alcohol it was necessary.IMG_20250806_180026.jpg
 
Lots has happened with this project so I feel like I should give an update. Things are moving back in a positive direction, thanks to blood sweat and tears.


I took the head off the engine, with the engine still in the car. Made the following changes when I had it apart:

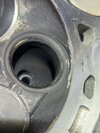
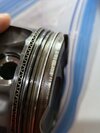
- Knocked down high spots with some 800 grit on some unfortunate scuffing that happened on cylinder 2, the one that had a clogged injector and ran lean early on
- New rings on cylinder 2, they saw some minor accelerated wear from the above issue, despite fine leakdown numbers. We're crossing our fingers boys, otherwise fully fixing this calls for starting all over again. I know this is not ideal but we're in damage control mode at this point
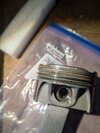
- New rings on cylinder 4, the piston with the bad leak down numbers. The original rings all looked fine, including their gap, but I threw new rings at it regardless since something clearly wasn't right. I did notice that one of the top two rings was EVER SO SLIGHTLY not flat, possibly from my machine shop bending it while installing it. That's my best guess as to why it wasn't sealing properly and I was seeing a ton of oil in my pcv line.
- +10 thou cometic head gasket to compensate for the material removed during head/block decking. My theory was that the CR may have been increased too high (I had 190PSI of comp on some cylinders which is almost unheard of high) causing our shitty 91 octane fuel to predetonate even easier
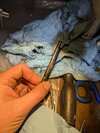
- I fired my machine shop and lapped all of the valves myself. They did a dogshit job that resulted in almost every valve not making 360 degree contact. I reached out to them about this. They got me to ship it over to inspect it. They did some type of vacuum test on it, said there was nothing wrong with it since it "held" 30psi of vacuum, decked it again for some reason (apparently they saw some knick I was unaware of), put it through the parts washer, and sent it back. Since the head did not have assembly lube or oil anywhere, this washing filled the head's nooks and crannies with water. This rusted my valves into their guides so badly I had to beat them with the end of a screwdriver to get them out. Good thing I planned on going over them for lapping (since I did not trust their diagnosis that it was fine) anyway. I ripped them a new one over the phone and will never be back. :)

cfc91cfe-d486-4a32-94f3-1651ce43c5ab.jpeg

After re-assembly, we basically went from 2-3+ kr on every pull to ~1.6 - ~1.8 kr. Noticeable and repeatable improvement, where Will D went from saying "you have a huge issue you gotta fix" to "I can't go any further with this tune but it's stable". This was good enough for us to move on to introducing my methanol kit.

First, I tried running methanol that I have had sitting in a container for over a year. It didn't even affect the AFR it was so stale! Picked up some fresh stuff, got another two revisions done with Will, now running 24psi, and hit a ~1.8 KR wall yet again. My favourite.

Chatted with Will about options, and we decided to try a 1500cc/min spray up from 1000cc/min. I set the car up for 1500cc/min, did a pull, and the AFR was IDENTICAL to before. What? Did I put the same pintle back in by mistake? How is it behaving identical to before?

Then I removed one of my nozzles and tested it inside a bottle. Holy shit, it's shooting more meth back out of the push fitting than is coming out the nozzle! That explains it, and I am lucky I never had an engine bay fire with this happening.

The tubing was installed fully. The tubing is cut perfectly square and it not deformed in any way. I tested this nozzle with brand new tubing from my stash, fully properly inserted, and it leaked like a sieve.

It seems to me like the O ring inside the push fitting has expanded and is no longer making reliable contact with the OD of the tubing. Since stupid problem call for stupid solutions, I did the right thing and shoved the stem of a valve inside the end of the tubing to increase its size where it meets up with said O ring. It's now a huge pain to install and remove, but it's sealing perfectly now. Will this fix last? I dunno man, probably. Fuck push fittings.

I switched the car back to its original 1000cc/min nozzle set up now that all the fuel is actually entering the engine, and the car is now running super rich in the early RPMs which Will is currently adjusting for. Now that that's fixed, we are now well under one degree of KR at 24PSI. We're so back. With the car running this well, I am hopeful that we can now get to the end of the tuning process without any further hair loss. We just need another two or three PSI worth of tune revisions and then it's drag strip time in the spring :partypooper:

Massive shoutout to Will D for putting up with me and my car through all of this, we are about to reach a full year that this tune has been in progress and it has not been easy.
 

Attachments

  • 8ed2797b-13b5-4356-9c5a-6b60125b5c21.jpeg
    8ed2797b-13b5-4356-9c5a-6b60125b5c21.jpeg
    179.8 KB · Views: 2
  • 5f1ac01d-4843-4066-ac51-6a0e4ca06c83.jpeg
    5f1ac01d-4843-4066-ac51-6a0e4ca06c83.jpeg
    223.6 KB · Views: 2
  • c8d6f3de-37e6-4df2-bd4c-288f0ef5308d.jpeg
    c8d6f3de-37e6-4df2-bd4c-288f0ef5308d.jpeg
    154.3 KB · Views: 2
  • 35958452-fd20-4d6a-a52c-8360f339e813.jpeg
    35958452-fd20-4d6a-a52c-8360f339e813.jpeg
    190.4 KB · Views: 2
  • 7f7b3dcc-c584-4ae7-94d6-4c99f544b8d8.jpeg
    7f7b3dcc-c584-4ae7-94d6-4c99f544b8d8.jpeg
    168.3 KB · Views: 2
  • 266535a3-5f96-4818-98ca-53c43cb8e3d8.jpeg
    266535a3-5f96-4818-98ca-53c43cb8e3d8.jpeg
    119.6 KB · Views: 2
  • f25d9a1e-544e-46c2-b7ee-fc344d27c994.jpeg
    f25d9a1e-544e-46c2-b7ee-fc344d27c994.jpeg
    129.9 KB · Views: 2
  • a64c21a4-5b20-4178-8b90-a2151243e4cc.jpeg
    a64c21a4-5b20-4178-8b90-a2151243e4cc.jpeg
    308.2 KB · Views: 2
Back
Top