Got rust, need advice

D106

Greenie N00B Member
Not sure if this is the right place to post this but...

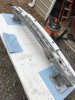
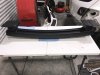
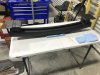
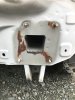
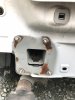
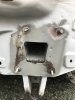
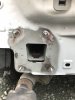
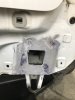
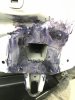
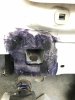
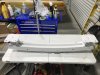
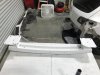
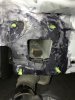
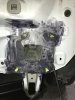
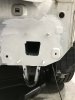
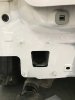
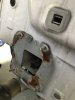
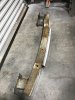
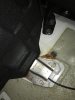
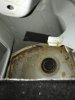
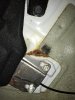
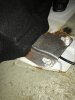
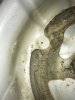
I recently purchased an 09 MS3, for some reason it had a receiver hitch bolted to the bumper. In order to remove the hitch I had to pull the rear bumper cover. Throughout the process I noticed some rust here and there. Such as; the bumper itself, the floor of the inside of the trunk area, the body of the car where the bumper bolts to it, the seam where the hatch weather seal is installed.

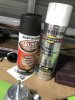
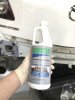
the bumper itself I’ll probably take to my local powder coater and have them sand blast it for me. I don’t know what i should do about the rest of the rust. I despise rust so this is bothering me more than it probably should. I’ve heard of the rust specific paint ‘POR15’ but I’ve never used it.

Any and all advice on how to fix this will be greatly appreciated

Thanks!
 

Attachments

  • CC4424ED-8D8B-43A0-9425-68B074A3F22E.jpeg
    CC4424ED-8D8B-43A0-9425-68B074A3F22E.jpeg
    1.1 MB · Views: 26
  • 46289A2C-2FC8-4C57-B595-E03984010ACB.jpeg
    46289A2C-2FC8-4C57-B595-E03984010ACB.jpeg
    1.5 MB · Views: 23
  • 30AE33D1-1197-4A28-B382-37F8D9DAFF12.jpeg
    30AE33D1-1197-4A28-B382-37F8D9DAFF12.jpeg
    2.3 MB · Views: 21
  • 75507545-A76B-45EF-A861-8CC997C6FBB1.jpeg
    75507545-A76B-45EF-A861-8CC997C6FBB1.jpeg
    1.2 MB · Views: 21
  • B3342690-872E-48D3-8F82-6E45E7469519.jpeg
    B3342690-872E-48D3-8F82-6E45E7469519.jpeg
    3.1 MB · Views: 20
  • E3A429B2-A8E7-4B3E-9077-9ED1B6A681A2.jpeg
    E3A429B2-A8E7-4B3E-9077-9ED1B6A681A2.jpeg
    2.8 MB · Views: 21
  • 147EE7EA-D81C-4942-90B6-52CB1675E17D.jpeg
    147EE7EA-D81C-4942-90B6-52CB1675E17D.jpeg
    2.3 MB · Views: 21
  • 4C907F7D-A1B4-4ED0-A0D8-0EDA928542BF.jpeg
    4C907F7D-A1B4-4ED0-A0D8-0EDA928542BF.jpeg
    1.1 MB · Views: 20
Last edited:
I also despise rust as well, but I live in Canada where we salt the roads continuously throughout the winter. My Gen 2 has started a rust problem as well.

Personally, i may not bother with the bumper since it's a replaceable part. You may want to check a local junkyard to see if they have one as it'll most likely be the same part as any 3 of that generation. Alternatively, you could use an angle or die grinder to sand it down to bare metal, degrease, metal etch and apply POR-15.

This really applies to any of the affected areas. Sandblasting paint and rust is the best way to get rid of it...but sandblasting is extremely messy. Not sure your shop would be willing to sandblast the trunk area for you.

But once the rust and paint are removed down to bare metal, the process for POR-15 is as follows:

1) Degrease the metal (using their product)
2) Apply metal prep to etch the smooth metal (extremely important step)
3) Apply two coats of POR-15 with a foam brush. It self levels.
4) Apply seam sealer at all body seams that it was removed from

Optional steps:

Go to an autobody supply shop and purchase a compatible primer and have them mix a rattle can to match you factory colour.

These spots are not visible so i would not worry 2 minutes about blending or even a nice smooth finish, haha.

I’ve read that if POR15 is not prepared EXACTLY as it should be, then it will peel. I’ve been reading about a product called Corroseal. I’m thinking about sanding/ wire brushing most if not all of the rust down, then cleaning with isopropyl alcohol, then I will apply corroseal to the areas (to “convert” any left over rust), then I will cover that with white rustoleum enamel paint.
Link to paint: https://www.lowes.com/pd/Rust-Oleum-128-fl-oz-Interior-Exterior-Gloss-White-Paint/3067159

Link to corroseal: https://corroseal.com/

I live in the southeast (north Carolina). I’ve been screwed on rusty cars before. I ran the carfax before l bought this one, it was purchased in Tennessee then it moved to Texas for several years. I didn’t think rust would be a problem with this one, but here we are
 
I'm certainly no expert on corrosion (who really is?), but speak with a reputable autobody supply shop to discuss your plans and they should be able to help you out.

Your basic premise seems correct though...I was going to say a wire wheel and other wire attachments for your drill will be your best friend. Just ensure the enamel paint is compatible with the Corroseal. Typically you should be priming over the converted areas with a 2K epoxy primer, base coat, and clear.

But again, these are in non-visible areas so the enamel should work if compatible with the converter. I went through a mess of incompatibility in my project I just completed. So speaking with a pro is just my $0.02.

The car may have spent time close to the ocean when it was in Texas...that could cause rust for sure.

EDIT: Don't forget safety...buy an organic vapor respirator to save your lungs.
The compatibility with the paint and corroseal has me worried. I’ll have to do more research to confirm. I’ve got a half face 3M respirator laying around somewhere, I’ll have to get some cartridges for it
 
D106, what you have there is possibly normal for a car used in daily duty. By no means do I see your issues as irreversible, however getting on top of it now is your best plan of action. However, in some of your pictures, I would tell you to take a rag with some varsol and wipe the area. If the rust isnt through to paint, it will most likely wipe clean. For the areas that you have compromised paint showing, you will need to remove all traces of rust to stop it from expanding. Your car looks very solid and I would consider gingerly hitting the area next to the silver bracket with a grinder till there is no pinholes or brown dimples. The area around where the bumper mounts or door frame is only surface rust and could easily be cleaned up with 120 grit sand paper, followed by 220 and 400. Dont stop till it looks silver and dull, dont cheap on sanding...if your arm falls off, use the left one! Once all the rust is cleaned up, go to a body supply and get a good filler primer, one that is easy to sand. Mask, prime in thin coats and sand repeatedly, the more the better. Once well primed go get a urethane with catalyst paint, NAPA metal pro is a good one for areas not susceptible to UV rays. It will need to be thinned and mixed with a catalyst and can be applied with a brush or roller for areas that are normally hidden. After a month or 2, spray the interior areas with a rust inhibitor (respray yearly). Fluid film will work on the interior areas for your part of the world, the outer area should be good without spray. I dont think you necessarily need POR, although its tough as nails, you are not dealing with compromised metal.
 
D106, what you have there is possibly normal for a car used in daily duty. By no means do I see your issues as irreversible, however getting on top of it now is your best plan of action. However, in some of your pictures, I would tell you to take a rag with some varsol and wipe the area. If the rust isnt through to paint, it will most likely wipe clean. For the areas that you have compromised paint showing, you will need to remove all traces of rust to stop it from expanding. Your car looks very solid and I would consider gingerly hitting the area next to the silver bracket with a grinder till there is no pinholes or brown dimples. The area around where the bumper mounts or door frame is only surface rust and could easily be cleaned up with 120 grit sand paper, followed by 220 and 400. Dont stop till it looks silver and dull, dont cheap on sanding...if your arm falls off, use the left one! Once all the rust is cleaned up, go to a body supply and get a good filler primer, one that is easy to sand. Mask, prime in thin coats and sand repeatedly, the more the better. Once well primed go get a urethane with catalyst paint, NAPA metal pro is a good one for areas not susceptible to UV rays. It will need to be thinned and mixed with a catalyst and can be applied with a brush or roller for areas that are normally hidden. After a month or 2, spray the interior areas with a rust inhibitor (respray yearly). Fluid film will work on the interior areas for your part of the world, the outer area should be good without spray. I dont think you necessarily need POR, although its tough as nails, you are not dealing with compromised metal.
Any particular fluid film i should use?
 
Fluid film is a brand. There are various rust inhibitor sprays, I'm not familiar with all the different brands in the US. Perhaps Krown if you can find it. Seafoam also has one called deep creep.

Sent from my SM-G930W8 using Tapatalk
 
Fluid film is a brand. There are various rust inhibitor sprays, I'm not familiar with all the different brands in the US. Perhaps Krown if you can find it. Seafoam also has one called deep creep.

Sent from my SM-G930W8 using Tapatalk
I have heard of the deep creep by sea foam. Thanks!
 
Wire wheeled all the loose rust off of the bumper today. Washed it with soapy water and let it dry. Then hit it with 2 cans of rustoleum rust reformer. Gonna let it cure overnight before I hit it with some rustoleum industrial enamel.
 

Attachments

  • C5A24DB2-3AB5-4157-9216-7CD56DDD09E6.jpeg
    C5A24DB2-3AB5-4157-9216-7CD56DDD09E6.jpeg
    1.6 MB · Views: 12
  • 0F57B899-65F5-41D5-996C-9F61B10C07C6.jpeg
    0F57B899-65F5-41D5-996C-9F61B10C07C6.jpeg
    1.4 MB · Views: 11
  • E29C4E5B-D2D7-4FB7-9DB2-B09B41B371A8.jpeg
    E29C4E5B-D2D7-4FB7-9DB2-B09B41B371A8.jpeg
    2.2 MB · Views: 11
  • 3C68BBC0-99A0-47C7-95E3-391267C1DA59.jpeg
    3C68BBC0-99A0-47C7-95E3-391267C1DA59.jpeg
    3 MB · Views: 11
perfect approach and execution. Have you pulled the front bumper off and checked the OEM crash bar up front to see if there is any rust up there?
 
perfect approach and execution. Have you pulled the front bumper off and checked the OEM crash bar up front to see if there is any rust up there?
I have not. Looking from underneath the car there does appear to be a little bit of rust on the exterior of the crash bar. I’ll probably address it when I install a FMIC later on down the road.

currently waiting for the paint to dry on top of the rear crash bar so I can flip it over and paint the underside.
 
Painted the rear bumper bar and prepared the rear body of the car for paint.

I used Corroseal after wiring wheeling all of the loose rust from the rear of the body.

All the areas that turned black is where the corroseal found leftover rust that was left behind after wire wheeling. The corroseal will have to cure for a day or two before I can top coat it.

I’m glad I spent a few extra dollars and got the spray can attachment for spray painting. Makes the job so much easier.
 

Attachments

  • 49DA75D6-76F3-479D-AE7B-C1138A468682.jpeg
    49DA75D6-76F3-479D-AE7B-C1138A468682.jpeg
    1.4 MB · Views: 11
  • C90A994C-77D4-4887-ADA4-B638C33BEE42.jpeg
    C90A994C-77D4-4887-ADA4-B638C33BEE42.jpeg
    1.2 MB · Views: 10
  • 81E7BD85-6958-4E5A-B112-35C330B73969.jpeg
    81E7BD85-6958-4E5A-B112-35C330B73969.jpeg
    1.2 MB · Views: 9
  • 4F63BE0D-1937-45FF-9F7E-F1615BDA37E0.jpeg
    4F63BE0D-1937-45FF-9F7E-F1615BDA37E0.jpeg
    1.2 MB · Views: 9
  • FC960F33-C4BB-4E36-9E7A-618AB66C409F.jpeg
    FC960F33-C4BB-4E36-9E7A-618AB66C409F.jpeg
    1 MB · Views: 9
  • 314F57A1-CDD7-455E-B29B-44B088B0C85E.jpeg
    314F57A1-CDD7-455E-B29B-44B088B0C85E.jpeg
    1 MB · Views: 9
  • F5E92142-9BD2-4147-ADE7-ED3052B0DE21.jpeg
    F5E92142-9BD2-4147-ADE7-ED3052B0DE21.jpeg
    900.8 KB · Views: 9
  • 15B25D7D-0437-449F-9BB4-7A7679F42327.jpeg
    15B25D7D-0437-449F-9BB4-7A7679F42327.jpeg
    1.3 MB · Views: 10
  • C3687034-378B-4BCD-BC5F-1C618727B8C0.jpeg
    C3687034-378B-4BCD-BC5F-1C618727B8C0.jpeg
    1.1 MB · Views: 11
  • 714E17FA-52E9-4969-82C5-B2B1635242AD.jpeg
    714E17FA-52E9-4969-82C5-B2B1635242AD.jpeg
    2.5 MB · Views: 9
  • 215B941A-C255-42E7-BCE7-78125403F4A2.jpeg
    215B941A-C255-42E7-BCE7-78125403F4A2.jpeg
    2.3 MB · Views: 9
  • B4854EE0-3142-485F-BEBC-31A4EACB4B21.jpeg
    B4854EE0-3142-485F-BEBC-31A4EACB4B21.jpeg
    2.8 MB · Views: 9
Update: Spoke to someone at corroseal, they told me to wait for the corroseal to fully cure for 2-3 days before painting over it. Told me to test it with a fingernail and if it doesn’t leave an indentation when pressed on then it is ready to paint. It has been quite humid where I am, so I’m allowing the corroseal and bumper paint extra time to fully cure

I did notice some moisture in the spare tire well the day after I washed the car. There is some rust along the seam where the rear hatch seal is installed. I’ll be removing the seal, treating the rust, painting, then installing a new hatch seal. Other than the hatch seal and the taillight gaskets, I’m not sure what else would cause water to leak into the trunk.
 
applied a coat of paint to the rear crash bar mount area last night. I’ll probably only do one coat, it covers well and went on thick. It doesn’t have to be perfect, and color matching isn’t critical as you won’t see the area once the crash bar and bumper cover are installed.
 

Attachments

  • F9DCC983-01E5-4139-B47A-89E028C1BF79.jpeg
    F9DCC983-01E5-4139-B47A-89E028C1BF79.jpeg
    1.4 MB · Views: 6
  • 2F7DFE1E-93CE-45B1-B90F-EF042B317B83.jpeg
    2F7DFE1E-93CE-45B1-B90F-EF042B317B83.jpeg
    1.5 MB · Views: 8
  • 24655B17-CB7D-4CE6-8E74-A3ABE0CCA516.jpeg
    24655B17-CB7D-4CE6-8E74-A3ABE0CCA516.jpeg
    1 MB · Views: 7
  • 101C323F-B11E-44C7-A6A1-5BD3C50D76F1.jpeg
    101C323F-B11E-44C7-A6A1-5BD3C50D76F1.jpeg
    1,008.7 KB · Views: 7
Back
Top