Mazda CX-7 Project

NinjaCustoms

Greenie N00B Member
Greenie Member
New update on CX-7,
I found some time to work on my car and big suprise its not about tuning this time. This time i collected some tools and prepared for the ,,big cleaning,, of something that is the most painfull experience of all mazda owners and it is RUST. I began with ordering every new parts such as coolers condensers oil bushing ect. which turned out not cheap.
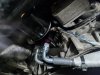
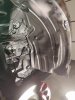
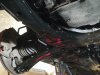
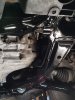
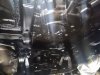
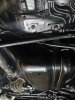
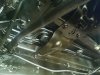
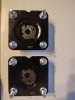
I nearly disassembled whole front of my car and im moving slowly to the back.
At this step I have ,,clear engine bay,, where i took everything out replaced engine mounts , cooler , condenser ,all kinds of rubber and belt and even all fluids. I sanded down all metal elements removed during the process , i've put zinc layer and anti-corrosion paint which ll be painted black as a final step.
Tommorow i'll apply r-stop protective layer and final black coat.
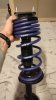
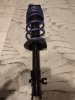
Next I'll move underneath and disassemble whole suspension and everything in way to the body. Then sand down the body and repeat my ,,cleaning layer sequence,, which is zinc layer , rust-free primer ,protective coat of app's r-stop and black paint which is coloured as body and if its not major suspension part i also spray it with extra protective bitum-mass layer.
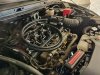
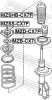
The only photo i have except disassembly photos i use as my ,,hov to reassembly,, 'll be posted down.
SPOILER : this photo was tahen half through the job and does not represent all the hard work i've done,
Wish me luck and motivation.IMG_20241012_143923.jpg
 
Last edited by a moderator:
Next update and next mods,
I finished basic restoration of rust in my cx-7 and for now i urned out better than i expected. After whole car disassembly described in older thread i sanded painted and assmbled everyting including new part such as new cndenser cooler and stock SMIC cooler. After this work including fluids exchange car runs normal there are no unexpected suprises in errors. I also installed protective ,,tuning,, mesh on the front grille which 'll protect internals with beeing hit bu some rocks bugs ect. Now I'llmake weekend break and then i'll restore suspension and change oil with installing fmic and oil cooler incuding plugging in measuring sensors . I choosed Motul SAE 5W-30 Xclean+ oil which is top qulity oil as MOTUL oils are . For now I'm posting my work effects in new internals , painted parts and engine bay.462542661_559292686595672_4031983795226678571_n.jpeg IMG-20241015-WA0000.jpg IMG_20241018_180315.jpg
 
Last edited by a moderator:
Should make a build diary of all your posts!
 
Today i finished installation process of oil cooler, oil catch tank , fitting everything properly and finally making my interior gauges functional. The project is still growing but I'm still a little far from achieving my dream project end as fastest suv sleeper.
Next mod 'll probably installing my self restored brembo brakes taken from lmp audi (Big brake kit 6 and 4 pot calipers with custom selfmade adapters with highest quality steel and bolts possible). I also bought custom orderes brake discs which are drilled and slotted. I only need to purchase some stainless steel or other hard bending brake lines , custom forced made brake lines (ends) and some other tools for installation. As always, uploading photos.
 

Attachments

  • IMG_20241101_132749.jpg
    IMG_20241101_132749.jpg
    2.6 MB · Views: 10
coming along nicely.

ps watch how you cut zip ties that angle is a sure fire way to get someone cut who's not paying attention. you want them flush cut. zip tie pullers are a wonderful thing

alright dude it's time for you to use a build thread and update it with new posts and not create a new ones each time. I've gone ahead and merged the threads and moved them to the cx7 build diary section.
 
Today's updates:
The front restoration is complete, everything is new if was possible to buy the whole,, underground,, is jow rust free and protected for years . After finally putting all new plastic and metal trims together including new clips and screws i 'vp put the tires back (on stock rims but that'll change in the future for bbs or Sparco Wheels) and dropped him onto the ground slowly removing jack stands. Now i5s time to repark him and repeat the same process for the back. As always precious photos of job done . Spoiler : from photos you can see i finally found time to install oil catch tank .
 

Attachments

  • IMG_20241111_120213.jpg
    IMG_20241111_120213.jpg
    3.8 MB · Views: 19
  • IMG_20241111_120831.jpg
    IMG_20241111_120831.jpg
    3.1 MB · Views: 20
  • IMG_20241111_120852.jpg
    IMG_20241111_120852.jpg
    4.4 MB · Views: 19
  • IMG_20241111_121403.jpg
    IMG_20241111_121403.jpg
    3.1 MB · Views: 19
  • IMG_20241111_122009.jpg
    IMG_20241111_122009.jpg
    3.3 MB · Views: 19
Todays job done,
I successfully managed to install oil catch tank as always using high quality FMIC parts . I choosed location considering leaving space for future twin turbo setup. As always photos.
 

Attachments

  • IMG_20241112_154844.jpg
    IMG_20241112_154844.jpg
    2.3 MB · Views: 13
  • IMG_20241112_154802.jpg
    IMG_20241112_154802.jpg
    3 MB · Views: 13
New Update,
today's restoration process of my car is finally end , i painted everything in my rustproofing way as described in previous posts and applied heavy protection coat . As always photos and soon I'll lower this bad boy putting everything new to suspension
 

Attachments

  • IMG_20241125_193610.jpg
    IMG_20241125_193610.jpg
    4.4 MB · Views: 10
  • IMG_20241125_193523.jpg
    IMG_20241125_193523.jpg
    2.5 MB · Views: 9
  • IMG_20241125_193439.jpg
    IMG_20241125_193439.jpg
    3.3 MB · Views: 10
Today i did a little mod as a finishing step to rust repairs. It is arguable thing in car tuning but yes : it's underglow. I did it in two reasons. First is car look and second is maintenance because when these ligts are on (not the red because u can change colours ect via smartphone) i can see everything down there and I don't need to drop lights into my tunnel (idk how to call this in eng.) You may like ut or not i think it looks 6/10 . As always photo in dark garage.
 

Attachments

  • IMG_20241130_172209.jpg
    IMG_20241130_172209.jpg
    1.7 MB · Views: 10
New Update:
Today i prepared for a big tuning. As i mentioned or not I'm preparing for a custom carbon fiber bodykit I'll prepare on my own. I trained carbon parts production and i decided to expand the project. As always if I'll make it done I'll post it
To the point.
I prepared important mods before power gain wich are always Suspension and Brakes.
I restored some Brembo set i adapted from Porshe, ordered custom size rotors, ordered rally suspension parts and it's done , two perfect sets that only wait to be installed, unfortunately as always family extends everyone's projects so this year i won't do anything. stay updated.
As always photos
 

Attachments

  • IMG_20241220_155736.jpg
    IMG_20241220_155736.jpg
    1.5 MB · Views: 9
  • IMG_20240809_213553.jpg
    IMG_20240809_213553.jpg
    1.9 MB · Views: 9
New Update:
I decided to prepare some list of maintenance parts that need to be exchanged in every car. It's not a secret that every car guy does not remember every specific part number so i helped myself and anyone who ll want to ,,copy,, my project and create the same sleeper.
Here is the List:

Brake pads: (Both can be searched for Audi Q8 3.0 TFSI 333KM)
Brembo P85 065 (Front)
Brembo P85 070 (Rear)

Brake Rotors: (Custom Sized)
ATM Mikoda 1175S , GT (Front)
ATM Mikoda 1549S , GT (Rear)

Oil:
MOTUL SAE 5W-30 (ACEA C3) XCLEAN+ 8100 (7l)

Coolant:
K2 Kuler (10l)

Brake Fluid:
Brembo Brake Fluid DOT 4 (3l)

Condenser/Cooler/Intercooler (Not Tuning one):
NRF Condenser With Dryer EAN8718042085214 nr.35881
NRF Cooler EAN8718042088819 nr.53904
NRF Intercooler EAN8718042131041 nr.30360

Oil Cooler :
TurboWorks 7-rows 260x50x50 AN8 Black (60 cm lines x4 , Epman thermostate)

Intercooler (Tuning):
FMIC Intercooler 550x180x65mm

Filters :
Oil filter , Filtron OP 617 (Longer won't fit due to frame)
Cabin Filter , Filtron K 1161 or K 1161A
Fuel Filter , Filtron PP 855
Air Filter , FMIC PRO 150mm mount diameter 76mm

Warning : The list does not include shock absorbers and especially all tuning parts.

Warning: The list of all tuning parts and approximate price without work time and workshop prices will be made after my project build.
 
New (Longer) Update (Value Calculations)


As promised I prepared tuning parts list and approximate value of the project including everything you need to get/know

Disclaimer: As for my rights, because this is custom project which ill be sold by me (as RWB Porches are sold individually) I am not including any instalation instructions or additional parts, just main things you need to get.

Let's get started....


Interior Modifications:

Dechromed center console bars (K2 Colorflex)
Carbon fiber passenger side handle cover
Carbon fiber Radio panel bars
Alcantara steering wheel with red stripe on 12'
HKS Turbo Timer Type 01
52mm Addco Oil Pressure
52mm Addco Oil Temperature
52mm Addco Boost
Sparco pedals , black
Sparco Seats (NOT SPECIFIED)
Seatbelt OMP 4-point ECE Road 4
Carbon Fiber Gear shift knob 10cm
Light Kit
Switches for accessories on dashboard (on the left)
Weight reduction (Removed plastic trims, spare tire ect.)
Sound deadening deletion (foam deadening and rubber)
Sparco SP-305 3.9L Extinguisher system


Exterior Modifications:

Dechromed bars (K2 Colorflex x2)
Radio antenna upgrade (shark fin antenna)
F1 LED Brake Light
Badges deletion (Rubber pad for drill , heatgun ,metal string/cord are needed)
Badge chrome delete (Mazda logo)
Blacked out floating blinkers
Custom Bodykit (WRC Style Carbon fiber)
Sparco Assetto Gara 20' Black Matte
CONTINENTAL AllSeasonContact 265/45 R20 108Y
Slide Wheel Spacers 50 mm 5x114
D1 Spec racing tire nuts


Suspension:

Master Sport Shock absorber 16K001811 x2 (front)
Master Sport Rubber acc. kit nr. 189947022 (front)
Master Sport Shock absorber kit 16K007324 (rear)
H&R Lowering springs EAN4048419004536
NTY Rubber Pad for Spring , MZSI-MZ3R x2 (rear)
Tedgum Spring Pad , TED41898 x2 (front)
MaxGear Brackets with Bearing, 72-4629 x2 (front)
Spring Pads SKF upper , VKD75025 x2 (front)
Mounting bracket kit , Magnum A73034MT (rear)
Hardrace Wishbone kit (Rear)
Hardrace Wishbone kit with angle reg. (Rear)
Rear Torsion Bar 2853 Ultra Racing 06-12 (rear)
Rear Lower Bar 2852P) Ultra Racing 06-12 (rear)
Front Upper Strut) Bar Ultra Racing (Front)
Custom Made axle shafts


Brakes:

Brembo P85 065 x4/kit (Front)
Brembo P85 070 x4/kit (Rear)
ATM Mikoda 1175S , x2 GT (Front)
ATM Mikoda 1549S , x2 GT (Rear)
Custom Sized Brake Adapters for F and R
Brembo 18ZL Caliper (front left)
Brembo 18ZR Caliper (front right)
Brembo 18Z Caliper, 20.7873.04 5 A , (Rear right)
Brembo 18Z Caliper , 20.7873.04 5 A , (Rear left)
EBC brake lines in steel, BLA1585-4L , kit
Brembo Dot 4 Brake fluid (3l)


Exhaust:

Custom Exhaust
Custom Exhaust Manifold
Custom Intake Manifold
Custom Downpipes


Engine(Engine/Fuel/Cooling):

CPS Custom Made piston x4
Techno5 custom made Rod x4
Custom made head bolts kit, re5pect.pl
Custom Light Flywheel , re5pect.pl
Wastegate 38mm x2 , FMIC
Nitrous Oxide kit NX11110, 15Lb/6,8kg
HKS 3 Blow off valve x2
57mm Silicone Connector x14, FMIC
57/76mm reduction x2, FMIC
51/57mm reduction x2 , FMIC
Fuel Line AN8 , x3, FMIC
Fuel Line AN10 , x3 , FMIC
Additional AN8/AN10 connectors
TurboWorks Fuel Pump 340LPH GSS340
Turbine Blanket x2 , Turboworks
Thermal Band 15m x4
Manual Boost Controller MBC01 x 2 , Turboworks
TurboWorks Turbine GTX3076R x2
TurboWorks Fuel pressure Regulator
FMIC Intercooler 550x180x65mm
57mm piping kit , x2
ECU Standalone, Turboworks
Proper Dyno Tune
Custom or Denso Race Fuel Injector x4


Oil System:

Oil lines steel 60cm x4, Turboworks
MOTUL SAE 5W-30 (ACEA C3) XCLEAN+ 8100 (7l)
TurboWorks 7-rows 260x50x50 AN8 Black
Epman Thermostate
Oil Filter Adapter AN8 , Turboworks
Oil Filter , Filtron OP 617
Oil Cooler Adapter
TurboWorks OIl Catch tank 10mm
10mm FMIC Line x3


Intake:

Air Filter , FMIC PRO 150mm mount diameter 76mm
76mm 90° Pipe
76mm connector x2 , FMIC
63/76 connector, FMIC
MAF Sensor Adapter, round
, 76mm
Custom Heat Shield


WARNING: Additional Silicone cables , screws or connectors may be missed on the list .

Project REQUIREMENTS are rust removal process which requires inspection pit and minimal 300$ in value of chemicals.

Project ALSO REQUIRES as you can think purchase of this specified model which is:

2010 Mazda CX-7 2.2 TD SUV I FL Sport 127kW 173KM


Pricing of the project: (READ BEFORE ANY PURCHASES)


Value PLN to Dolars at current 1 USD / 4 PLN


Warning: Prices are minimal for day 25th December 2024 and may be different when you are reading

Car price - 30k PLN / 7,5 k USD

Parts - Tax not included - Approximately 90% of all parts needed - 120k PLN / 30k USD

Working Time - Depends or Experience and if you give it to the shop :
Alone (Experienced) - min. 1-2 Months
(Working 4-5 hrs a day)
Value - Free - only your free time (by me)
Workshop (with crew) - min 1,5-2 Weeks
(working 8-12 hrs a day)
Value :
With min charge of working time which is
between 200-300 PLN/HR - 50-75 USD/HR
will be approximately (for a month of 252 hrs) - 12 600- 18 900 USD (50k-75k PLN)


Total :

PLN (200 000-225 000)
USD (50 100-56 400)


WARNING - The pricing is done for 25.12.2024 and prices may be different.

WARNING - Some of the websites presented may won't be available in your country so please do not depend on them totally.


DISCLAIMER: My project is not done completely as you may know (for now).
It's mostly done in aprx. 50-60% .
 
project looks like it's coming along, thanks for detailing all the part numbers.

just a friendly Reminder that if you go to sell your car on here it'll have to be in the for sale section which is only accessible to metal members and if you're selling as part of a business then you'll need to be set up as a vendor which @Raider can walk you through if needed. otherwise merry Christmas!
thank you for a reminder. I'm not planning on selling by now but thanks. Merry Christmas to you
 
Small update on my expensive and unusual project. Everything ic coming nicely. I assembled suspension pieces into functioning parts and i can already tell that sport suspension with lowering ll be nice. Also update on brakes. I updated my set of Brembo brakes and nom I'm installing those pot 6 calipers on the 350mm's in front but those in the rear won't be 4 pot brembo calipers on 340 mm's but two sets of 4 pot on the rear so two calipers per wheel with the hydraulic handbrake.
 
Suspension is coming slowly together. Because i couldn't find new spring housings for sale i decided to buy used , sand blast them zinc coat them , paint them with underlay, and finally with black paint and temperature resistant black paint (waiting for them to fully cure). I also ceramic coated struts (only on painted areas) and strut mounts . I also preassembled rubber boots.
If somebody wanted to ever work on mazda cx 7 (custom project or not) here are struts specs and assembly ;:

1. Prepared new strut (MS Germany/ Bilstein or KYB)
2. Insert bottom rubber (Tedgum TED41898)
3. Insert Boot with strut bouncer assembled as on photo so grooves match
4. Compress and insert lowering H&R (or normal) springs facing up with markings/letters
5. Insert upper rubber protector (they are no longer in sales so reuse old ones if they're in good shape or as me if u have equipment make your own matching old ones )
6. Insert spring housing with marking facing out (same situation - they are no longer for buy so reuse or restore old one) , do not recompress spring yet.
7. Insert strut mount with bearing (warning - bearing must face white side up)
8. Assemble mount and position everything so it's sitting good in place
9. Put thread locke loctite 243 (blue one) on the nut (should be 21mm) and torque it to 62 Nm with torque wrench or use pneumatic wrench but do not overtighten it.
10. Torque ur ready strut to the chassis also with 65 Nm .
11. Torque the strut to the steering column wit min. 130Nm .

Done

Now, as always ,photos .
Stay updated to see if these sport struts will work.
I am installing them temporarily as a ,,sport,, alternative till i can buy air ride or proper coilovers.

My recommendation if u want to have nice car is not to buy coilovers or air ride because u loose comfort over extreme lowering effect.
The -40mm offered with H&R springs combined with high quality shocks and more are enough to achieve nice fitment.

My recommendation is also using A LITTLE of ceramic paste on threads combined with loctite threadlocker . Also if u can , ceramic coat painted parts for easy cleaning and maintenance. Once a time check your suspension especially rubber elements. For maintaining rubber parts ,,rubber resealer,, is a nice mechanic trick to keep the flexibility of a rubber and prevent cracks. It is a clear polymer that can be sprayed on EVERY rubber parts that use over time. They EXTEND THEIR LIFESPAN NOT MAKING THEM INVINCIBLE so at least control your car shape.
 

Attachments

  • IMG_20250214_211127.jpg
    IMG_20250214_211127.jpg
    3.4 MB · Views: 3
  • IMG_20250214_171405.jpg
    IMG_20250214_171405.jpg
    1.8 MB · Views: 4
  • IMG_20250214_171318.jpg
    IMG_20250214_171318.jpg
    2.9 MB · Views: 3
  • i-nty-poduszka-amortyzatora-mazda-cx-7-cx-9-przod-ad-mz-030.jpg
    i-nty-poduszka-amortyzatora-mazda-cx-7-cx-9-przod-ad-mz-030.jpg
    22.9 KB · Views: 4
Last edited:
I'm done with assembling struts because i didn't have time to assemble them same day as i posted about how to assemble strut from scratch. A nice assembled strut should look like on attached photos (unfortunately my coil compressors despite covering spring with cloth , scratched beautiful paint a little when taking off)

When you are done with strut and you don't know if some things are ok and some are not so reassembly is needed, don't worry if:

Strut is not 100% straight when standings - sturts are supposed to be mointed with some angle but we are talking about 3-4° not like ,, / ,,
so it won't be ,, | ,, bu in 1/4 of way from | to /.

Housing marks do not fully align with mounting side . Spring housings must face the markings out to ,,the wheel,, perspective but the acceptable tolerance i am talking is max 5mm (for my perfectionism)

Next is the mount bearing. If u though the bearing will be spinning with a swing of a finger but u need to use whole hand to rotate the housing, you are wrong, because these ones need to have some spinning resistance. Only worn out/ badly used / cheap or defective ones after install and spring depression will spin without any force (ma differ in strut type)

And the last one worrying for somebody who is assembling strut for the first time despite experience may be the hardness of a spring. The hoarder the spring the better it is, is a misconception. Actually only sport quality springs will be hard to compress even with both hands. These will be perfect for track use but a pain in the .... for daily use . If u want go daily drive, but if u reached someway here probably u won't, u want to have spring that is a little compressible with both hands.

After writing everything that nobody will ever read , as always photos
 

Attachments

  • IMG-20250218-WA0003.jpeg
    IMG-20250218-WA0003.jpeg
    3.2 MB · Views: 3
  • IMG_20250218_211504.jpg
    IMG_20250218_211504.jpg
    3.5 MB · Views: 4
Back
Top