Nope it's just a regular phone picture lol It sits high right now but I am going to be welding the matching vband (that came with the turbo) onto the t3 to vband adapter and will bring it down about an inch and a bit closer to the block tooDid you take that with a fish eye lens? Id say that wont fit under the hood -- HAHAHA!!!
Navigation
Install the app
How to install the app on iOS
Follow along with the video below to see how to install our site as a web app on your home screen.
Note: This feature may not be available in some browsers.
More options
Style variation
You are using an out of date browser. It may not display this or other websites correctly.
You should upgrade or use an alternative browser.
You should upgrade or use an alternative browser.
StreetSpeed’s DD 500+ MS6 Build
- Thread starter StreetSpeed6
- Start date
- Watchers 39
Small update*
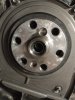
I pulled the engine off the stand and onto the engine hoist today. I am preparing to install the twin disc tomorrow so new pilot bearing is my first task.

My old fidanza flywheel somehow left behind some aluminum on the crank so I sanded it smooth again. Has anyone else ever had something like this happen? Needless to say I'm making progress slow but sure!
I also noticed some stuff about my block I didn't pay attention to the first time around but I think this could be a reman block or something not for sure...
I pulled the engine off the stand and onto the engine hoist today. I am preparing to install the twin disc tomorrow so new pilot bearing is my first task.
My old fidanza flywheel somehow left behind some aluminum on the crank so I sanded it smooth again. Has anyone else ever had something like this happen? Needless to say I'm making progress slow but sure!
I also noticed some stuff about my block I didn't pay attention to the first time around but I think this could be a reman block or something not for sure...
Attachments

Ahh... My car is a mystery for real lol It said on the car fax it was a "fleet vehicle" for the first 2 years of its life, then stayed in indiana the whole time but showed something happened in tx where they fixed it there. Was like 2k or whatever to fix but then was back here again.Lkq stamp on the block. Came from a junkyard, likely out of a wrecked car
So now I know they blew it up and put another motor into it and then it broke a ring when I had it and I rebuilt it again and then a new head AGAIN so wow..... What a life for my poor speed lol
Funny, I think mine was a Mazda executive fleet car too.
New pilot bearing is installed and ready for the clutch. Had a long day so didn't get to it yet. Took some pics of how I removed it but basically used the bread method. Found a bolt that barely fit in the inside of the pilot bearing. Used a Hawaiian roll and packed it full to the face of the bearing. Hammered it until it sounded like metal on metal.


Filled to the face of the bearing again and this time hammered again until hearing the same sound. Third time around it should start to push it out if you hammer it pretty hard once you've heard that same sound of metal on metal again.
After that it should come out!

Use a board to get the bearing in most of the way. Once that doesn't work use a ball peen hammer that is preferably not metal like my ancient one lol Get another hammer to tap it in and it should be slightly inset but also not fully seated back into the hole. Leave a little bit behind it for sure.

Filled to the face of the bearing again and this time hammered again until hearing the same sound. Third time around it should start to push it out if you hammer it pretty hard once you've heard that same sound of metal on metal again.
After that it should come out!
Use a board to get the bearing in most of the way. Once that doesn't work use a ball peen hammer that is preferably not metal like my ancient one lol Get another hammer to tap it in and it should be slightly inset but also not fully seated back into the hole. Leave a little bit behind it for sure.
Attachments
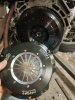
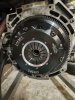
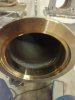
Got the new sexy clutch installed finally tonight. Didn't know that the pressure plate had allen head bolts so I guess I will be purchasing a new set of those sockets tomorrow to do the tq specs on them.

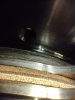
Made sure all the friction plates were aligned and centered properly on the flywheel. This clutch seems to have two separate materials of friction discs. One is a copper color and the other looks like kevlar or something with fibers.
Pictures of the flywheel show it is a silver metal on the friction surface but mine is all black so not sure about that but sprayed it all with brake cleaner and rubbed it down a bit and figured that was good enough")
I am planning to try and have it ready to drop in this weekend if possible.
I still will have to figure out my routing on the wastegate piping and the downpipe but figured I have no choice but to do that in the car.
Made sure all the friction plates were aligned and centered properly on the flywheel. This clutch seems to have two separate materials of friction discs. One is a copper color and the other looks like kevlar or something with fibers.
Pictures of the flywheel show it is a silver metal on the friction surface but mine is all black so not sure about that but sprayed it all with brake cleaner and rubbed it down a bit and figured that was good enough
I am planning to try and have it ready to drop in this weekend if possible.
I still will have to figure out my routing on the wastegate piping and the downpipe but figured I have no choice but to do that in the car.
Attachments
Ok....so a question hundreds of speed 6 owners have had and I am hoping for an answer lol
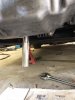
Is there a specific combination to getting to the turbo oil drain bolts on the engine block? Like a long tool to reach it from the bottom or what?
I have the transmission on now and the transfer case and even just with the t-case on and hanging on my engine stand I still can't get to it to tighten it up! Has to be a good tool for this and I need to know what it is haha
Cfoldone
Silver Member
I understand your pain. When I decided to redo mine while on a dolly and transfer case installed, I gave up and repulled transfer. The bolt on passenger side was impossible to tighten. I was using a oem style with custom bends. In my case I had only a few degrees of wrench turning and then next try to tighten wasn't lining up with wrench flat. I want to know a better way too.
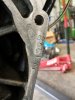
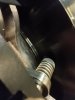
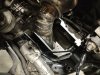
I pulled the transfer case off and put it on as well. I had planned to just use AN fittings but my 45 wouldn't work on the bottom as it was hitting the t-case so I said screw it and installed the factory bottom half of the oil drain.I understand your pain. When I decided to redo mine while on a dolly and transfer case installed, I gave up and repulled transfer. The bolt on passenger side was impossible to tighten. I was using a oem style with custom bends. In my case I had only a few degrees of wrench turning and then next try to tighten wasn't lining up with wrench flat. I want to know a better way too.
I just know there is surely a way they addressed leaks other than fighting it for hours and hours surely!
Cfoldone
Silver Member
 So far just high temp silicone (no gasket) the flanges area vs the OEM steel compression I didn't have on hand...So far ok!
Now found my drip.........left side trans output shaft seal, at least I didn't replace that on build.

Here's my custom bends..
Attachments
Last edited:
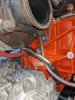
Nice lol I will show my custom stuff shortly. I have to get the vband flange welded on that actually fits my turbo for the t3 to vband adapter. I'm just aiming for very little leaks and a solid motor and build.View attachment 23086 So far just high temp silicone (no gasket) the flanges area vs the OEM steel compression I didn't have on hand...So far ok!
Now found my drip.........left side trans output shaft seal, at least I didn't replace that on build.View attachment 23085
Here's my custom bends..
Got some stuff done for the car today! I have a good bit of stick and mig welding experience and consider myself very good at it. As for tig...... Not something I have had much of a chance to do lol

I have a nice tig/stick/plasma setup (Everlast PowerPro 256s w/watercooler) and it can do anything you would need almost. As for the operator, I need much practice lol I have only touched a tig a few times in my life even though I have owned mine for over a year now. Welded twice on aluminum for about 5 mins and then this that I am about to show you that I welded tonight.
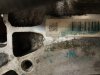
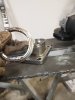
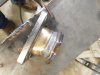
Anyway, here is my welded t3 to vband and also my screamer pipe vband that is welded on. Obviously not cut and welded to its finished form but glad it is coming along!
Also random but got some yard action with the scag too lol (pic is front yard on one side of the house)

I have a nice tig/stick/plasma setup (Everlast PowerPro 256s w/watercooler) and it can do anything you would need almost. As for the operator, I need much practice lol I have only touched a tig a few times in my life even though I have owned mine for over a year now. Welded twice on aluminum for about 5 mins and then this that I am about to show you that I welded tonight.
Anyway, here is my welded t3 to vband and also my screamer pipe vband that is welded on. Obviously not cut and welded to its finished form but glad it is coming along!
Also random but got some yard action with the scag too lol (pic is front yard on one side of the house)
Attachments
Those look like strong welds to me. I too wish I had more experience with TIG when I had the chance. I once worked at a stamping and welding facility with presses ranging from 250 up to 3500 ton. As the 2500 ton press operator I had a prerequisite month in die maintenance. Access to all that metal work equipment would be nice right now, lol.
Damn, you are getting close to dropping this thing in and hooking it all up. Sweet!
Damn, you are getting close to dropping this thing in and hooking it all up. Sweet!
Getting very close for sure! I have a couple new plugs (alternator plug and vvt solenoid plug) to wire up. Then, just need the material for the downpipe to extend it and fill the fluids and get this baby dropped in!Those look like strong welds to me. I too wish I had more experience with TIG when I had the chance. I once worked at a stamping and welding facility with presses ranging from 250 up to 3500 ton. As the 2500 ton press operator I had a prerequisite month in die maintenance. Access to all that metal work equipment would be nice right now, lol.
Damn, you are getting close to dropping this thing in and hooking it all up. Sweet!
I custom made my intake and it was obviously not intended for a top mount setup so I may need to buy a new coupler to the turbo for it that's got a 45 in it too but main thing is get this baby fired up and running!
Pretty late night for me and the speed but she's got her heart back! I am still getting things hooked up and will be welding and fabricating the downpipe and screamer pipe.
Then the front clip will go on and the ic piping will get fit up and welded as well.

I can't wait to get this thing running!
Then the front clip will go on and the ic piping will get fit up and welded as well.
I can't wait to get this thing running!
Turbo on display like a show piece! 
Keep going, so close
Keep going, so close
I'm trying to persevere despite several set backs lol There's always a few wrenches in something like this and I found the first. My power steering pump needs a spacer to clear my intake manifold now due to the DM pi adapter.
I hooked up the plasma and cut away and fabricated a piece to space it all out. Nothing pretty about it but it will work. Soldered a new vvt solenoid plug onto my wiring harness, cut my air intake to fit its new placement, and then started on the bigger task....

Welding up my stainless dump pipe... lol I will be much more experienced and what not with my tig by the time I am done with this car. Got a few pieces tacked up and should be have it welded out tomorrow afternoon. Making a 90ish turn and out behind my t-case.

I'll be wrapping my ewg pipe most likely to keep it from scorching things around it.
I hooked up the plasma and cut away and fabricated a piece to space it all out. Nothing pretty about it but it will work. Soldered a new vvt solenoid plug onto my wiring harness, cut my air intake to fit its new placement, and then started on the bigger task....
Welding up my stainless dump pipe... lol I will be much more experienced and what not with my tig by the time I am done with this car. Got a few pieces tacked up and should be have it welded out tomorrow afternoon. Making a 90ish turn and out behind my t-case.
I'll be wrapping my ewg pipe most likely to keep it from scorching things around it.
Ok guys so I know it probably seems like the car should be running by now but going top mount makes things... interesting lol
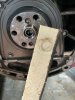
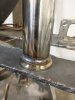
Anyway, I finally got my ewg dump pipe all welded out sporting some pie cuts!
(Keep in mind this is my very first thing ever welded on a tig lol)

Was a squeeze to get it exactly right but I am happy with the results. Has about 1/2" all the way around in clearance. Planning to wrap it after car is up and going and I make sure everything is good after a few heat cycles.

Now I'm working on the downpipe and will post pics of it as well when I get the chance. Hopefully I will have it finished up tomorrow if possible.
Front passenger side axle is in and everything around it for that side. Went to do the driver's side and the cv axle I ordered said it was a speed axle but apparently wasn't, so now I will be picking up another one in the morning.
Chipping away at this as best I can so bear with me guys!
Anyway, I finally got my ewg dump pipe all welded out sporting some pie cuts!
(Keep in mind this is my very first thing ever welded on a tig lol)
Was a squeeze to get it exactly right but I am happy with the results. Has about 1/2" all the way around in clearance. Planning to wrap it after car is up and going and I make sure everything is good after a few heat cycles.
Now I'm working on the downpipe and will post pics of it as well when I get the chance. Hopefully I will have it finished up tomorrow if possible.
Front passenger side axle is in and everything around it for that side. Went to do the driver's side and the cv axle I ordered said it was a speed axle but apparently wasn't, so now I will be picking up another one in the morning.
Chipping away at this as best I can so bear with me guys!
Attachments
Not another miss labeled CV!! lol! What brand axle?
Similar threads
- Replies
- 2
- Views
- 300
- Replies
- 3
- Views
- 676
- Replies
- 6
- Views
- 576
- Replies
- 20
- Views
- 1K
- Replies
- 6
- Views
- 1K