Salvaged from the old forum user DynoBunny's post using WebArchive. This helped me, it will help you!
Note: A lot of these steps could be skipped depending on what you’re replacing and how you like to work. I’m not in a rush when I work on my car so I was thorough and clean.
Here’s the parts:
1/2023 update! You can also buy the whole unit!
A601-17-470 Case assembly (with boot)
A601-17-530 Air breather
 ms3_pivot_shaft_seal_replacment-001
Here’s the tools I used in case you want to have them ready:
(You don’t need them all but I like to make things easy)
 ms3_pivot_shaft_seal_replacment-063
I jacked the car up, I’m tall:
 ms3_pivot_shaft_seal_replacment-002
Remove whatever intake you have:
 ms3_pivot_shaft_seal_replacment-003
Pop off the shift linkage. I used two small flat heads on either side.
 ms3_pivot_shaft_seal_replacment-004
Take out the two 12mm bolts holding the shift mechanism on:
 ms3_pivot_shaft_seal_replacment-005
The shorter bolt goes in the back:
 ms3_pivot_shaft_seal_replacment-006
I think this is the clip some people were referencing that could slide off into the trans. Since you take this part off before you take the pivot shaft out, just make sure it’s accounted for:
 ms3_pivot_shaft_seal_replacment-056
Next take out the other three 12mm bolts that hold the shaft in:
 ms3_pivot_shaft_seal_replacment-007
 ms3_pivot_shaft_seal_replacment-008
This 14mm bolt is has the guide pin for the shaft so it needs to come out to pull the assembly out:
 ms3_pivot_shaft_seal_replacment-009
This is self explanatory. I used a chisel, just stick it in the top and pull to the side. Works every time for me, and I feel safer than beating and prying on it:
 ms3_pivot_shaft_seal_replacment-010
The inside, keep in mind you’ll need to fit the pivot shaft into that bearing in the bottom. It’s easy to get back in if you realize what you’re doing:
 ms3_pivot_shaft_seal_replacment-011
Don’t get anything in there, you’ll need to clean that surface sometime before the final assembly. I use a razor and drag it away from the blade. Also put a rag in there to catch any accidental drops:
 ms3_pivot_shaft_seal_replacment-012
 ms3_pivot_shaft_seal_replacment-039
Pull the assembly up and out, you’ll need to tip it forward a bit to get past the intake mount. Lay it down on something clean:
 ms3_pivot_shaft_seal_replacment-013
See how the guide pin works:
 ms3_pivot_shaft_seal_replacment-015
This pin has to come out. There’s two sides; one’s beveled, the other isn’t. This is the side it will go back in:
 ms3_pivot_shaft_seal_replacment-016
This is the side you’ll tap it out from. I used a 5/32 punch:
 ms3_pivot_shaft_seal_replacment-017
 ms3_pivot_shaft_seal_replacment-018
Whenever I take things apart I mark them with a paint marker, good habit. Although this only goes one way, so you don't need to, but it’s still handy:
 ms3_pivot_shaft_seal_replacment-019
Slide the piece off the shaft and then remove the boot from the plate:
 ms3_pivot_shaft_seal_replacment-020
 ms3_pivot_shaft_seal_replacment-021
This is the piece that has all the parts you’ll replace. Here is the seal:
 ms3_pivot_shaft_seal_replacment-022
The bearing:
 ms3_pivot_shaft_seal_replacment-023
The seal came out really easy, I used my finger. If you need to get a screwdriver, just don’t maul the wall inside:
 ms3_pivot_shaft_seal_replacment-024
I put it on two 2x4s and used a 19mm deep socket with a hammer to tap the bearing out. Also used a pair of vice grips to hold the socket, I don’t have the best aim with a hammer and it’s easier to hold. Always use safety glasses when hammering:
 ms3_pivot_shaft_seal_replacment-025
 ms3_pivot_shaft_seal_replacment-026
 ms3_pivot_shaft_seal_replacment-027
Make sure everything is very clean when you put the new bearing in. I applied some synthetic grease (mobil1) to the bearing to help it slide in. If you have a bearing press, great use it. If not a clean cloth, wooden board, and hammer will work just as good. Just take it slow, tap it in a little and make sure it’s straight. Once it’s in as far as you can get it with the wooden board, use the 19mm to go the rest of the way:
 ms3_pivot_shaft_seal_replacment-028
 ms3_pivot_shaft_seal_replacment-029
Turn it over and make sure you’re in all the way to the lip. Don’t beat it in too hard or you’ll damage it:
 ms3_pivot_shaft_seal_replacment-030
The seal goes in this way. I didn’t need to hit it in, just pushed it in evenly with my fingers. Again don’t push it in too far, just past the edge:
 ms3_pivot_shaft_seal_replacment-031
 ms3_pivot_shaft_seal_replacment-032
I used that same 5/32 punch turned around to get the breather out:
 ms3_pivot_shaft_seal_replacment-033
 ms3_pivot_shaft_seal_replacment-034
A 13mm deep will go over the vent but catch the lip to hammer it back in:
 ms3_pivot_shaft_seal_replacment-036
 ms3_pivot_shaft_seal_replacment-037
 ms3_pivot_shaft_seal_replacment-038
Slide the cover back onto the shaft and attach the boot:
 ms3_pivot_shaft_seal_replacment-040
 ms3_pivot_shaft_seal_replacment-041
If this piece came apart, it’s no big deal, it just slides over it:
 ms3_pivot_shaft_seal_replacment-042
 ms3_pivot_shaft_seal_replacment-043
You can see how this only goes two ways, but if you do it the wrong way the pin hole won’t line up:
 ms3_pivot_shaft_seal_replacment-044
 ms3_pivot_shaft_seal_replacment-047
 ms3_pivot_shaft_seal_replacment-048
When you put the pin back, hammer it in from the beveled side. Also the pin should have a slight taper. Put the smaller end in first. It should be just flush with the back side:
 ms3_pivot_shaft_seal_replacment-049
 ms3_pivot_shaft_seal_replacment-050
 ms3_pivot_shaft_seal_replacment-051
 ms3_pivot_shaft_seal_replacment-052
I used Permatex gasket maker. It’s made to resist gear oil, specifically the additives for LSDs. Whether this is bullshit, idk. Be aware that this stuff takes 24hr to cure, you may want to opt for a different kind if you can’t be down that long:
 ms3_pivot_shaft_seal_replacment-053
 ms3_pivot_shaft_seal_replacment-062
Make a small bead around. I go around the bolt holes as well. Keep the stuff to the outside edge since it’ll squish in:
 ms3_pivot_shaft_seal_replacment-054
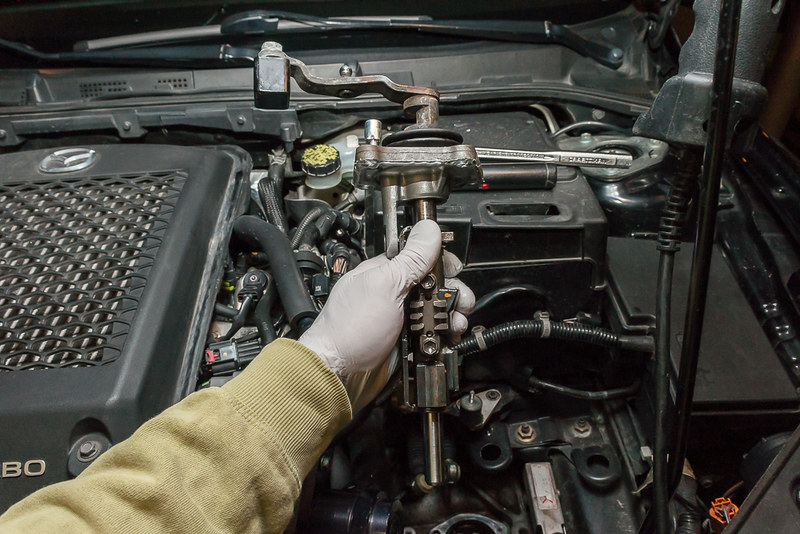
Here’s the big deal, put this mother fucker back in. This is how it should look when you’re ready. Make sure there’s NOTHING down in the hole. Be careful, don’t hit the sealant on anything. Remember you’ll need to have a slight angle to get it past that intake mount. There’s also that hole that you’ll need to line the shaft up in; it’s directly centered. If it gets to the bottom and won’t go the last inch, turn the shift mechanism a little back and forth and it will go. Be patient, be cool, you’ll get it in:
 ms3_pivot_shaft_seal_replacment-055
Once it’s in put those three 12mm bolts back, but don’t tighten them down yet:
 ms3_pivot_shaft_seal_replacment-057
Put the 14mm bolt in:
 ms3_pivot_shaft_seal_replacment-058
Put the other piece of the shift mechanism in. See how it goes:
 ms3_pivot_shaft_seal_replacment-059
Put the other two 12mm bolts in and tighten the four main ones in a criss cross pattern. I don’t have the torque specs but I did them around 15-20 ft/lbs:
 ms3_pivot_shaft_seal_replacment-060
That’s it!
Note: A lot of these steps could be skipped depending on what you’re replacing and how you like to work. I’m not in a rush when I work on my car so I was thorough and clean.
Here’s the parts:
1/2023 update! You can also buy the whole unit!
A601-17-470 Case assembly (with boot)
A601-17-530 Air breather
ms3_pivot_shaft_seal_replacment-001Here’s the tools I used in case you want to have them ready:
(You don’t need them all but I like to make things easy)
ms3_pivot_shaft_seal_replacment-063I jacked the car up, I’m tall:
ms3_pivot_shaft_seal_replacment-002Remove whatever intake you have:
ms3_pivot_shaft_seal_replacment-003Pop off the shift linkage. I used two small flat heads on either side.
ms3_pivot_shaft_seal_replacment-004Take out the two 12mm bolts holding the shift mechanism on:
ms3_pivot_shaft_seal_replacment-005The shorter bolt goes in the back:
ms3_pivot_shaft_seal_replacment-006I think this is the clip some people were referencing that could slide off into the trans. Since you take this part off before you take the pivot shaft out, just make sure it’s accounted for:
ms3_pivot_shaft_seal_replacment-056Next take out the other three 12mm bolts that hold the shaft in:
ms3_pivot_shaft_seal_replacment-007ms3_pivot_shaft_seal_replacment-008This 14mm bolt is has the guide pin for the shaft so it needs to come out to pull the assembly out:
ms3_pivot_shaft_seal_replacment-009This is self explanatory. I used a chisel, just stick it in the top and pull to the side. Works every time for me, and I feel safer than beating and prying on it:
ms3_pivot_shaft_seal_replacment-010The inside, keep in mind you’ll need to fit the pivot shaft into that bearing in the bottom. It’s easy to get back in if you realize what you’re doing:
ms3_pivot_shaft_seal_replacment-011Don’t get anything in there, you’ll need to clean that surface sometime before the final assembly. I use a razor and drag it away from the blade. Also put a rag in there to catch any accidental drops:
ms3_pivot_shaft_seal_replacment-012ms3_pivot_shaft_seal_replacment-039Pull the assembly up and out, you’ll need to tip it forward a bit to get past the intake mount. Lay it down on something clean:
ms3_pivot_shaft_seal_replacment-013See how the guide pin works:
ms3_pivot_shaft_seal_replacment-015This pin has to come out. There’s two sides; one’s beveled, the other isn’t. This is the side it will go back in:
ms3_pivot_shaft_seal_replacment-016This is the side you’ll tap it out from. I used a 5/32 punch:
ms3_pivot_shaft_seal_replacment-017ms3_pivot_shaft_seal_replacment-018Whenever I take things apart I mark them with a paint marker, good habit. Although this only goes one way, so you don't need to, but it’s still handy:
ms3_pivot_shaft_seal_replacment-019Slide the piece off the shaft and then remove the boot from the plate:
ms3_pivot_shaft_seal_replacment-020ms3_pivot_shaft_seal_replacment-021This is the piece that has all the parts you’ll replace. Here is the seal:
ms3_pivot_shaft_seal_replacment-022The bearing:
ms3_pivot_shaft_seal_replacment-023The seal came out really easy, I used my finger. If you need to get a screwdriver, just don’t maul the wall inside:
ms3_pivot_shaft_seal_replacment-024I put it on two 2x4s and used a 19mm deep socket with a hammer to tap the bearing out. Also used a pair of vice grips to hold the socket, I don’t have the best aim with a hammer and it’s easier to hold. Always use safety glasses when hammering:
ms3_pivot_shaft_seal_replacment-025ms3_pivot_shaft_seal_replacment-026ms3_pivot_shaft_seal_replacment-027Make sure everything is very clean when you put the new bearing in. I applied some synthetic grease (mobil1) to the bearing to help it slide in. If you have a bearing press, great use it. If not a clean cloth, wooden board, and hammer will work just as good. Just take it slow, tap it in a little and make sure it’s straight. Once it’s in as far as you can get it with the wooden board, use the 19mm to go the rest of the way:
ms3_pivot_shaft_seal_replacment-028ms3_pivot_shaft_seal_replacment-029Turn it over and make sure you’re in all the way to the lip. Don’t beat it in too hard or you’ll damage it:
ms3_pivot_shaft_seal_replacment-030The seal goes in this way. I didn’t need to hit it in, just pushed it in evenly with my fingers. Again don’t push it in too far, just past the edge:
ms3_pivot_shaft_seal_replacment-031ms3_pivot_shaft_seal_replacment-032I used that same 5/32 punch turned around to get the breather out:
ms3_pivot_shaft_seal_replacment-033ms3_pivot_shaft_seal_replacment-034A 13mm deep will go over the vent but catch the lip to hammer it back in:
ms3_pivot_shaft_seal_replacment-036ms3_pivot_shaft_seal_replacment-037ms3_pivot_shaft_seal_replacment-038Slide the cover back onto the shaft and attach the boot:
ms3_pivot_shaft_seal_replacment-040ms3_pivot_shaft_seal_replacment-041If this piece came apart, it’s no big deal, it just slides over it:
ms3_pivot_shaft_seal_replacment-042ms3_pivot_shaft_seal_replacment-043You can see how this only goes two ways, but if you do it the wrong way the pin hole won’t line up:
ms3_pivot_shaft_seal_replacment-044ms3_pivot_shaft_seal_replacment-047ms3_pivot_shaft_seal_replacment-048When you put the pin back, hammer it in from the beveled side. Also the pin should have a slight taper. Put the smaller end in first. It should be just flush with the back side:
ms3_pivot_shaft_seal_replacment-049ms3_pivot_shaft_seal_replacment-050ms3_pivot_shaft_seal_replacment-051ms3_pivot_shaft_seal_replacment-052I used Permatex gasket maker. It’s made to resist gear oil, specifically the additives for LSDs. Whether this is bullshit, idk. Be aware that this stuff takes 24hr to cure, you may want to opt for a different kind if you can’t be down that long:
ms3_pivot_shaft_seal_replacment-053ms3_pivot_shaft_seal_replacment-062Make a small bead around. I go around the bolt holes as well. Keep the stuff to the outside edge since it’ll squish in:
ms3_pivot_shaft_seal_replacment-054Here’s the big deal, put this mother fucker back in. This is how it should look when you’re ready. Make sure there’s NOTHING down in the hole. Be careful, don’t hit the sealant on anything. Remember you’ll need to have a slight angle to get it past that intake mount. There’s also that hole that you’ll need to line the shaft up in; it’s directly centered. If it gets to the bottom and won’t go the last inch, turn the shift mechanism a little back and forth and it will go. Be patient, be cool, you’ll get it in:
ms3_pivot_shaft_seal_replacment-055Once it’s in put those three 12mm bolts back, but don’t tighten them down yet:
ms3_pivot_shaft_seal_replacment-057Put the 14mm bolt in:
ms3_pivot_shaft_seal_replacment-058Put the other piece of the shift mechanism in. See how it goes:
ms3_pivot_shaft_seal_replacment-059Put the other two 12mm bolts in and tighten the four main ones in a criss cross pattern. I don’t have the torque specs but I did them around 15-20 ft/lbs:
ms3_pivot_shaft_seal_replacment-060That’s it!
Last edited:


") Removing that side mount is a bit of a pain so I wondered if the shaft could just come out without removing it.
Removing that side mount is a bit of a pain so I wondered if the shaft could just come out without removing it.