StreetSpeed’s DD 500+ MS6 Build

Which should I get for Christmas?

  • Big Fmic Core (tr9/10 or equivalent size)

    Votes: 1 20.0%
  • EWG conversation for my CST4 setup

    Votes: 2 40.0%
  • Rear Diff Mount

    Votes: 2 40.0%

  • Total voters
    5
  • Poll closed .

StreetSpeed6

Diesel Slayer
Silver Member
Greenie N00B Member
Greenie Member
Hey guys! So I have been wanting to post a build thread for a while but felt I should wait since it was going to take a while. I bought my Speed 6 about 2 years ago with 170k miles on it for $3,500. Love the car but most of you know it’s screwed up and didn’t know since it still ran smooth just slower.

Anyway, ill post up some pics soon of previous mods and the adventure of getting where I am before I dive into what I have in store in the next month or so.
 
All this started with just wanting a speed 6 I found. After basically a year I was fully bolted with dual magna-flows. Decided to put some titanium header wrap on the catless downpipe since I wasn’t putting any of my heat shields back in around the turbo. It still looks great so happy with it for my first time wrapping something.

A5E77046-84B9-4628-85C8-270A6BFA4DB5.jpeg

V-band FTW (Just try to ignore all the ugly factory heat crap on the firewall)
141BF03D-F61C-443C-8AF0-AD71F6B650EE.jpeg

This fmic is off a friend’s mitsubishi eclipse haha Took a bit to fit it since it was universal when he got it and had cut it all to fit already, but it’s on nonetheless. Plan to cut out the crash bar and put a nice mishimoto core in in the future.

C8CA8B79-F008-4D25-B5A9-311DA5E60074.jpeg
 

Attachments

  • EC294AE3-AE68-4B59-8233-802B9BCDFA1C.jpeg
    EC294AE3-AE68-4B59-8233-802B9BCDFA1C.jpeg
    1.9 MB · Views: 14
Last edited:
So working towards my build I bought some much needed coilovers and got rid of all the rediculously screwed up old stuff. 21A3DDE0-A424-4E62-ADD9-9D190753DD4C.jpeg 8EB84047-3B07-4E21-98AB-7D3DBD75C0DC.jpeg
For anyone doing this on here who hasn’t, just let it be known that the rear upper shock bolts are a royal pain to say the least. Just drop the subframe a few inches to help get some room, but it is still pretty tight imo. ALSO, I didn’t tighten the main bolt tight enough that holds the shock to the mounting plate and take it from me when I say it’s a noisy mistake. Haha Guess the angle of it as best as possible and tighten that bad boy down tight before putting it back in.
E64D9441-3CFC-4ABD-B114-669AD5E6E7F5.jpeg
2379ED27-82E8-4DC1-B93C-362A933A32F6.jpeg
Well worth it in the end though and even though I only had the money for Raceland’s, they actually have been great so far. Only complaint really is that they won’t sit very high even adjusted all the way up and they would be too soft for track use.
[doublepost=1553915327][/doublepost]Moving on the the present...8E7D4AF3-BB5C-4C08-B53A-DB8ADA1E57DE.jpeg I know these are some long posts but im wanting to keep a record of what has been done and show the progress as I go. My car has been burning/leaking (it’s a combination but mostly burning I think) an insane 4-6qts per oil change depending on if I drive out of boost mostly. Thanks to @Bigelow for selling his internals to me and giving me some extras! Huge help man and very appreciative....

71C63211-E903-43B0-9407-AC26DF0A6D4B.jpeg
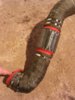
These were with the valvesprings and I might be having a dumb moment but does anyone know what they are? We spoke on the phone about “buckets” in the head that might need replaced and didn’t know if these where the “buckets” or just broken stuff from the head getting messed up.
 
Last edited:
@StreetSpeed6 those are called keepers they go to the top of the valve stem grooves inside of the retainer to lock the valve and spring together.

shown here at the top
http://www.sweethaven02.com/Automotive01/fig0353.gif

Valve buckets are used to set valve lash for clearance

Valve buckets look like this:
https://www.z1enterprises.com/media...970ab036de70892d86c6d221abfe/z/1/z1e_0524.jpg

This is the buckets atop of the valve assembly:
http://farm8.staticflickr.com/7015/6709767217_cffb9c4b59_b.jpg
Pay no attention to the numbers that is for the head bolt/studs torque sequence
Thanks man I appreciate the enlightenment! Haha I don’t know much about internals tbo other than the more common knowledge/obvious things lol Since the retainers are titanium I wonder if those would be then as well...
 
I know they’re bigger than stock valves and the springs and retainers are a Crower kit. That’s what Bigelow said anyway. If I remember right the valves actually said manley on them tho.
 
+1 mm manley valves. Springs are crower ti retainers.
Thanks man I dropped off all my parts to my builder so can’t look at them anymore
[doublepost=1554084776][/doublepost]Made a bit of time to work on the car today and pulled the calipers and rotors off along with loosening up some stuff. Only had about 30 mins so didn’t get a lot done but found this while I was pulling stuff off the other day.

3212EE85-CDD2-4EAD-80E5-0E8910A80F11.jpeg

I will be testing out the new wilwoods before long to see how much work they will need to fit so will post more about that here sometime soon. Working 60 hours doesn’t leave much time to really make a lit of progress since I also am working in my gravel driveway.
 
Figured I would give an update. With the little time I have had each day I finally got my motor out so that is a relief. Will be tearing down to a longblock tomorrow most likely and will hopefully drop it off to my builder on Tuesday.

68C58C65-24FE-4FEA-936C-8B99E9F52D3E.jpeg 13508372-9653-4230-A25B-D69751FAE66F.jpeg

Feel free to give input on color ideas for the engine pieces im going to paint. I am wanting to do 2 colors. First being on the valve cover, intake mani, and timing cover, and the second being on the intercooler piping going over the engine and the air intake.

I am thinking a nice darker red and chrome piping or a gunmetal grey with black or red piping. Let me know your thoughts.
 
So ik not much of an update but I have my motor broke down and just can’t seem to get the fuel rail torx bolts out. I keep snapping off the ends of the bits! Anyone know which ones to buy that won’t snap off or twist? These are two of the 3 that I have broke brand new already and had to return.
FCEFEC5D-0DDC-411A-B7F1-F2B2AD6601F7.jpeg 19490214-1657-4328-BF67-F7D83BD2FAE7.jpeg

Here is some more pics of the chaos. Don’t know how normal it is for carbon build up but this seemed a bit ridiculous of an amount imo.
176DCBBB-E068-48E1-9B58-5E43AB2BFB26.jpeg A1530716-FFCC-4474-B1A6-AD6C3C35CDB1.jpeg 6C87A0D4-1C65-4EFF-97EF-1FF83A353E10.jpeg
 
Last edited:
I know it has been a while so ill attempt to give an update. Hopefully it isn’t too lame haha

Nonetheless a few things have only taken place since the last update. I have purchased a new 90* pipe to replace the one with a hole in it.

image.jpg
It was $20 but seems to be of good quality which is what matters anyway.

I also finished doing a vtcs delete and porting my stock intake manifold which turned out decent but couldn’t get a very good pic of it that represents it well.

57510B7B-63F0-4608-9199-659B0D95BDDD.jpeg
D31FADE6-1D9E-4548-B1AF-44EFB866C307.jpeg
My builder has just started on my motor. Dropped off the intake gasket for them to use during the porting they will be doing. Gave them the intake mani as well to hot tank. Once they hot tank it I am picking up the valve cover, timing cover, and intake mani to have it powder coated black chrome.

I also bought a cheap catch can, but hoping it works alright. If so I will buy another one most likely. It is vented but comes with a plug to run sealed. Also has a easy drain valve. Hope it actually works.

https://www.ebay.com/itm/2-Port-Oil...rentrq:bdb8ca5016a0ac1d3bca07e7ffcafa42|iid:1
 
Last edited:
  • Like
Reactions: Sho
FYI if you keep the little black box that controls the vcts system plugged in it will not throw an error code even if the flappers are gone. If you live in a state with emissions you could be limited on the number of not ready a you can have and this would eliminate one
 
FYI if you keep the little black box that controls the vcts system plugged in it will not throw an error code even if the flappers are gone. If you live in a state with emissions you could be limited on the number of not ready a you can have and this would eliminate one
Thanks for the heads up. Luckily I live in a place where there are no emissions tests so catless, no egr, no vtcs, and all the goodies. Lol Good lookin’ out tho man! I actually already plugged it too so not much going back anway lol
 
  • Like
Reactions: Sho
Sooo... I had a tiny hole like that in my IC piping back in the day. Small enough to where it didn't affect afr and go rich like a big boost leak, but my car was down 40whp and 50+wtq lol. Wonder if you had that hole for a while, which caused your low power numbers
 
Sooo... I had a tiny hole like that in my IC piping back in the day. Small enough to where it didn't affect afr and go rich like a big boost leak, but my car was down 40whp and 50+wtq lol. Wonder if you had that hole for a while, which caused your low power numbers
I would say that could have been a part of it but whatever was causing it was causing over a 100hp loss according to the v-dyno.

I can’t wait to find out if any of my ringlands were broken. With how much oil I was burning and such low power I assume that is what it was mostly.
 
True. Forgot about how much oil you were burning.
 
If you are having such difficulty with the injector bolts, people have replaced them in the past to resolve for all time. Stole these dims from a Silverdemon post on the other place.

Dont think the links work anymore.

stud) M8x1.25x50mm Fastnal Part number 0349266 http://www.fastenal.com/web/products...0349266&ucst=t
Flange Nut) M8x1.25 grade 8.8 Fastnal Part number 90701 http://www.fastenal.com/web/products...=1&searchBox=1
Thanks man I appreciate it! I actually ended up leaving it on cuz I couldn’t get it and kept breaking the bits. They said they could do what it took to get them out. Said they usually took a brass bar and smacked it on the head of the torx bolt. If that doesn’t work he said he would just head it up from inside with the head off and they would come right out.
[doublepost=1558194130][/doublepost]
True. Forgot about how much oil you were burning.
Yeah I was burning 5-6qts every 3-5k miles lol So pretty bad
 
Well guys so I got the first look inside my motor today! Finally getting somewhere I feel like and not just waiting around.
45A09341-7682-44E0-9507-3A315766504A.jpeg
A26FB143-1A64-4D2F-88D9-937F06D2C25E.jpeg
0D11CD98-93E6-4878-BC97-6780AC9D066C.jpeg
He said the cylinder walls were absolutely great for 200k miles. There was a good bit of carbon build up on the tops of the pistons though and found a bit of “carnage” myself @JohnnyTightlips!
26910610-BD40-48C8-AB69-E9779DB78D24.jpeg
275837C9-4490-4680-923D-9955B6CEEF7B.jpeg
We are pretty sure the first two cylinders in the first pic decided to demolish the rings and play tennis with them against the head.

They said it would be ok though and will inspect everything thoroughly. Also, found out my camshafts are worn where the bearing caps go and he recommended replacing them. Said he could polish it back up but felt nervous about making power from them like they were.
9BCA5B5A-7B62-4A72-B908-07FF477EC4FD.jpeg
BF525364-0EA7-4EED-9529-06E06524F611.jpeg
Needless to say when it rains it pours. Got my injectors back as well and they definitely were a pain for the shop to get out. They actually broke a few so I am glad they will be replaced with better bolts for the future.
image.jpg
 
Back
Top